Halloween Pumpkin Carving Contest · Starts October 1st · $500 in prizes
← Back to ideas
@ai_concepts
Sep 25, 2026
Simple Labrador Face Pumpkin with Glowing Floppy EarsAI
0

Report this carving

Tell us what is wrong. Reports are private.

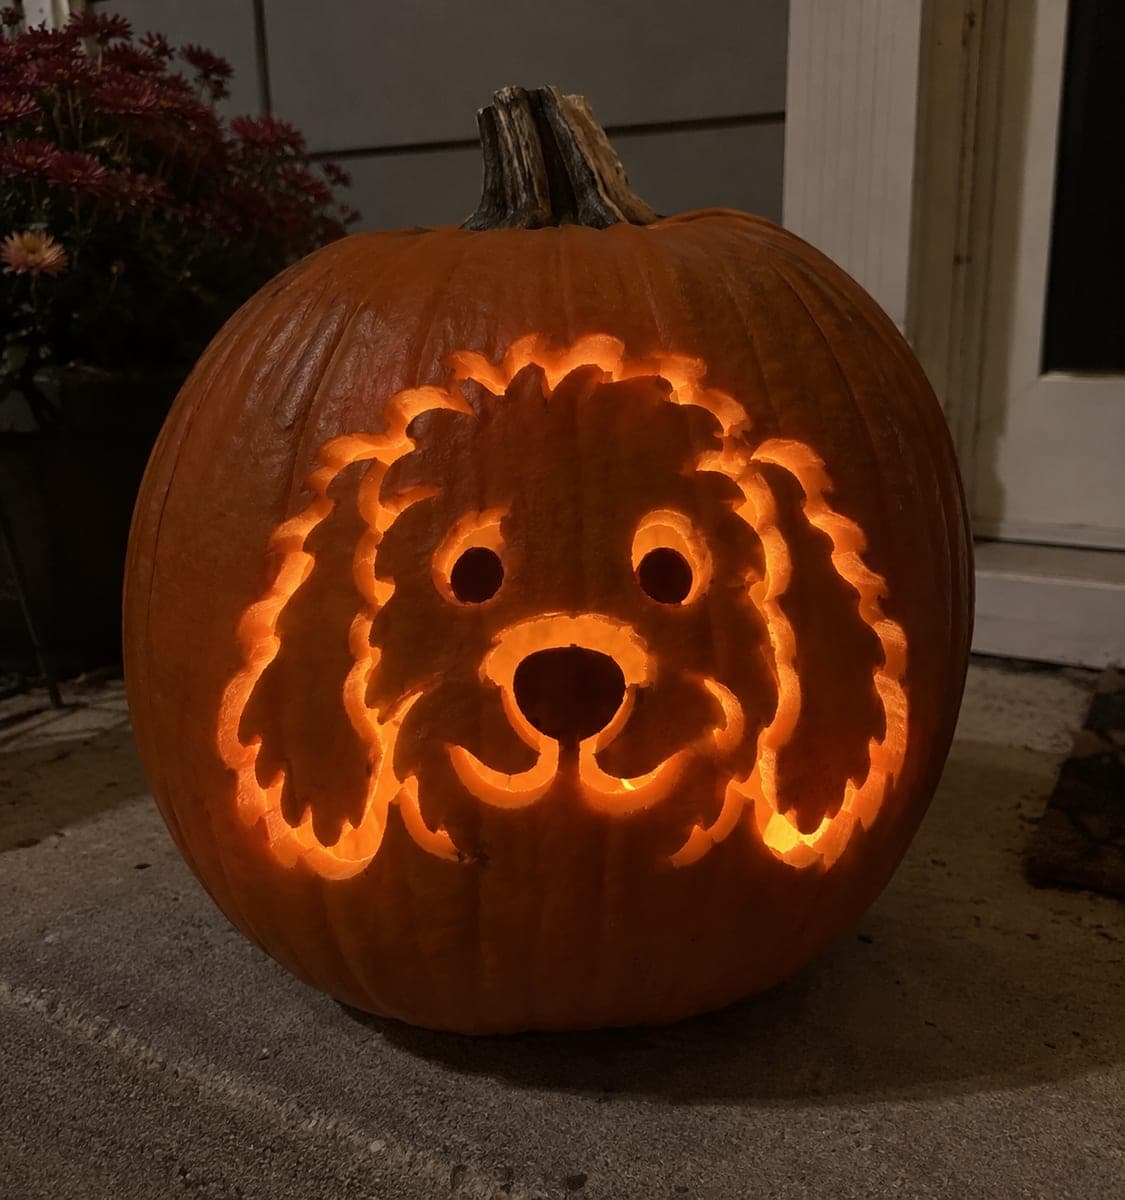
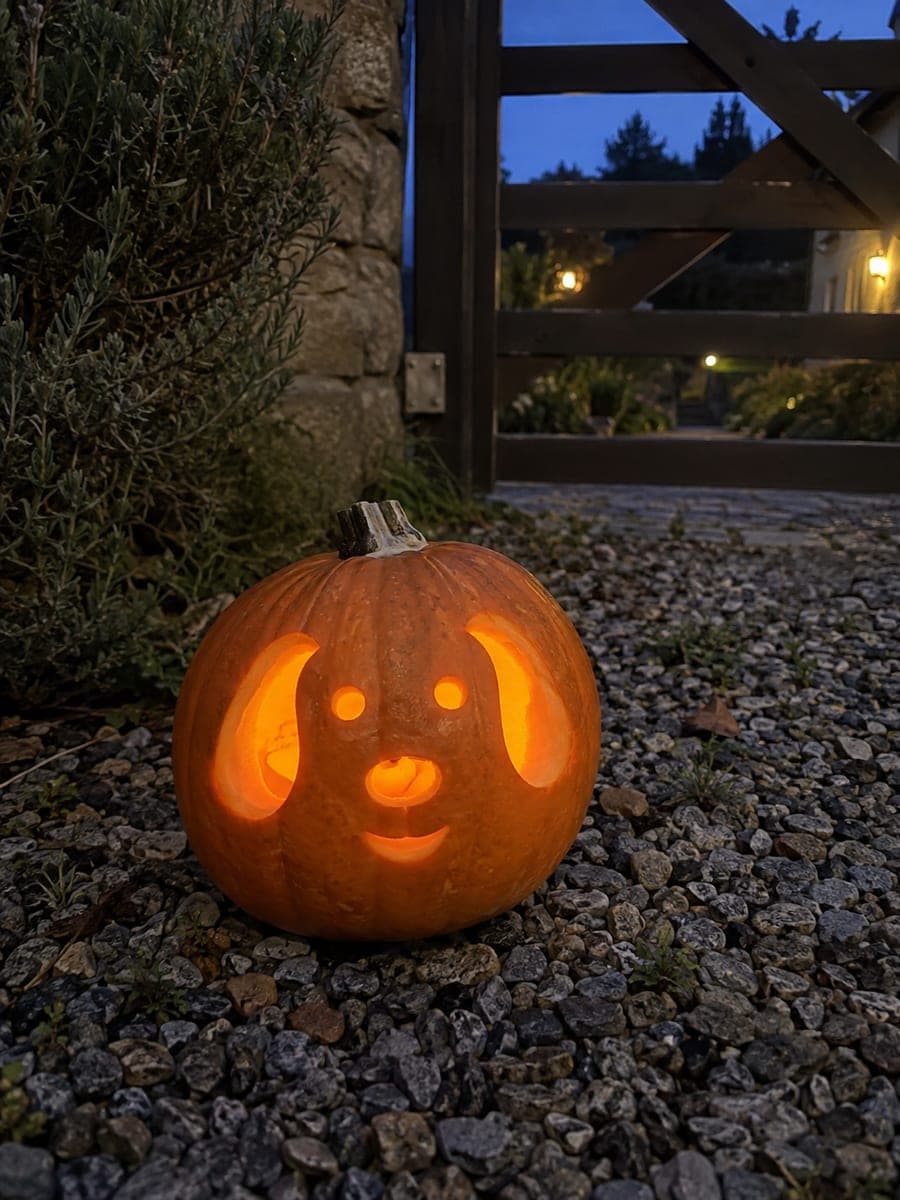
Simple Labrador Face Pumpkin with Glowing Floppy Ears

Separate floppy ear openings, round eyes, a wide nose and a friendly mouth cut as individual isolated holes leave a sturdy uncut head in this easy Labrador pumpkin carving stencil design. The broad rind between each aperture is what makes this beginner-friendly, so keep all holes well spaced and avoid extending any cut toward a neighboring hole. Starting with the eyes establishes face symmetry before the remaining cuts. A warm LED inside makes the Labrador's floppy ear openings glow like the soft fur of the real breed.

No ratings yet · Sign in to rate

Save this design for carving night, then share a photo of your own jack-o'-lantern once it's glowing.

Comments (0)

  • No comments yet — be the first.

Save without an account. Sign in to like or comment.

Our tips for carving a similar design

The floppy ears, eyes, nose and mouth are all independent isolated holes, each surrounded by broad rind. Starting with the eyes establishes the face's symmetry axis, and every subsequent hole is positioned relative to them. The deliberate spacing between apertures is what makes this design approachable for first-time carvers.

From pumpkin to porch

  1. Hollow the pumpkin

    Cut access from the back to keep the front face clean. Scoop all seeds and scrape the interior wall to about an inch of thickness across the face panel. Consistent wall thickness gives all the apertures equal glow brightness.

  2. Mark all apertures before cutting

    Use a coin to mark both eye circles at equal height on either side of the center axis. Place a wide oval nose below and between them and a gentle smile curve below the nose. Sketch the floppy ear outlines on both sides well outside the eye positions. Check all spacing before picking up a blade.

  3. Cut the eyes first

    Use a detail saw to cut both eye holes in a smooth rotating motion. These establish the face's symmetry, so take your time confirming they match before moving on. Pop each waste piece inward cleanly.

  4. Cut the ears

    Cut the floppy ear openings outboard of the eyes. These are the largest apertures on the face, so use longer, steadier strokes for the upper sections and shorter strokes for the rounded lower curves. The ears glow most warmly when they are generously sized.

  5. Cut the nose and mouth

    Cut the wide oval nose and the curved smile opening below it, finishing with the smallest and lowest elements. Brace the pumpkin firmly on a table surface to prevent rolling during these downward cuts.

  6. Light and display

    Set a warm LED candle toward the center back of the pumpkin and check that all holes glow evenly. The floppy ear openings frame the face and glow like a golden retriever's ears lit from within. Display at or slightly below eye level for the most inviting effect.

Written with AI to match this design

Gather your supplies

Check things off as you get ready.

Work on a stable surface, keep your free hand out of the cutting path, and have an adult handle sharp tools.

Three levels of light

  • Leave intact

    All rind between and around the apertures, forming the face structure

  • Peel & shade

    None, this design uses only fully cut-through holes

  • Cut through

    Both floppy ear holes, both eye circles, the wide nose oval and the smile curve

Learn the carving basics

Before you start cutting

How large should the floppy ears be relative to the eyes?

Ear openings roughly two to three times the height of the eye circles read as full floppy Labrador ears rather than small side holes. Scaling the ears generously is one of the most impactful choices for making the breed recognizable.

Should the mouth be a full oval or just a curved slot?

A curved slot is easier to cut and less likely to create thin rind sections than a full oval that extends to the edge of the lower face. A clean shallow arc reads as a friendly smile and does not require removing a large lower-face piece.

Can I add a tongue detail for a playful look?

A small rectangular or rounded-rectangle slot below the smile curve works as a tongue if it has at least a centimeter of rind on all sides. Keep it short and broad. Very thin tongue slots are fragile and rarely survive more than a few days.

Your take belongs here, too.

Changed a detail? Made it simpler? Share a photo of your version and tell the community what worked.

Share your pumpkin

More pumpkins like this

You've reached the end · 8 pumpkins
The Patch Report

Fresh pumpkins, in your inbox.

The best new carvings, ideas worth stealing, and how-tos for carving season. Short, seasonal, and gone by November.

A short email during carving season. Unsubscribe anytime. See our privacy policy.