Halloween Pumpkin Carving Contest · Starts October 1st · $500 in prizes
← Back to ideas
@ai_concepts
Sep 2, 2026
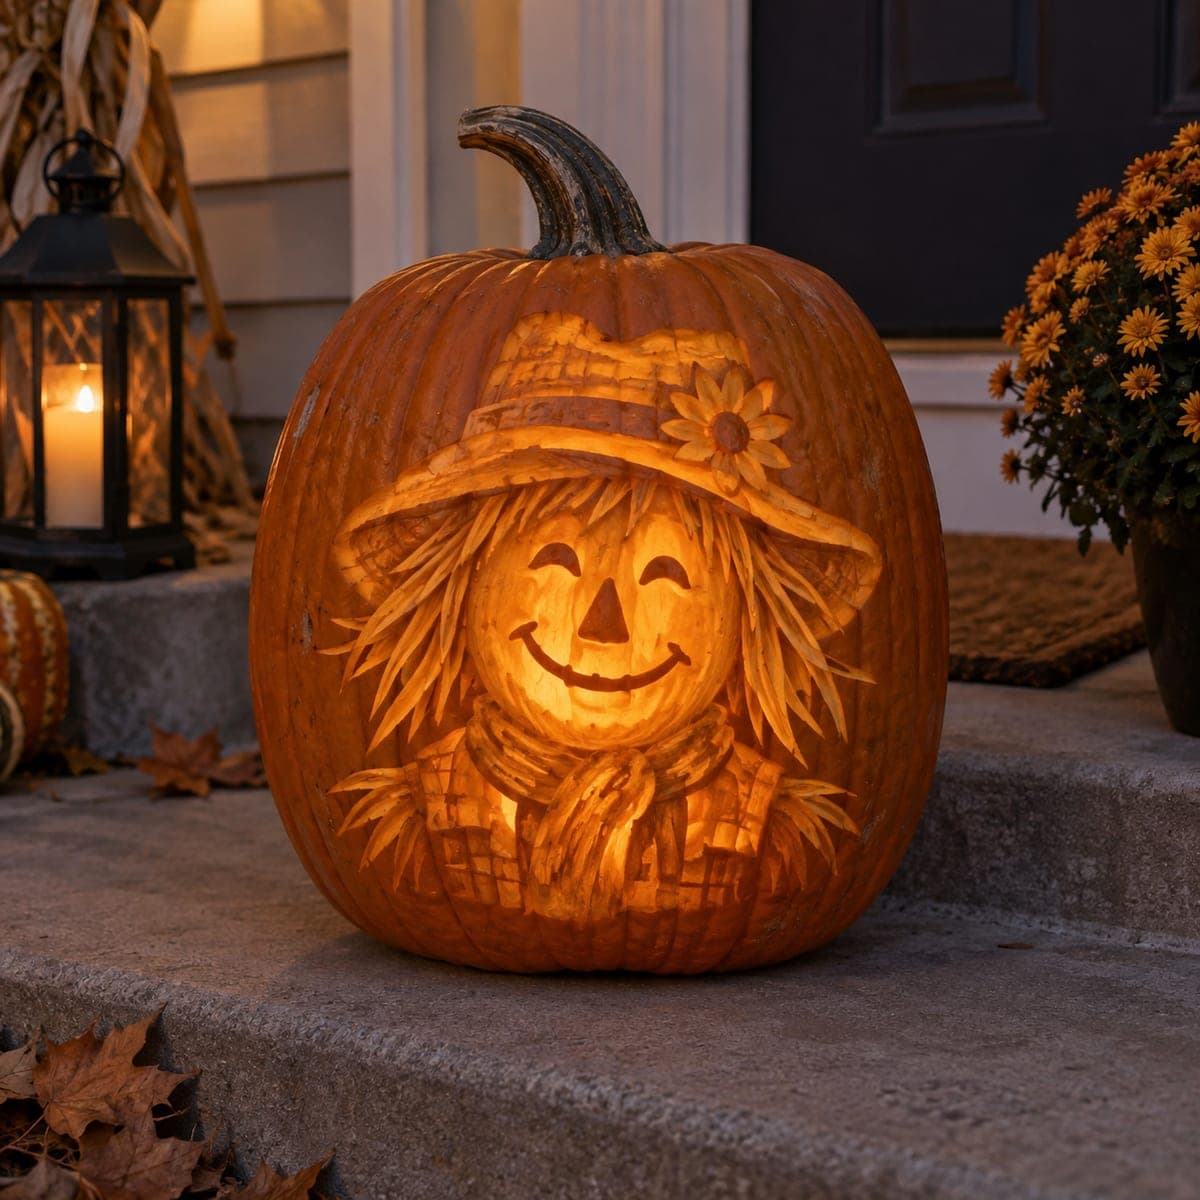
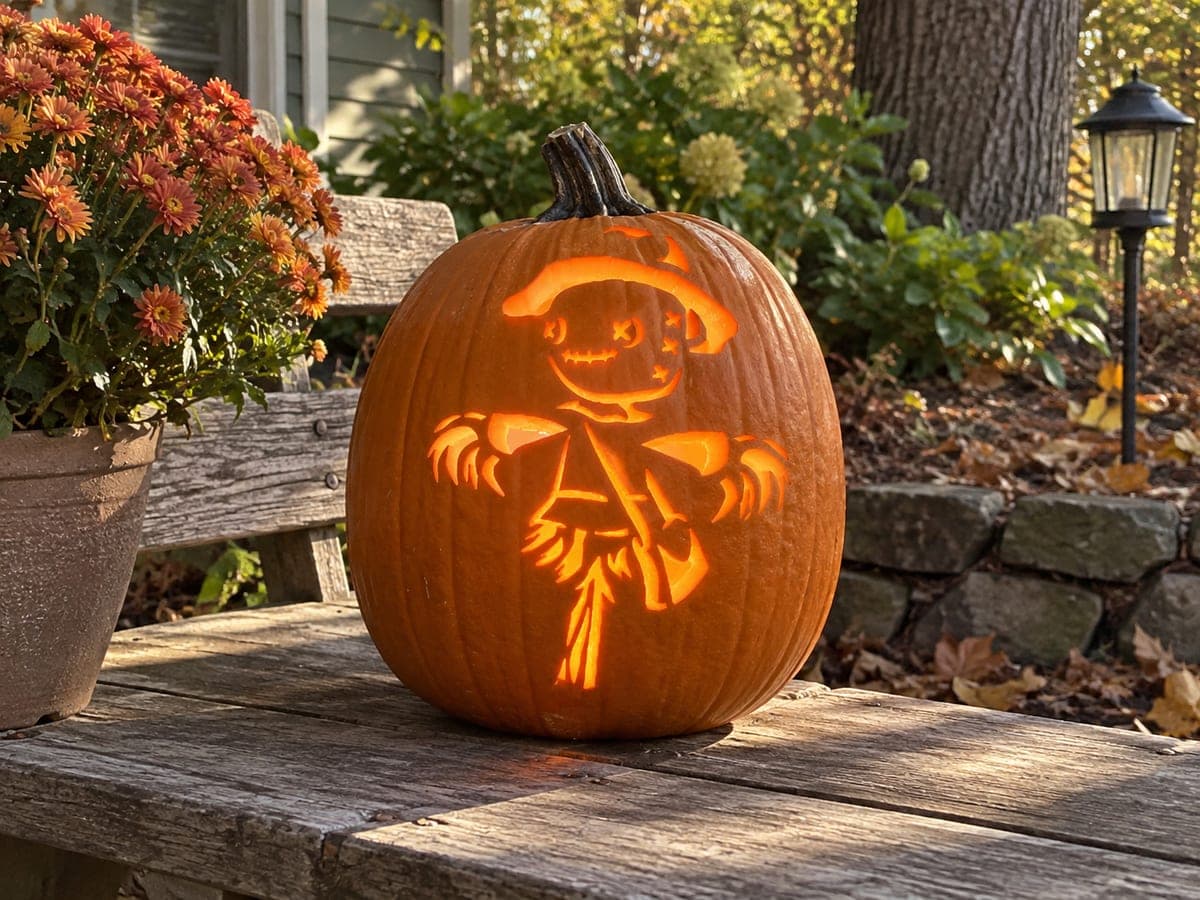
Smiling Scarecrow With Sunflower Hat Jack-O-LanternAI
0

Smiling Scarecrow With Sunflower Hat Jack-O-Lantern

A happy scarecrow grins from this pumpkin, straw hair spilling from under a wide-brimmed hat trimmed with a sunflower, all etched in glowing layers. The straw texture is the fun part: long confident V-gouge strokes radiating out from the face, with the patched collar shaded at a shallower depth. Light it warmly and it makes a perfect harvest welcome that carries from October into Thanksgiving.

This is an AI-generated concept image: a realistic, carvable design idea rather than a photo of a finished carve. AI concepts are always labeled and sit out the leaderboard and the contest.

No ratings yet · Sign in to rate
Comments (0)

  • No comments yet — be the first.

Save without an account. Sign in to like or comment.

Our tips for carving a similar design

This design leans on shading depth rather than heavy cutting, so the face and hat read as glowing layers instead of open holes. The core trick is the straw hair: long V-gouge strokes fanning out from the face, kept shallow enough to glow softly. Plan the light so the face is brightest, the straw and sunflower sit at a middle glow, and the untouched skin frames everything in the dark.

Written by PumpkinCarvingIdeas.com, inspired by the image above. These are our suggestions, not instructions from the uploader. This approach to the AI concept has not been tested on a real pumpkin.

From pumpkin to porch

  1. Prep and transfer the pattern

    Since this is a concept image, start by choosing or drawing a scarecrow stencil with a wide hat, a sunflower, straw hair, and a patched collar. Pick a tall pumpkin with a broad, smooth front so the whole scene fits. Cut a lid from the bottom or the back, not the top, so the stem stays intact, and hollow the front wall to about one inch. Tape the pattern on and poke the main outlines with a pin so you have dots to follow.

  2. Outline the shapes first

    With a small detail knife or a fine gouge, trace the outer edges of the hat, the face oval, the collar, and the sunflower. These reference lines keep the zones separate before you commit to any depth. Do not cut all the way through yet. Think of this pass as drawing the map you will shade inside.

  3. Etch the face for the brightest glow

    The smiling face is the focal point, so peel the skin fully across the face oval to let it glow warm. Carve the two smiling eye lines, the triangle nose, and the curved grin a touch deeper so they stand out as darker marks against the bright skin. Keep the cheeks rounded and smooth. Work slowly here since this is where every viewer looks first.

  4. Carve the straw with confident V strokes

    Switch to a V-gouge and pull long, steady strokes radiating out from the face for the hair, and shorter angled strokes for the straw at the wrists and collar. Vary the length so the straw looks natural rather than combed. Keep these grooves shallow for a middle glow, and leave thin skin bridges between clusters so nothing snaps off. Confidence beats precision here, so commit to each stroke in one motion.

  5. Shade the hat, collar, and sunflower

    Skin-peel the hat brim and crown for a soft mid glow, then add a woven or plaid texture with light crosshatched lines at a shallow depth. Do the same shallow shading on the patched collar. For the sunflower, peel the petals and leave the center slightly darker with a stippled dot texture. Save any small full cutouts, like tiny gaps in the brim, for last so the shell stays strong while you work.

  6. Light it and photograph

    Drop in a battery LED light, warm white if you have it, and set the pumpkin on a step or porch shelf. An LED is safer than a candle and will not scorch the thin etched areas. Dim the surroundings, then shoot at dusk so the glowing face pops against the dark skin. Add a mum or lantern nearby for that harvest porch feel.

Gather your supplies

Check things off as you get ready.

Work on a stable surface, keep your free hand out of the cutting path, and have an adult handle sharp tools.

Three levels of light

  • Leave intact

    The outer pumpkin skin around the whole scene stays untouched and dark to frame the scarecrow.

  • Peel & shade

    The hat brim, sunflower petals, straw hair, and patched collar are skin-peeled and lightly etched for a soft mid glow.

  • Cut through

    The smiling face oval is peeled thin, or lightly cut, so it reads as the brightest area, with the eyes, nose, and grin left darker for contrast.

Learn the carving basics

Before you start cutting

How do I keep the straw hair from looking messy?

Aim your V-gouge strokes so they all radiate outward from the face, like spokes from a hub. Vary the length of each stroke and let some overlap, which reads as natural straw rather than a neat comb. Keep them shallow and even in pressure so the glow stays consistent.

Should I cut all the way through anywhere?

Mostly no. This design works best as shaded and etched layers, so keep the face, hat, and straw as peeled skin for a warm glow. If you want a few bright accents, small cutouts in the hat brim or between straw clusters are fine, but save them for last and keep skin bridges between them.

What pumpkin shape works best for this scene?

Choose a tall pumpkin with a wide, smooth front so the hat, face, and collar all fit in a vertical stack. Avoid heavy ribbing across the front, since deep ridges fight the fine straw lines. A pale, even-colored surface also shows shading depth more clearly.

Your take belongs here, too.

Changed a detail? Made it simpler? Share a photo of your version and tell the community what worked.

Share your pumpkin

More pumpkins like this

You've reached the end · 8 pumpkins
The Patch Report

Fresh pumpkins, in your inbox.

The best new carvings, ideas worth stealing, and how-tos for carving season. Short, seasonal, and gone by November.

A short email during carving season. Unsubscribe anytime. See our privacy policy.