@patchwork_penny
Sep 7, 2026
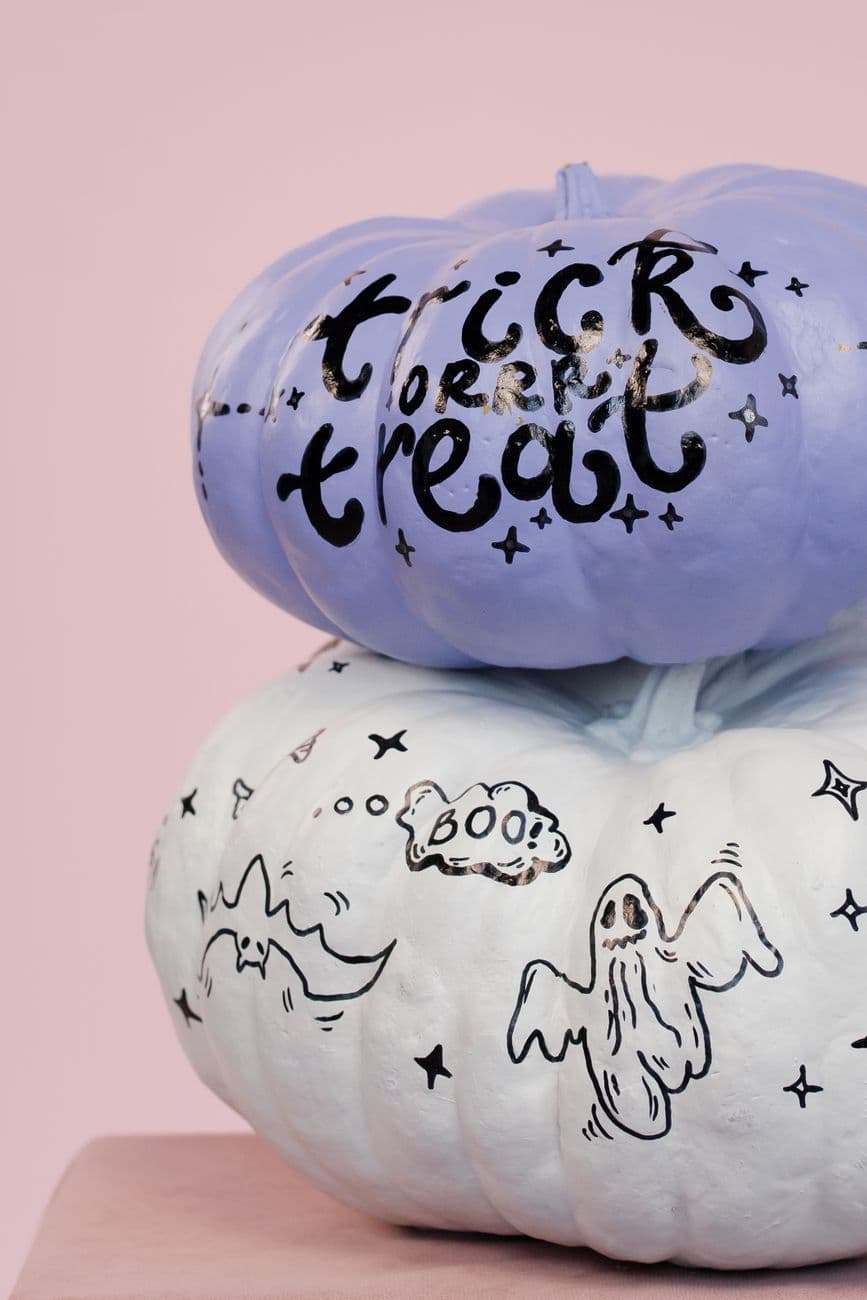
The charm here is loose cartoon line art: chubby ghosts, a little bat, a speech bubble, and scattered stars floating over a light surface. The plan is to carve most of it as shallow skin-peel outlines so it reads as clean drawing, then punch only the smallest shapes all the way through for sparkle. Keep everything spread out so no single detail gets fragile.
Written by PumpkinCarvingIdeas.com, inspired by @patchwork_penny's photo above. These are our suggestions, not instructions from the uploader, and this approach hasn't been tested on their exact carve.
Sketch your ghost, bat, small cloud with a word inside, and a spray of stars on paper first, or tape a printed stencil to the pumpkin. Keep shapes plump and rounded so thin necks and points do not snap later. Poke the outlines with a pin or transfer tool so you have a dotted map to follow. Space the elements out around the widest part of the pumpkin where the wall is flat and thick.
An adult should cut a lid from the bottom or the back rather than the top so the stem stays cute. Scoop the pulp and scrape the inside wall behind your design down to about one inch thick. A thinner wall makes skin-peeling and cutting much easier and lets more light through. Dry the inside with a paper towel before you start detailing.
Use a lino or gouge tool to shave off only the outer skin inside the ghost bodies and the bat, leaving the flesh underneath. This gives a soft dim glow that separates them from the dark background. Keep the outlines as untouched skin so the figures stay crisp and readable. Work slowly and keep your free hand behind the blade.
Trace the doodle lines with a narrow detail blade, cutting shallow grooves rather than all the way through. Add the wavy ghost mouths, the little dotted thought bubbles, and the outline of the speech cloud this way. Leaving these as grooves keeps the whole design connected and sturdy. Take breaks to brush out debris so you can see your lines.
Now punch the small four point stars and the tiny round eyes fully through the wall for the brightest pops of light. Save these full cutouts for the end so the pumpkin stays rigid while you do the finer work. Keep each star small and leave plenty of skin between them so the wall does not weaken. Clean up the edges with a gentle scrape.
Drop in a battery LED tea light or a small puck light, never a real flame near these thin walls. Dim the room and check that the ghosts glow softly while the stars shine bright. Rub a little petroleum jelly on cut edges to slow drying and keep it fresh. Snap your photo at night against a plain wall to show off the contrast.
Check things off as you get ready.
Work on a stable surface, keep your free hand out of the cutting path, and have an adult handle sharp tools.
The background surface and all the doodle outlines stay as untouched skin so the drawing reads dark and crisp.
The ghost bodies and the little bat get skin-peeled for a soft dim orange glow.
The small stars and the ghost eyes are cut all the way through for the brightest sparkle.
You can carve a version of the same look by turning the black doodle lines into shallow grooves and skin-peeled shapes. The outlines that were drawn in marker become carved lines, and the light shows through the peeled areas and cutouts instead of paint doing the work. It reads as the same playful ghost scene once it is lit.
Keep the ghost outlines as untouched skin and only skin-peel the inside of the body. That contrast between dark line and dim glow is what makes the shape pop. Avoid cutting the whole ghost through, since a big opening washes out the detail.
Lettering is optional and it is the trickiest part to carve cleanly. If you want words, keep them to a short one like BOO inside the little cloud and carve them as shallow grooves. Beginners can skip the text and let the ghosts and stars carry the design.
Changed a detail? Made it simpler? Share a photo of your version and tell the community what worked.
The best new carvings, ideas worth stealing, and how-tos for carving season. Short, seasonal, and gone by November.




Comments (0)