Halloween Pumpkin Carving Contest · Starts October 1st · $500 in prizes
← Back to ideas
@ai_concepts
Sep 25, 2026
Star and Dot Small Round Pumpkin CarvingAI
0

Report this carving

Tell us what is wrong. Reports are private.

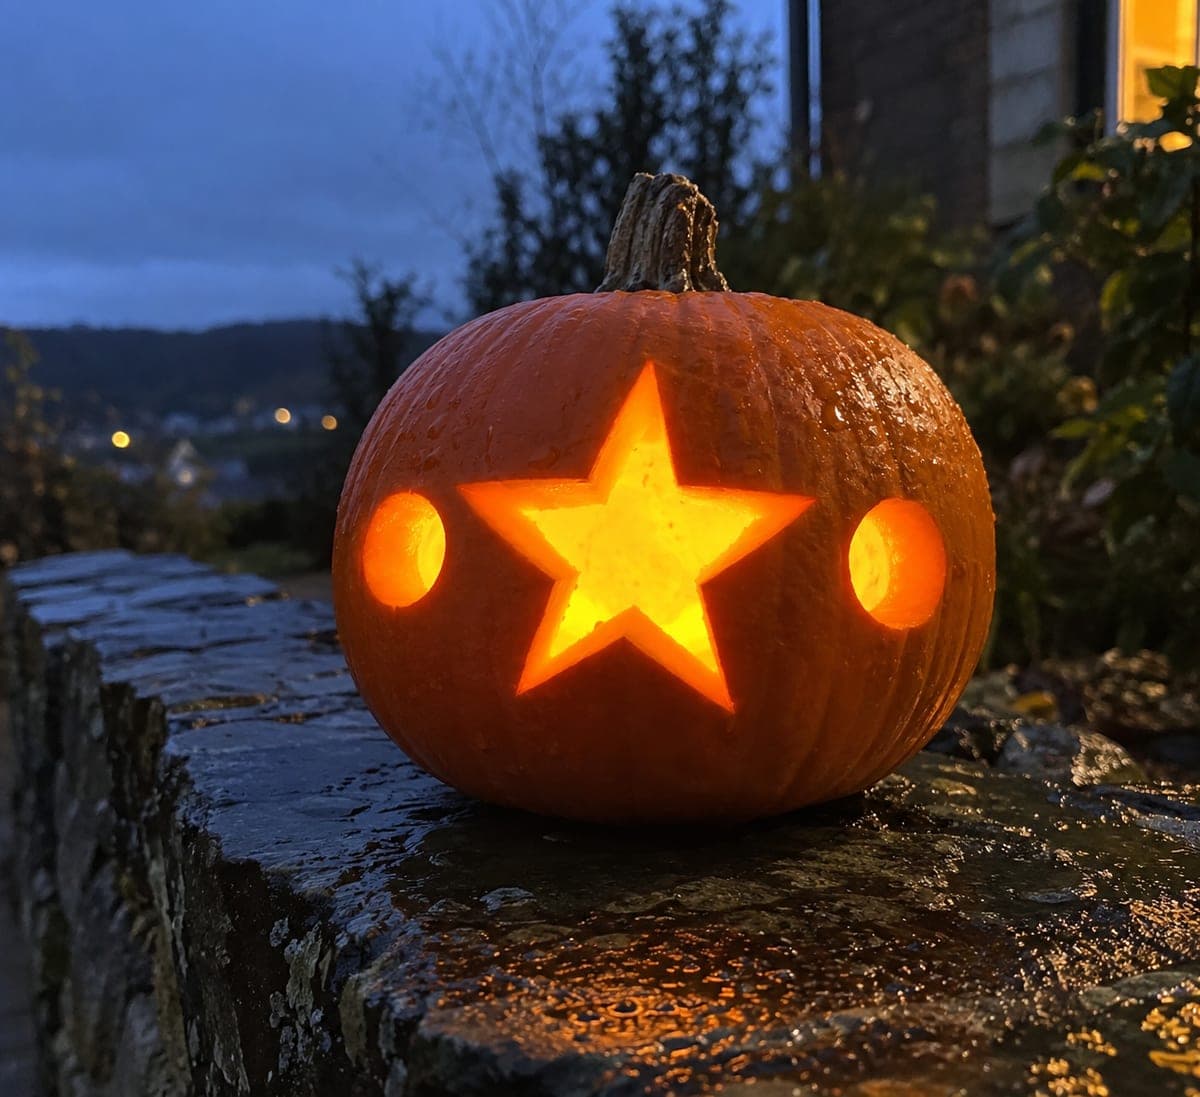
Star and Dot Small Round Pumpkin Carving

One five-pointed star opening and two round holes cut into a small round pumpkin create a minimal, graphic advanced pumpkin carving idea that is deceptively simple to execute. Choose a compact pumpkin for the design since the rounded shape compresses the star points elegantly on a smaller surface. Cut the star with deliberate straight-line cuts meeting at crisp points, then drill the two round holes with a spade bit for clean circular edges. A single tea light inside the small pumpkin fills the tight interior with warm light that beams through each shape.

No ratings yet · Sign in to rate

Save this design for carving night, then share a photo of your own jack-o'-lantern once it's glowing.
Comments (0)

  • No comments yet — be the first.

Save without an account. Sign in to like or comment.

Our tips for carving a similar design

A small round pumpkin naturally compresses the star into an elegant compact form, making the size an asset rather than a limitation. The star is cut with deliberate straight-line meeting cuts at each point, while the two circular holes are drilled cleanly for precise round edges. Because all three shapes are fully independent, there are no structural bridges to manage.

From pumpkin to porch

  1. Select a small round pumpkin

    Choose a pumpkin roughly the size of a cantaloupe with smooth, even walls. A compact interior concentrates the light so even a single tea light will illuminate all three holes brightly. Cut a bottom cap and scoop the interior to about three-quarters of an inch of wall thickness.

  2. Center and draw the star

    Find the center of the face and draw a five-pointed star from that point outward, keeping all five points equal. A printed template taped to the surface and poked through with a nail transfers the outline accurately and quickly.

  3. Mark the two round holes

    Place one circle above the star and one below, or both to one side for an asymmetric composition. Mark the center of each circle for the drill bit and confirm at least 15 mm of rind between each circle and the nearest star point.

  4. Drill the round holes

    Using a spade bit on a low-speed drill, press straight into the wall at each circle center. The spade bit produces a perfectly round edge that a saw cannot match. Keep the drill perpendicular to the wall and withdraw slowly to avoid tearing the rind at the exit.

  5. Cut the star and light

    Cut the star with a thin pumpkin saw, meeting each point with two clean straight inward cuts from opposite sides. Pop the star piece inward. Insert an LED tea light and position the pumpkin where the star casts point-shaped shadows on a nearby wall.

Written with AI to match this design

Gather your supplies

Check things off as you get ready.

Work on a stable surface, keep your free hand out of the cutting path, and have an adult handle sharp tools.

Three levels of light

  • Leave intact

    All rind surrounding the star and the two round holes stays intact and dark.

  • Peel & shade

    None for this design.

  • Cut through

    The five-pointed star opening and both round holes are cut through completely for full warm light.

Learn the carving basics

Before you start cutting

How do I cut star points without the tips tearing?

Make each point by approaching from each side of the point and letting the two cuts meet cleanly at the tip. Avoid sawing back and forth at the tip. A sharp, fresh blade makes this much easier; a dull blade tends to drag and tear the rind at the narrow point ends.

Can I use a drill for the star shape too?

A drill only makes circles, not stars. However, you can drill a small starter hole at the center of the star outline and insert a pumpkin saw blade through it to begin cutting without pressing the saw tip through the outer surface, which reduces the risk of the blade slipping at the start.

Will a tea light be bright enough in a small pumpkin?

Yes. A small interior concentrates light effectively, and all three holes will glow brightly with a single LED tea light. If you want more intensity, a small LED puck light or a flameless votive candle fills the compact space with even more even light.

Your take belongs here, too.

Changed a detail? Made it simpler? Share a photo of your version and tell the community what worked.

Share your pumpkin

More pumpkins like this

You've reached the end · 8 pumpkins
The Patch Report

Fresh pumpkins, in your inbox.

The best new carvings, ideas worth stealing, and how-tos for carving season. Short, seasonal, and gone by November.

A short email during carving season. Unsubscribe anytime. See our privacy policy.