Halloween Pumpkin Carving Contest · Starts October 1st · $500 in prizes
← Back to ideas
@ai_concepts
Aug 8, 2026
Textured Armadillo Relief Carved PumpkinAI
0

Textured Armadillo Relief Carved Pumpkin

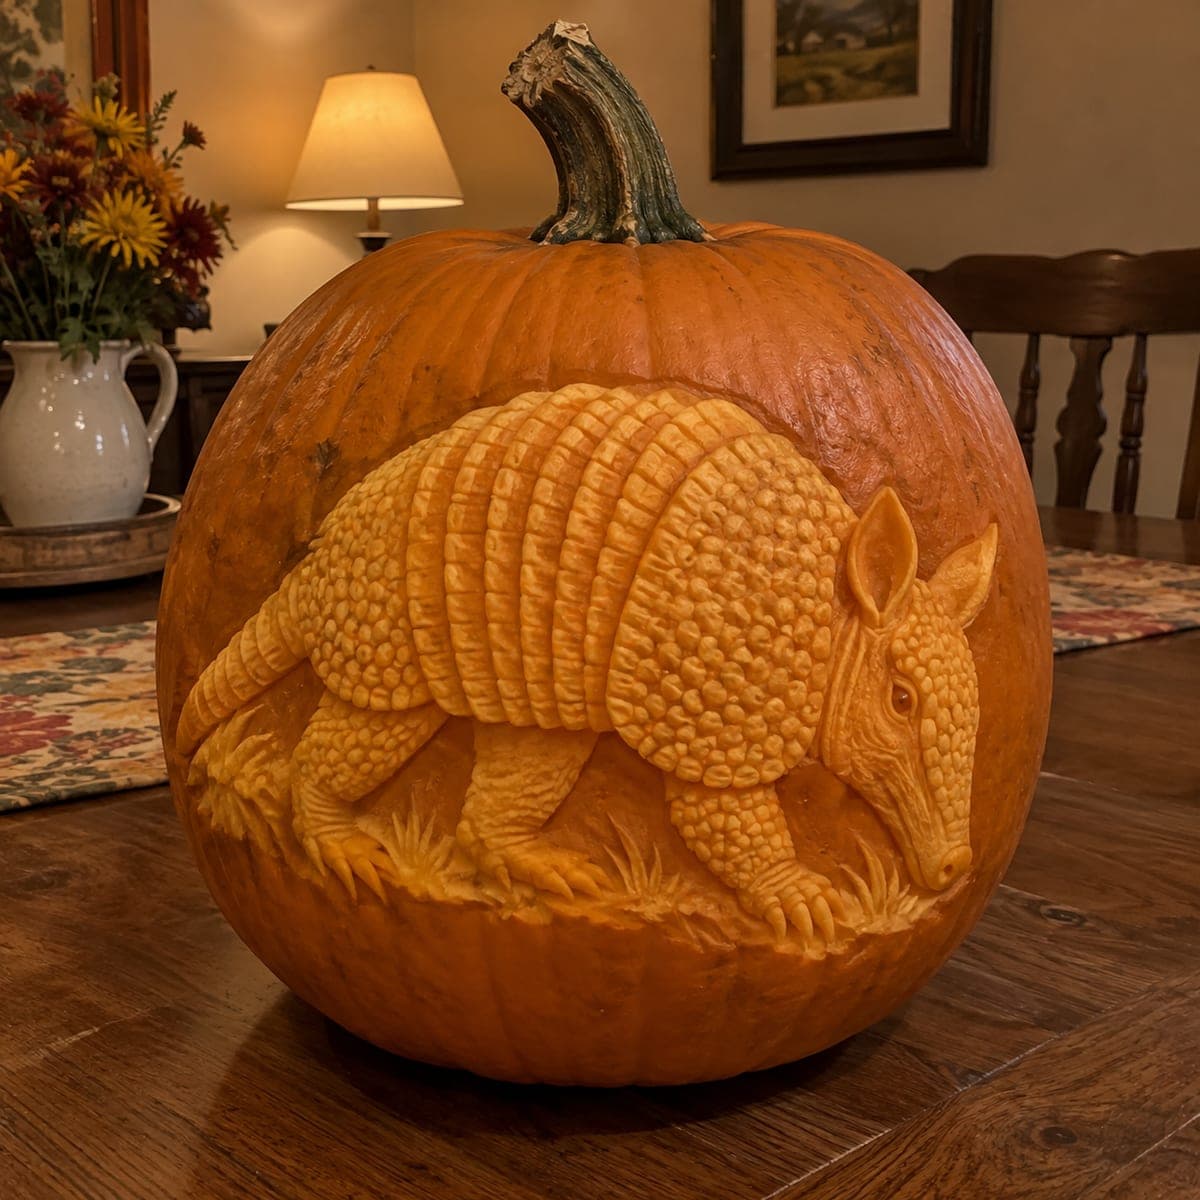
An armadillo trundles across this pumpkin in astonishing sculpted detail, from the banded armor plates to the pebbled texture covering its shoulders and haunches. The design is pure relief carving: the animal is raised by cutting the background away, then every scale and band is tooled individually with small gouges. Block in the silhouette and big shell bands before touching any texture. Give yourself a full afternoon and a very sharp set of clay loops.

This is an AI-generated concept image: a realistic, carvable design idea rather than a photo of a finished carve. AI concepts are always labeled and sit out the leaderboard and the contest.

No ratings yet · Sign in to rate

Comments (0)

  • No comments yet — be the first.

Save without an account. Sign in to like or comment.

Our tips for carving a similar design

The core trick here is pure relief carving, where the armadillo is left standing proud while the background skin is shaved away around it. You build depth by peeling instead of cutting all the way through, then tool every band and pebbled scale one at a time with small gouges. Plan on blocking in the silhouette and the big shell bands first, saving all the fine texture for last.

Written by PumpkinCarvingIdeas.com, inspired by the image above. These are our suggestions, not instructions from the uploader. This approach to the AI concept has not been tested on a real pumpkin.

From pumpkin to porch

  1. Prep the pumpkin and transfer the outline

    Pick a large pumpkin with a smooth, blemish-free belly for your canvas and wipe it clean. Since you are carving a relief and not a lantern, you can leave the pumpkin whole rather than gutting through a big lid, or cut a small access hole in the back later for a light. Tape your armadillo pattern to the front and trace the outline plus the major shell bands with a poker tool. Keep dotted reference lines light so they disappear as you carve.

  2. Lower the background

    Use a wide ribbon or clay loop tool to shave away the skin and a thin layer of flesh everywhere outside the armadillo. Work slowly and keep the depth even, about a quarter inch, so the animal reads as raised against a lower field. Round the edges of the silhouette slightly so it looks sculpted rather than stamped. This is the most time-consuming stage, so take breaks and keep your tools sharp.

  3. Block in the big forms

    Before any texture, establish the large shapes: the domed shell, the separate head, the ears, the legs, and the tail. Round the shoulders and haunches so light will wrap over them. Carve the banded midsection as a series of raised ridges with shallow valleys between them. Getting these masses right now makes the detail work fall into place later.

  4. Tool the armor bands

    Switch to a small U-gouge and define each armor band across the middle of the shell, keeping the bands slightly curved and parallel. Deepen the grooves between bands for shadow contrast. On the head, legs, and haunches, tap in the pebbled scales one at a time with a tiny loop, staggering them like brickwork. Vary the pressure so some scales catch more light than others.

  5. Add fine detail and grass

    Sculpt the eye, the pointed snout, and the ridged ears with your smallest tools, keeping any thin edges thick enough to stay attached. Carve the claws on each foot as short raised points rather than fragile spikes. Shave in the tufts of grass along the ground line by peeling the skin so they glow softly. Step back often to check that the texture flows in the right direction.

  6. Light it and photograph

    If you want backlight, cut a small round opening in the back of the pumpkin and set a battery LED inside; never use an open flame. Because most of this design is peeled rather than cut through, the glow will be soft and warm rather than bright. For display, a lamp or two aimed across the surface from the side will rake light over the texture and show off every band. Coat the carved areas with a thin layer of petroleum jelly to slow drying and shoot your photos the same evening.

Gather your supplies

Check things off as you get ready.

Work on a stable surface, keep your free hand out of the cutting path, and have an adult handle sharp tools.

Three levels of light

  • Leave intact

    The raised armadillo shell and head, left mostly at skin depth so the armored body stays the darkest, boldest mass.

  • Peel & shade

    The lowered background field and the grass tufts, skin-peeled to a dim orange glow that pushes the animal forward.

  • Cut through

    A small hidden opening in the back for the LED, the only spot cut all the way through.

Learn the carving basics

Before you start cutting

Do I need to cut all the way through anywhere on the front?

No. This is a relief carving, so the whole front stays intact and you only remove skin and shallow flesh. The animal is shaped by lowering the background and tooling texture, not by open cutouts. Any full cut is limited to a small light hole in the back.

How do I keep the pebbled scales from turning into mush?

Work with a very sharp small loop and remove tiny amounts at a time rather than digging deep. Stagger the scales and leave a little wall of flesh between each one so they hold their shape. If a section gets soft, stop and let the surface firm up before continuing.

How long will a relief carving like this last?

Peeled relief work dries faster than a simple lantern because so much skin is removed. Coat the carved surface with petroleum jelly and keep the pumpkin cool and out of sun. Realistically you get a day or two of crisp detail, so carve it close to when you plan to display and photograph it.

Your take belongs here, too.

Changed a detail? Made it simpler? Share a photo of your version and tell the community what worked.

Share your pumpkin

More pumpkins like this

You've reached the end · 8 pumpkins
The Patch Report

Fresh pumpkins, in your inbox.

The best new carvings, ideas worth stealing, and how-tos for carving season. Short, seasonal, and gone by November.

A short email during carving season. Unsubscribe anytime. See our privacy policy.