The 2026 contest winners are inGrand Prize, People's Choice and Most Creative, all crowned.
@ai_concepts
Sep 14, 2026
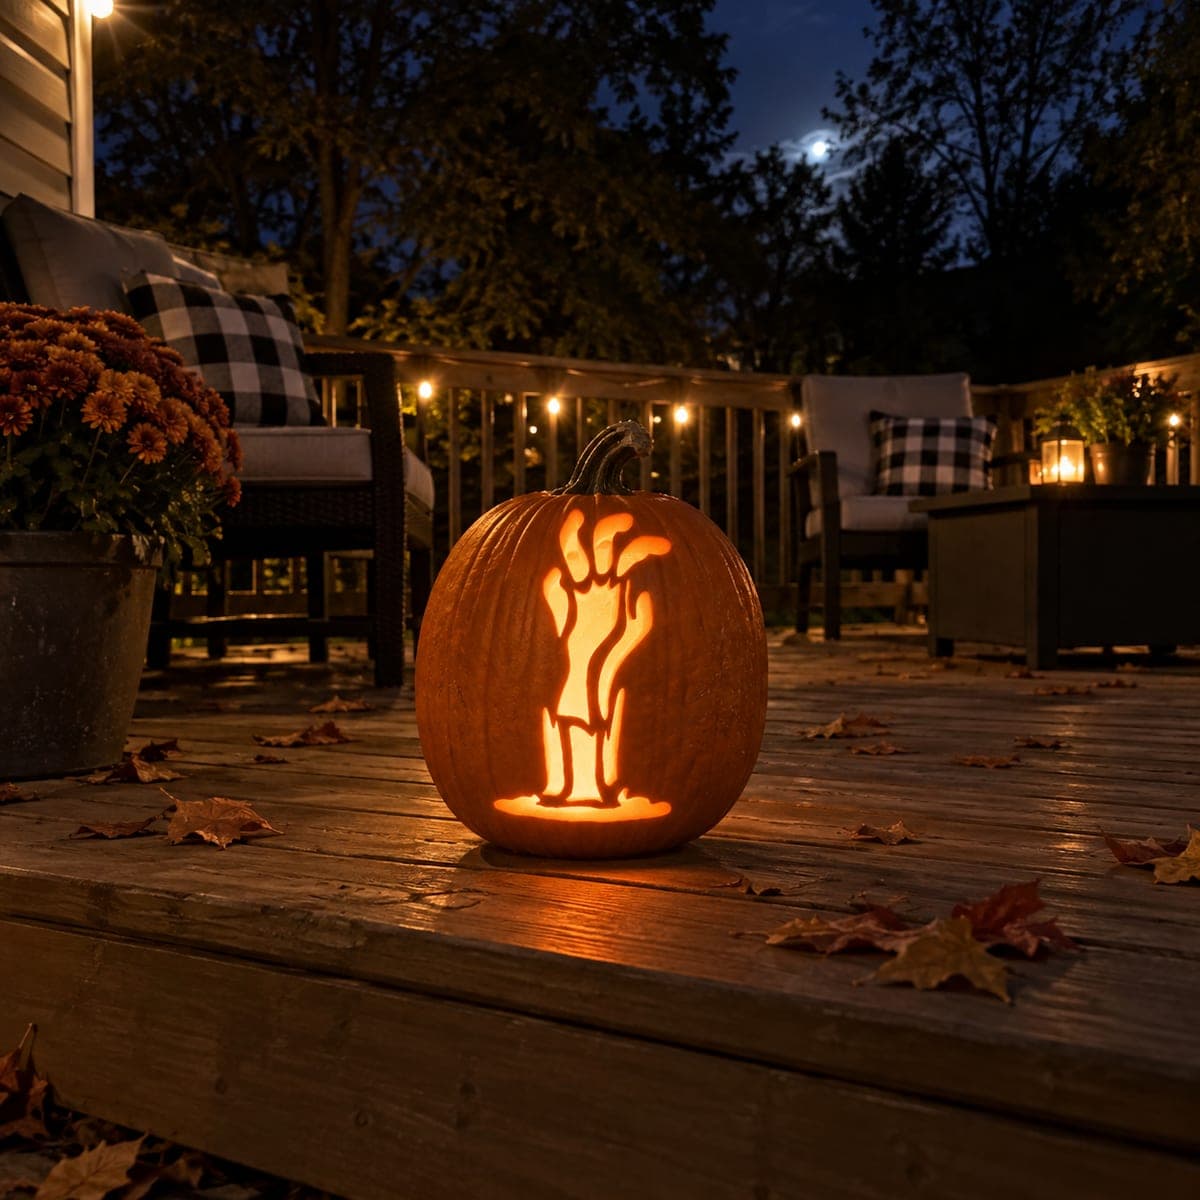
The Rising Skeleton Hand pumpkin carvingAI
0

Report this carving

Tell us what is wrong. Reports are private.

The Rising Skeleton Hand

Five long bony fingers and a narrow wrist rise straight upward from a flat ground line, the whole skeletal hand design glowing brightly against a dark outdoor deck setting. Every finger is separated by a thin sliver of intact rind in this cutout pumpkin carving, which forms the negative-space bones of the hand. Cut the spaces between the fingers first by plunging straight in at the base and drawing the saw upward toward the fingertip so each channel stays even and the finger columns remain parallel.

No ratings yet · Sign in to rate
skeletonskeletal-handbonesskeletalcutoutscaryspookycreepyundead

Save this design for carving night, then share a photo of your own jack-o'-lantern once it's glowing.
Comments (0)

  • No comments yet. Be the first.

Our tips for carving a similar design

The core trick here is negative space: the finger bones are actually the intact rind left standing between the cutout channels. You plan the whole hand as a set of parallel columns rising from a flat ground line, then remove the gaps around them so the light glows through everything except the bones. Work slowly and cut the gaps in a careful order so the thin finger columns stay supported until the very end.

From pumpkin to porch

  1. Pick a tall pumpkin and plan the layout

    Choose a pumpkin that is more tall than round so the fingers have room to stretch upward. Wipe the front smooth and dry, then tape your stencil flat over the best carving face. Center the design so the wrist sits low and the fingertips end well below the stem. Step back and check that the hand reads clearly before you commit.

  2. Open a lid and hollow it out

    Cut a hole in the bottom instead of the top so the pumpkin sits stable and drops easily over an LED light. Have an adult make the opening with a sturdy knife. Scoop out all the seeds and scrape the front wall down to about one inch thick so it carves cleanly. A thinner wall lets more light through and makes the thin channels easier to cut.

  3. Transfer the pattern

    Poke along every outline with a pushpin or a transfer wheel, spacing the dots close together. Peel off the paper and connect the dots with a washable marker so you can see the finger columns and the gaps between them. Mark clearly which shapes are gaps to remove and which slivers are bones to keep. Double check before any blade touches the shell.

  4. Cut the gaps between the fingers first

    Start with the thin channels that separate the fingers, since those define the whole design. Plunge a fine detail saw straight in at the base of each gap and draw it upward toward the fingertip so each channel stays even and the columns stay parallel. Cut one gap at a time and let each channel finish before starting the next. Keeping the largest openings for last means the bony columns stay braced while you work.

  5. Open the wrist and ground line

    Once the finger gaps are done, cut the wider openings around the wrist and along the flat ground line at the bottom. Push scrap pieces out gently from the inside so you do not snap a finger column. Clean up any ragged edges with the tip of your saw. Trim the inside edges at a slight bevel to widen the light path.

  6. Light it and photograph

    Drop the pumpkin over a bright LED puck or string, never a candle, so the cutouts blaze and the bones stand dark. Set it on a flat deck board at dusk for the best contrast. Scatter a few real leaves around the base to match the mood. Snap your photo slightly low and straight on so the hand looks like it is rising toward you.

Written with AI to match this design

Gather your supplies

Check things off as you get ready.

Work on a stable surface, keep your free hand out of the cutting path, and have an adult handle sharp tools.

Three levels of light

  • Leave intact

    The five finger columns and the narrow wrist stay as untouched rind so the bones read dark against the glow.

  • Peel & shade

    Optional shallow shaving along the ground line adds a dim orange base if you want a softer horizon.

  • Cut through

    The channels between the fingers, the wrist gaps, and the space around the hand are cut through for the brightest light.

Learn the carving basics

Before you start cutting

How do I keep the thin finger columns from breaking?

Leave the wall about an inch thick and cut the narrow gaps one at a time rather than all at once. Save the big surrounding openings for last so the columns stay braced as long as possible. Push scraps out gently from the inside instead of prying from the front.

This is a concept image, so what proportions actually work in a real pumpkin?

No real pumpkin was carved here, so plan for structure when you build your own. Keep each finger column at least a half inch wide at its narrowest so it does not crumble. Widen the wrist slightly more than the fingers since it carries the whole shape.

Where should I put the light for this glow?

Use a bright LED puck or a small LED string set inside the pumpkin, never a candle near these thin cutouts. Place it low and toward the back so light fans up through the finger gaps evenly. A cool white LED gives the strongest bone contrast, while a warm one keeps the cozy orange look in the photo.

Your take belongs here, too.

Changed a detail? Made it simpler? Share a photo of your version and tell the community what worked.

Share your pumpkin

Want more designs like this? Browse our full library of pumpkin carving ideas, or pick a free printable stencil. Every pattern and template in our own collection is free to print at home.

More pumpkins like this

You've reached the end · 8 pumpkins
The Patch Report

Fresh pumpkins, in your inbox.

The best new carvings, ideas worth stealing, and how-tos for carving season. Short, seasonal, and gone by November.

A short email during carving season. Unsubscribe anytime. See our privacy policy.