Halloween Pumpkin Carving Contest Β· Starts October 1st Β· $500 in prizes
← Back to ideas
@ai_concepts
Aug 26, 2026
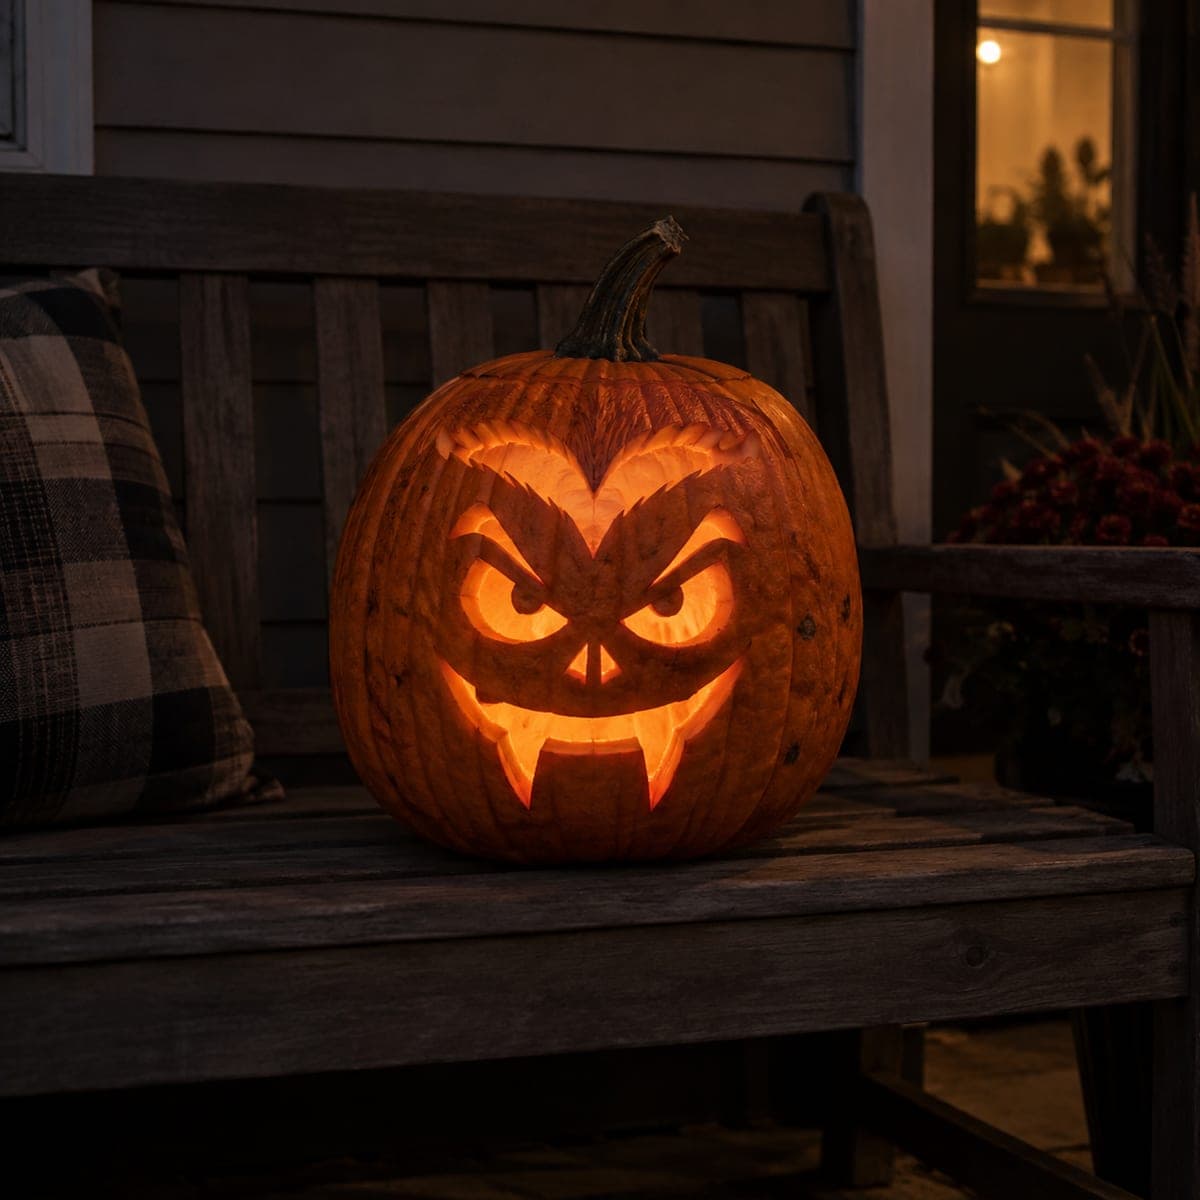
Vampire Fangs Angry Jack-O-Lantern Glowing at NightAI
0

Vampire Fangs Angry Jack-O-Lantern Glowing at Night

Arched menacing eyebrows, deep-set slanting eyes, and two prominent vampire fangs cut from the upper jaw give this pumpkin a terrifying undead grin that glows brilliantly after dark. The cutout design is a straightforward pumpkin carving idea that beginners can finish in about 45 minutes using the pattern as a guide. Cut the fangs by leaving two long rectangular tabs intact in the mouth opening, pointing downward, and score the tooth dividers with shallow cuts. Positioned at eye level on a porch railing, the glowing fangs create an impressively spooky first impression for trick-or-treaters.

This is an AI-generated concept image: a realistic, carvable design idea rather than a photo of a finished carve. AI concepts are always labeled and sit out the leaderboard and the contest.
No ratings yet Β· Sign in to rate

Comments (0)

  • No comments yet β€” be the first.

Save without an account. Sign in to like or comment.

Our tips for carving a similar design

The whole effect here comes from strong angular cutouts: arched brows, slanting eyes, and a wide mouth with two fang tabs left standing in the opening. The trick is to plan the fangs as part of the mouth cut so they stay attached to the top edge and hang down like real teeth. Keep every shape bold and connected, and the light will do the rest.

Written by PumpkinCarvingIdeas.com, inspired by the image above. These are our suggestions, not instructions from the uploader. This approach to the AI concept has not been tested on a real pumpkin.

From pumpkin to porch

  1. Pick a pumpkin and transfer the pattern

    Choose a large, round pumpkin with a smooth, flat-ish front face so the design reads clearly at eye level. Tape your printed pattern in place and poke through the outlines with a pin or a dotting tool to mark the brows, eyes, mouth, and the two fang tabs. Space your dots close together on the fang edges so you can follow the shape accurately. Step back and check that the face is centered before you start cutting.

  2. Cut the lid and clean out the inside

    Cut an access hole in the back or bottom rather than the top so the stem stays intact for looks. Scoop out the seeds and pulp, then thin the inside wall behind the face to about one inch. A thinner wall makes cutting the sharp corners easier and lets more light through. Save some scooped pulp in case you want to test bridge strength later.

  3. Carve the eyes and eyebrows first

    Start with the smaller shapes while the pumpkin is still strong. Use a fine saw tool to cut the slanting eyes and the arched, pointed eyebrows, working from the inner corners outward. Keep the narrow tip of each brow slightly wider than you think you need, since very thin points can snap. Push the cut pieces inward and out to keep the edges clean.

  4. Cut the mouth and leave the fang tabs

    Outline the full mouth shape, then plan your cut so two long rectangular tabs stay connected to the upper edge and point straight down. Cut around each fang carefully, removing the openings on either side while leaving the tabs standing. Do not cut across the top of the fangs, that is what holds them in place. Add the small tooth divider lines along the lower jaw as shallow score cuts, not full cutouts, so the bottom edge stays sturdy.

  5. Add the nose and refine edges

    Cut the small triangular or notched nose between the eyes last among the openings. Go back over every edge and bevel the inside rim slightly toward the light so the glow spreads. Check the fang tabs for wobble and leave them a touch thicker at the base if they feel loose. Wipe the cut faces clean and rub a little petroleum jelly on exposed edges to slow drying.

  6. Light it and stage the photo

    Set a battery LED or a string of LED lights inside, never a candle, since the fang tabs and thin brows are flammable and hard to reach. Place a brighter light low and toward the front so it lifts up into the eyes and mouth. Position the pumpkin at eye level on a railing or bench and shoot in near darkness for that brilliant fanged glow. Take your photo the same night, since thin cutouts curl as they age.

Gather your supplies

Check things off as you get ready.

Work on a stable surface, keep your free hand out of the cutting path, and have an adult handle sharp tools.

Three levels of light

  • Leave intact

    The broad cheeks, forehead, and outer rind stay as untouched skin for a dark frame around the face.

  • Peel & shade

    The fang surfaces and the ridge lines between teeth can be skin-peeled or shallow-scored for a dim orange glow that separates them from the black mouth opening.

  • Cut through

    The eyes, arched brows, nose, and the open gaps of the mouth are cut fully through for the brightest light.

Learn the carving basics

Before you start cutting

How do I keep the two fangs from breaking off?

Leave each fang connected to the top edge of the mouth and never cut across that join, since that band is what holds them up. Keep the tabs a bit thicker at the base and avoid over-thinning the wall right behind them. If one feels loose, widen the base slightly and handle the pumpkin from the bottom.

This is a concept image, can a real pumpkin look like this?

Yes, the design is built from ordinary cutouts and hanging fang tabs, all of which are realistic to carve. Just keep the brow tips and fangs a little wider than a rendered image might show so they hold their shape. Real pumpkin walls flex, so bolder shapes survive better than razor-thin ones.

Which parts should I cut first to avoid weakening the pumpkin?

Carve the small shapes first: eyes, eyebrows, and nose, while the wall is still firm. Save the big mouth opening for last since it removes the most material and makes the face flexible. Cutting in that order keeps everything stable while you work the detailed corners.

Your take belongs here, too.

Changed a detail? Made it simpler? Share a photo of your version and tell the community what worked.

Share your pumpkin

More pumpkins like this

You've reached the end Β· 8 pumpkins
The Patch Report

Fresh pumpkins, in your inbox.

The best new carvings, ideas worth stealing, and how-tos for carving season. Short, seasonal, and gone by November.

A short email during carving season. Unsubscribe anytime. See our privacy policy.