Halloween Pumpkin Carving Contest · Starts October 1st · $500 in prizes
← Back to ideas
@ai_concepts
Aug 5, 2026
Velociraptor Emerging from Jungle Shaded PumpkinAI
0

Velociraptor Emerging from Jungle Shaded Pumpkin

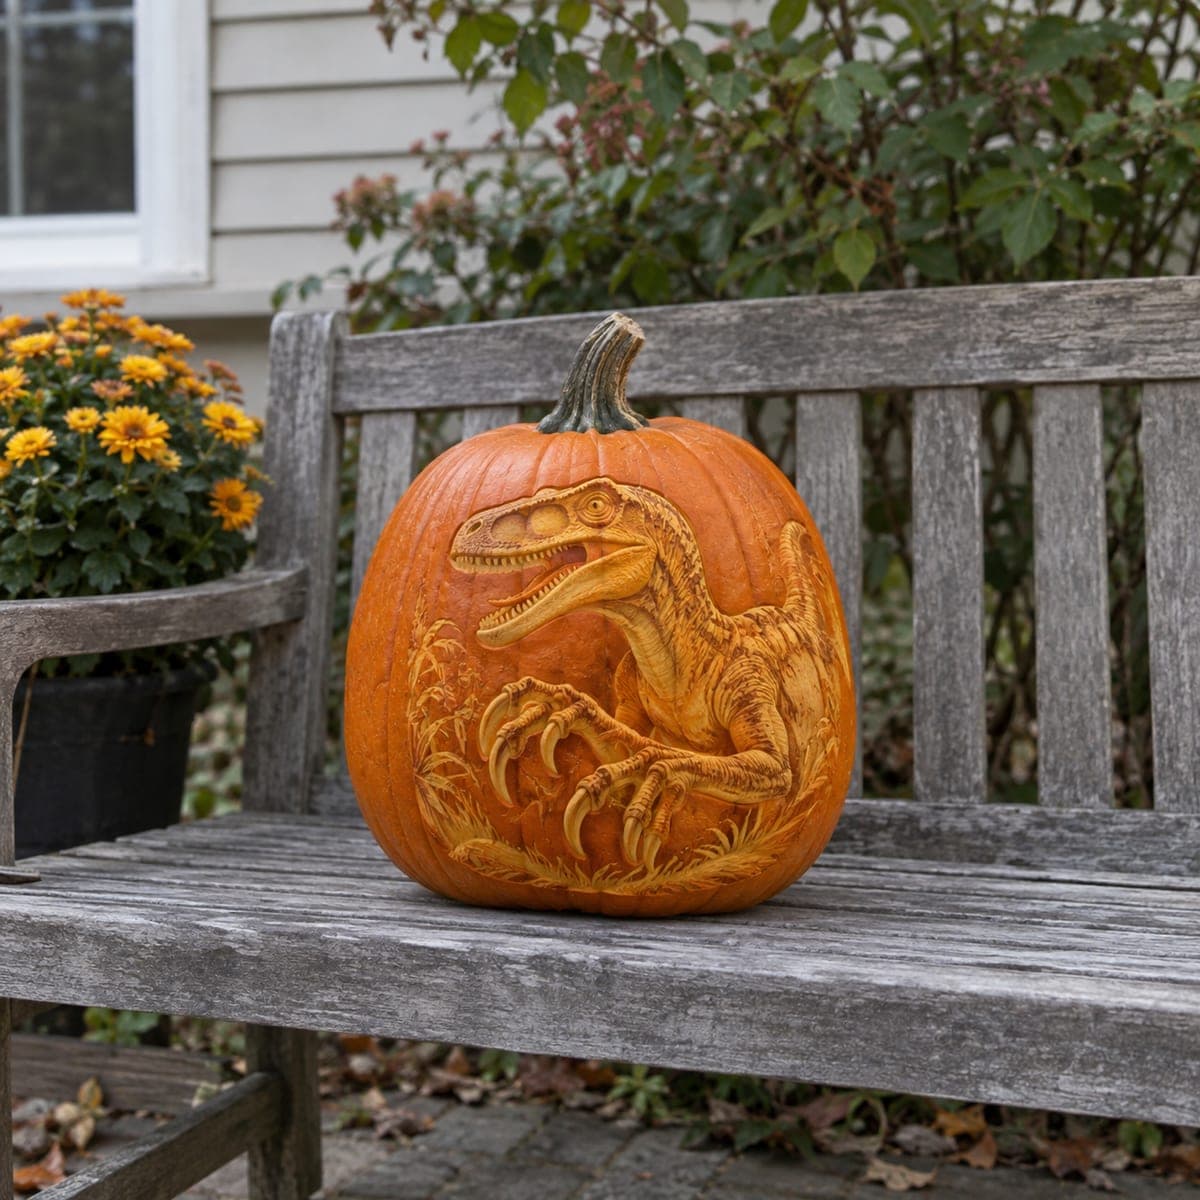
A velociraptor lunges forward from a tangle of prehistoric foliage, its serrated teeth, slit pupils, and outstretched claw carved in remarkable depth through multi-level shading across the pumpkin surface. The jungle grass and background fronds are etched at a shallower depth than the dinosaur's face, creating the visual illusion that the raptor is pushing through vegetation toward the viewer. Use a combination of Dremel bits, a cylinder bit for background removal and a fine ball tip for the scales and teeth detail. Dinosaur fans and thrill-seeking adults searching for an advanced pumpkin carving idea will find this design genuinely impressive.

This is an AI-generated concept image: a realistic, carvable design idea rather than a photo of a finished carve. AI concepts are always labeled and sit out the leaderboard and the contest.

No ratings yet · Sign in to rate

Comments (0)

  • No comments yet — be the first.

Save without an account. Sign in to like or comment.

Our tips for carving a similar design

The core trick here is depth staging: the raptor's face and claw are shaded deepest so they read as closest, while the grass and fronds behind it are scratched only shallowly. By carving the dinosaur at several skin depths and keeping the background thin, you sell the illusion that the animal is pushing forward through the foliage. Almost none of this design is a full cutout, so plan on a shading job rather than a silhouette.

Written by PumpkinCarvingIdeas.com, inspired by the image above. These are our suggestions, not instructions from the uploader. This approach to the AI concept has not been tested on a real pumpkin.

From pumpkin to porch

  1. Prep the pumpkin and transfer the stencil

    Pick a tall, smooth-shouldered pumpkin with an even front so the raptor has an unbroken canvas. Cut a lid from the bottom or back rather than the top, then scoop the wall on the carving side down to about one inch so light passes through peeled areas. Tape your stencil flat and poke or trace the main outlines: the head, jaw, claw, and the tallest grass blades. Mark which zones are dinosaur and which are background so you do not lose track once shading starts.

  2. Establish the depth map before any carving

    Decide your three surface levels now. The raptor's face and reaching claw will be your deepest shaded areas, the body and legs mid depth, and the jungle grass and fronds the shallowest scratches. Lightly pencil these zones so you carve dark to light and never over-thin a spot. Working this order keeps the dinosaur reading as the closest object.

  3. Shade the raptor body with a cylinder bit

    Use a cylinder Dremel bit or a large loop tool to peel the raptor's face, neck, and legs to a mid depth, removing only the outer skin so it glows dim. Go deeper on the muscle hollows, the eye socket, and the inside of the open mouth to build form. Keep tool speed moderate and let the bit do the work so you do not blow through the wall. Wipe away pulp often to check your tones under a light.

  4. Add scales, teeth, and claw detail with a fine tip

    Switch to a fine ball tip for the small stuff: rows of scales, the slit pupil, and the serrated teeth. Carve each tooth as a shallow raised shape by peeling around it rather than cutting it free, which keeps every point strong. Do the same for the curved claws, leaving a skin bridge along each tip so nothing snaps. Vary your pressure to get light highlights on the ridges and darker skin in the recesses.

  5. Scratch in the jungle background last

    Keep the grass and fronds deliberately shallow, just breaking the surface so they stay dimmer and sit visually behind the raptor. Angle your strokes upward for the blades and let a few overlap the dinosaur's lower legs to sell the emerging effect. If you want one or two true cutouts for pop, place them among the tallest grass tips and cut them last, after all shading is done. This protects the thin walls while you handle the pumpkin.

  6. Light it and photograph

    Drop in a battery LED puck, warm white if you have it, and set it low so light climbs into the deep face carving. Test in a dark room and touch up any tones that look flat by peeling a hair deeper. Rub cut edges with a little petroleum jelly to slow drying and keep detail crisp for a day or two. Shoot photos slightly off to one side so the raised claw and teeth catch a shadow.

Gather your supplies

Check things off as you get ready.

Work on a stable surface, keep your free hand out of the cutting path, and have an adult handle sharp tools.

Three levels of light

  • Leave intact

    Untouched skin stays on the darkest recesses, the eye slit, deep mouth interior, and shadow gaps between scales.

  • Peel & shade

    The raptor's face, body, legs, claw, and the shallow jungle grass are skin-peeled at varying depths for a dim orange glow.

  • Cut through

    Only a few optional grass tips or a small mouth gap are cut fully through for the brightest accents.

Learn the carving basics

Before you start cutting

This is a concept image, so can a pumpkin really hold this much detail?

Yes, if you treat it as a shading project rather than a cutout. The image is an AI concept, so no real pumpkin was carved, but the same look is achievable by peeling skin at different depths. Keep teeth and claws as raised peeled shapes instead of cut-through points so they do not break.

How do I make the raptor look like it is in front of the grass?

Control depth. Carve the dinosaur's face and claw the deepest so they glow strongest and read as closest, and keep the grass and fronds as shallow surface scratches. Letting a few blades cross over the raptor's legs adds to the pushing-through effect.

What kind of pumpkin holds fine scale detail best?

Choose a large pumpkin with a thick, smooth wall and few ribs on the front. A denser wall lets you shade multiple depths without breaking through. Carve within a day of displaying, since fine peeled detail softens as the pumpkin dries.

Your take belongs here, too.

Changed a detail? Made it simpler? Share a photo of your version and tell the community what worked.

Share your pumpkin

More pumpkins like this

You've reached the end · 8 pumpkins
The Patch Report

Fresh pumpkins, in your inbox.

The best new carvings, ideas worth stealing, and how-tos for carving season. Short, seasonal, and gone by November.

A short email during carving season. Unsubscribe anytime. See our privacy policy.