Halloween Pumpkin Carving Contest · Starts October 1st · $500 in prizes
← Back to ideas
@ai_concepts
Sep 14, 2026
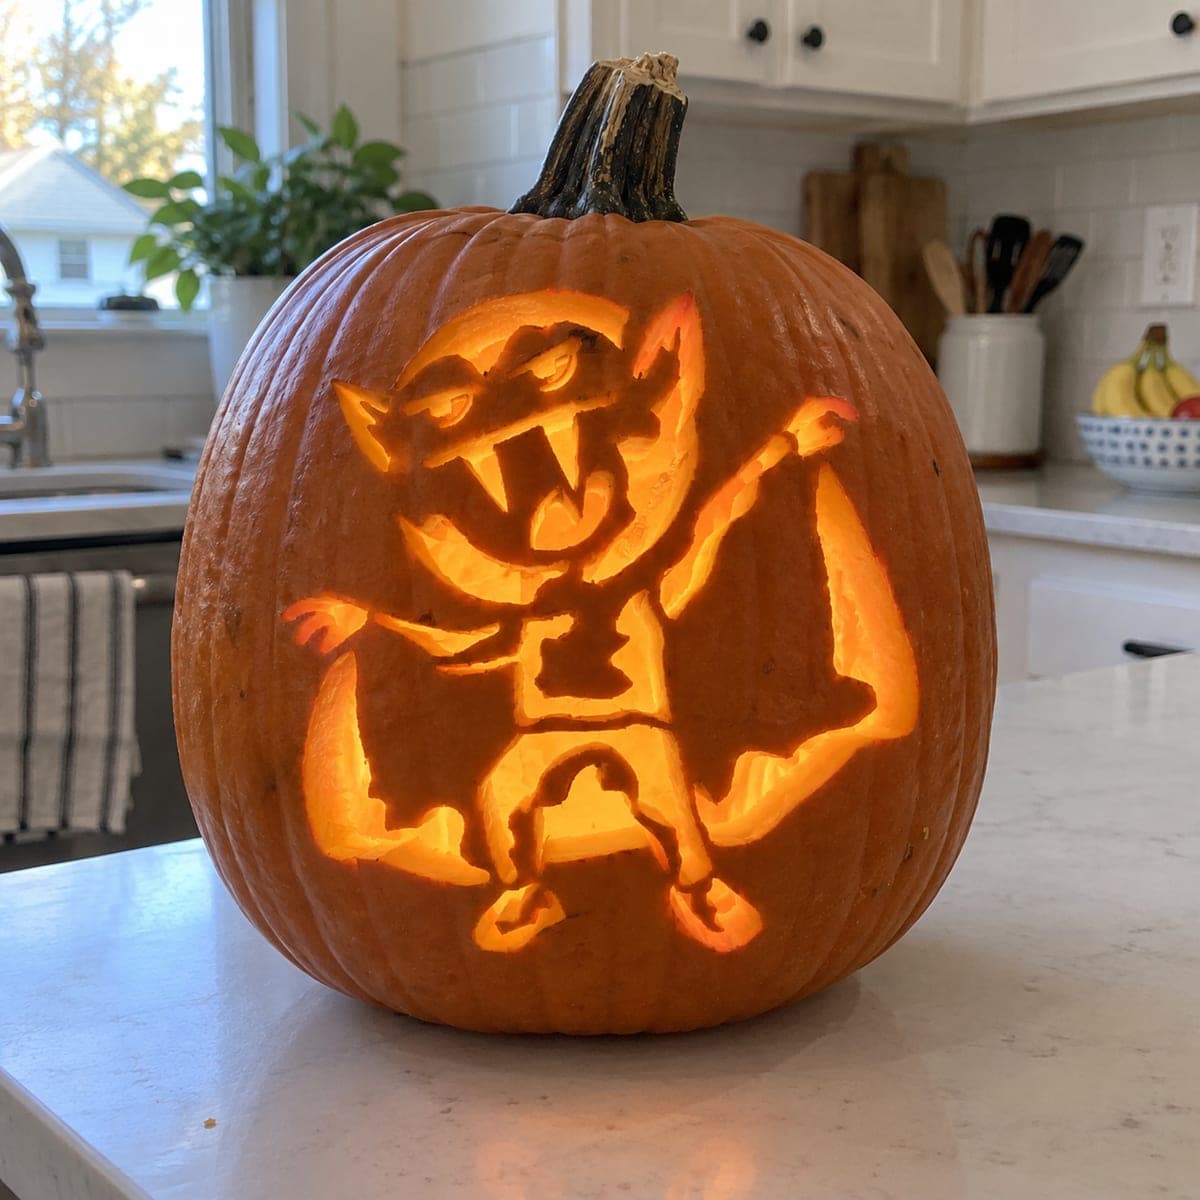
Wide-Eyed Grinning Vampire PumpkinAI
0

Wide-Eyed Grinning Vampire Pumpkin

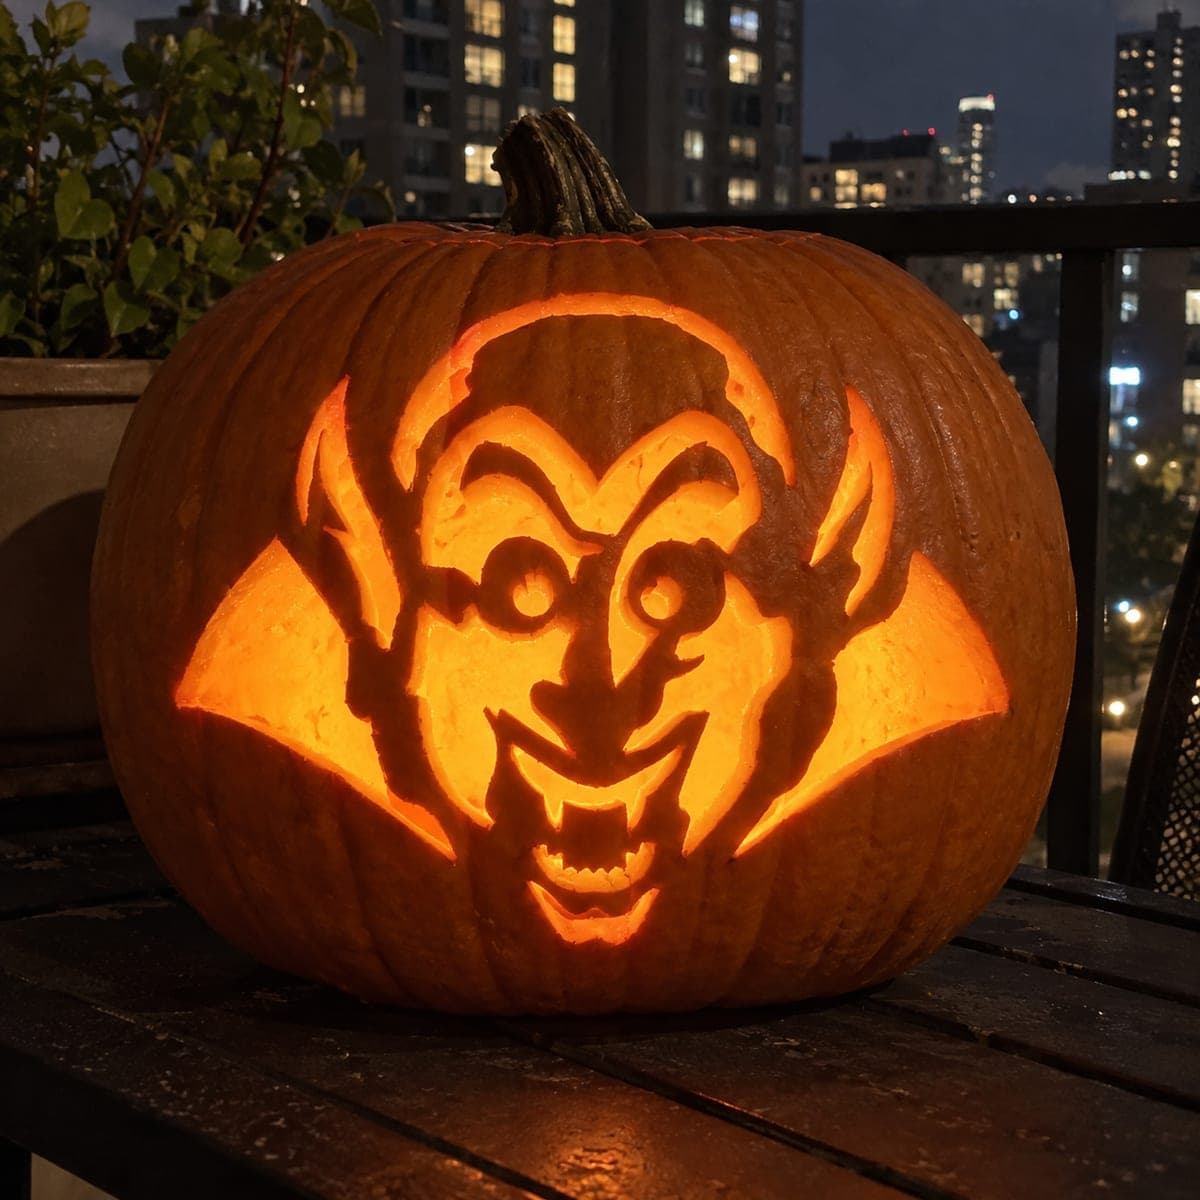
A cartoonish wide-grinning vampire with enormous circular eyes, wild swept hair, exposed fangs, and angular cape wings spread on either side fills this jack-o-lantern as a funny pumpkin carving idea. Every bright region is cut straight through, leaving the iris rings inside the big eyes and the facial features as dark uncut rind. The circular eye pupils are isolated islands of skin, so cut the surrounding eye openings in small arcs and test the fit before connecting the cuts all the way around. Warm candlelight makes the oversized eyes glow amber and amplifies the comic menace of the grin.

This is an AI-generated concept image: a realistic, carvable design idea rather than a photo of a finished carve. AI concepts are always labeled and sit out the leaderboard and the contest.
No ratings yet · Sign in to rate

Comments (0)

  • No comments yet — be the first.

Save without an account. Sign in to like or comment.

Our tips for carving a similar design

The core trick here is the pair of huge circular eyes, where the pupil rings are left as floating islands of skin surrounded by bright cutouts. Everything that glows is cut straight through the rind, while the face outline, nose, brows, and grin lines stay as dark uncut skin. Plan your bridges carefully so the pupils and the thin cape edges stay attached and structurally sound.

Written by PumpkinCarvingIdeas.com, inspired by the image above. These are our suggestions, not instructions from the uploader. This approach to the AI concept has not been tested on a real pumpkin.

From pumpkin to porch

  1. Pick a big pumpkin and open the lid

    Choose a large round pumpkin with a wide, flat front so the whole vampire fits with room for the spread cape wings. Cut a lid from the back at an angle so it rests without falling in, or cut a bottom vent hole instead. Scoop the inside clean and thin the front carving wall to about one inch so your blade passes easily. A thinner wall makes the many cutouts faster and cleaner.

  2. Transfer the stencil

    Print the vampire design and tape it snugly to the front, smoothing out wrinkles over the pumpkin's curve. Use a poking tool to dot along every line, paying special attention to the two circular eyes and their inner pupil rings. Dot the pupil islands densely so you can clearly see where skin must stay. Peel the paper and connect the dots lightly with a marker if the pattern is faint.

  3. Carve the eyes and protect the pupils

    Start with the eyes since they are the trickiest feature. Cut the bright eye openings in small arcs around each pupil rather than one continuous sweep, and leave the round pupil island uncut. Test the fit and support of each island before you connect the arcs all the way around. Take your time here, as this floating detail is what gives the vampire its wide comic stare.

  4. Cut the smaller face details

    Move on to the nostrils, the grin gaps, and the fang notches with a fine detail blade. Keep the nose, brow lines, and the outline of the face as uncut dark skin so the features read clearly against the glow. Leave a solid bridge above and below each fang so the pointed teeth stay attached and do not snap. Work from the center outward to keep the wall stable.

  5. Open the cape wings last

    Save the large angular cape cutouts on either side for last, since these big openings weaken the wall. Cut them cleanly along the stencil edges, keeping the pointed wing tips slightly thick so they hold their shape. Clean up any ragged edges with the blade angled slightly inward toward the light. Removing the big pieces last keeps the pumpkin firm while you carve the fine work.

  6. Light it and photograph

    Drop in a battery LED light, or two for an even amber wash, and skip candles near the thin cape edges. Set the pumpkin at eye level against a dark background so the glowing eyes and grin pop. Shoot in near darkness with a steady phone or a short timer to avoid blur. A little dusk light behind, like a city skyline, adds a nice moody frame.

Gather your supplies

Check things off as you get ready.

Work on a stable surface, keep your free hand out of the cutting path, and have an adult handle sharp tools.

Three levels of light

  • Leave intact

    The face outline, nose, brows, grin lines, and the round pupil islands stay as dark uncut skin.

  • Peel & shade

    Optional shallow shading on the cheeks or hair can be skin-peeled for a dim amber tone.

  • Cut through

    The big eye openings, grin, fang gaps, and the angular cape wings are cut straight through for full brightness.

Learn the carving basics

Before you start cutting

How do I keep the round pupils from falling out?

Cut the eye openings as several small arcs around each pupil instead of one full circle. Leave the pupil connected to the surrounding rind until the very end, then test how firmly it sits before you finish the last cuts. If an island feels loose, leave a small skin bridge to anchor it rather than fully isolating it.

Will the fangs snap off while I carve?

They can if you cut too aggressively. Keep a solid bit of uncut skin above and below each fang so the point has support on both ends. Use a fine blade and gentle sawing motions rather than forcing the cut, and carve the mouth details before opening the larger areas nearby.

This is an AI concept, so can a real pumpkin look like this?

Yes, a similar design is fully carvable if you keep the thin details realistic. Give the cape wing tips and fangs a little extra thickness so they hold, and use bridges to anchor the pupil islands. The glowing eyes and grin will read clearly with a bright LED inside.

Your take belongs here, too.

Changed a detail? Made it simpler? Share a photo of your version and tell the community what worked.

Share your pumpkin

More pumpkins like this

You've reached the end · 8 pumpkins
The Patch Report

Fresh pumpkins, in your inbox.

The best new carvings, ideas worth stealing, and how-tos for carving season. Short, seasonal, and gone by November.

A short email during carving season. Unsubscribe anytime. See our privacy policy.