Halloween Pumpkin Carving Contest · Starts October 1st · $500 in prizes
← Back to ideas
@ai_concepts
Aug 5, 2026
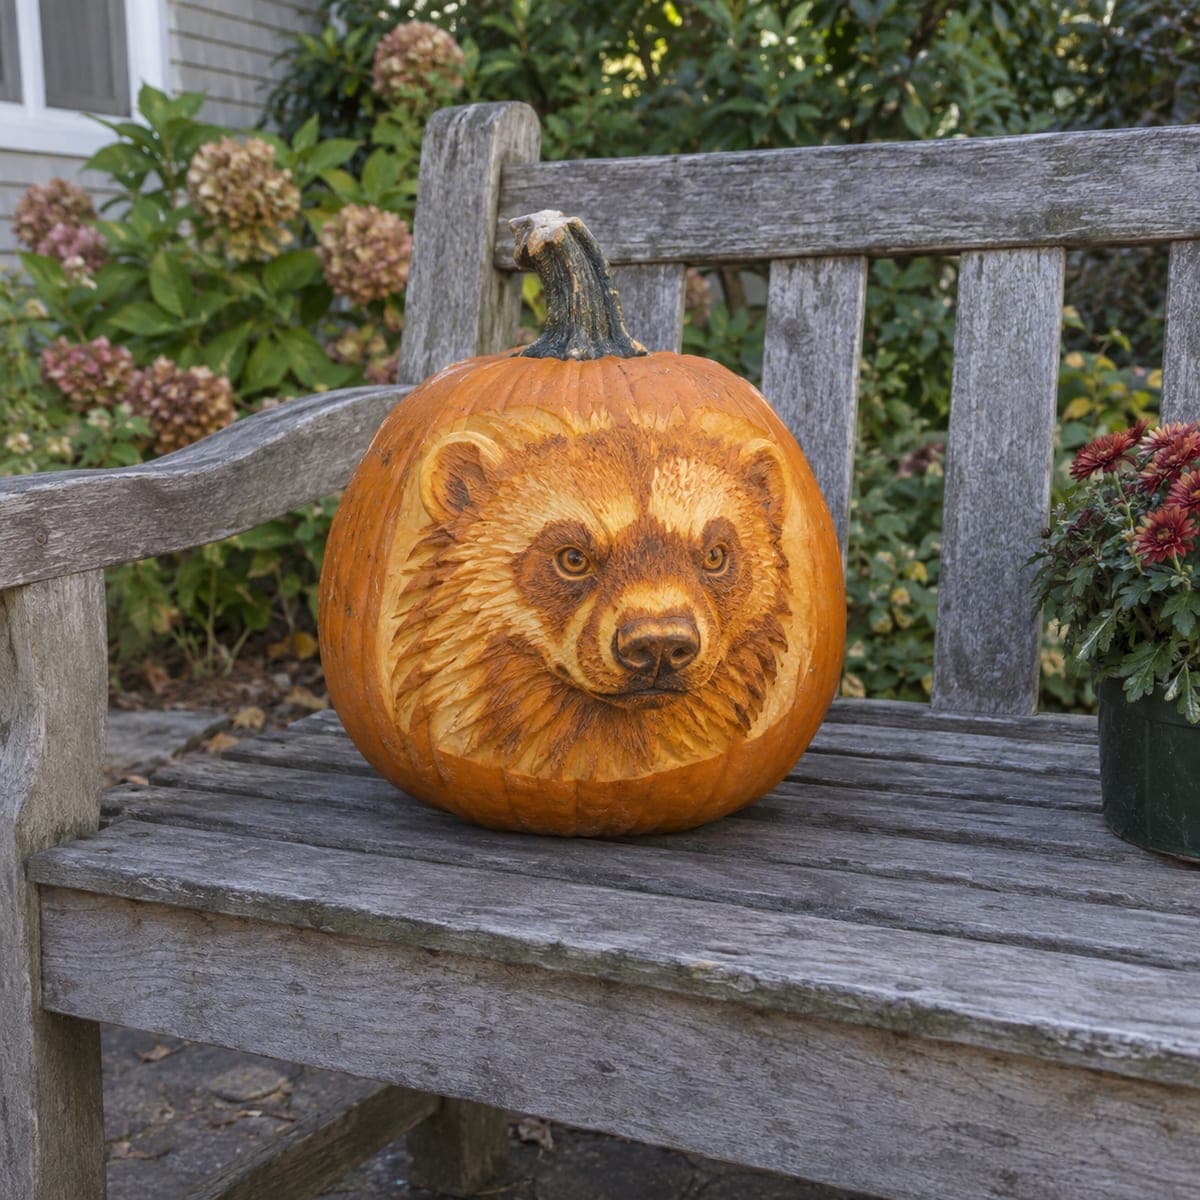
Wolverine Portrait Shaded Pumpkin CarvingAI
0

Wolverine Portrait Shaded Pumpkin Carving

A wolverine's intense, broad face stares out from this pumpkin, its thick fur and distinctive facial markings recreated with deep surface etching that looks almost painted in daylight. Varying depths of skin removal create the tonal range from the dark fur around the eyes to the lighter cheek bands, producing a compelling portrait without any cutout piercing. Reference a clear photo of a wolverine for the markings, then transfer the outline with a stylus before peeling. Display on a garden bench or porch railing in natural light for the best effect.

This is an AI-generated concept image: a realistic, carvable design idea rather than a photo of a finished carve. AI concepts are always labeled and sit out the leaderboard and the contest.

No ratings yet · Sign in to rate
Comments (0)

  • No comments yet — be the first.

Save without an account. Sign in to like or comment.

Our tips for carving a similar design

This is a shaded portrait that lives entirely on the pumpkin's surface, with no light punched through at all. The trick is controlling how deep you scrape: leave skin dark for the eyes and fur shadows, peel gently for mid tones on the cheeks and muzzle, and shave nearly to the flesh for the bright highlights. Because it is an AI concept, treat it as a target to work toward and let your own reference photo guide the markings.

Written by PumpkinCarvingIdeas.com, inspired by the image above. These are our suggestions, not instructions from the uploader. This approach to the AI concept has not been tested on a real pumpkin.

From pumpkin to porch

  1. Prep and transfer the face

    Pick a large, round pumpkin with a smooth, blemish free front so the shading reads cleanly. Wipe the surface dry, then tape your wolverine reference and outline over the front. Use a stylus or pushpin to trace the main shapes: the eye mask, muzzle, ear placement, and the outer edge of the fur. Keep the design centered and slightly above the middle so it sits at eye level on a bench.

  2. Map your value zones

    Before removing anything, lightly mark which areas stay dark, which get a light peel, and which go bright. The rings around the eyes, the nostrils, and the deep fur shadows are your darkest zones, so leave that skin fully intact. Sketch soft borders between zones so the tones blend rather than jump. Working out the map now saves you from over cutting later, since you cannot put skin back.

  3. Peel the mid tones

    Using a ribbon or loop tool, scrape away just the outer orange skin on the cheek bands and forehead to expose the pale flesh underneath. Keep these passes shallow and even for a soft, glowing tan. Vary your pressure slightly to suggest fur clumps rather than flat patches. Step back often in good light to check that the face is reading as a face.

  4. Carve the bright highlights

    For the lightest areas, the muzzle bridge, the top of the nose, and the brightest fur tufts, shave deeper so more light passes through the thinned wall. Do not cut all the way through; this design has zero pierced openings. Pull your strokes in the direction the fur grows to give the coat a natural flow. These deeper spots will look almost white next to the untouched dark zones.

  5. Detail the eyes and fur texture

    The eyes carry the whole portrait, so work them carefully with a small V gouge, keeping the darkest skin for the pupils and the ring of fur around each socket. Add short, tapered scrape lines radiating outward to build the thick fur texture across the face and ruff. Clean up any ragged edges with a fine detail knife. Take your time here, since crisp eyes are what make the animal feel alive.

  6. Preserve and light it

    Coat all the exposed and peeled areas with a thin layer of petroleum jelly or a spray preservative to slow drying and browning. Set a warm white LED puck or string inside; skip candles, since the thin shaded areas can scorch and the glow is too uneven. Because the piece relies on daylight to show the etched tones, display it on a shaded bench or porch during the day and let the LED add a soft interior warmth at dusk. Snap your photos in soft natural light for the best contrast.

Gather your supplies

Check things off as you get ready.

Work on a stable surface, keep your free hand out of the cutting path, and have an adult handle sharp tools.

Three levels of light

  • Leave intact

    Untouched dark skin for the eye rings, nostrils, and the deep fur shadows around the face.

  • Peel & shade

    Lightly scraped cheek bands, forehead, and outer ruff for a soft mid-tone glow.

  • Cut through

    No full cutouts; the brightest muzzle and fur highlights are just thinned deeper, never pierced.

Learn the carving basics

Before you start cutting

Should any part of this be cut all the way through?

No. This portrait is built entirely with surface shading, so light comes from thinning the wall, not piercing it. Cutting through would break the painted look and weaken the face. Keep even your brightest highlights as thinned skin only.

How do I keep the tones from all blending into mush?

Plan your value map before you scrape and commit to clear borders between dark, mid, and bright zones. Work from lightest peel to deepest last, checking in good light after each pass. Leaving crisp untouched skin next to a deep highlight is what creates the contrast that makes the face pop.

Since this is a concept image, will a real pumpkin look the same?

A real carve will read best in daylight, just as the concept suggests, because shading depends on how light grazes the surface. Expect softer, warmer tones than a rendered image, and use a live reference photo to guide realistic markings. The LED inside adds gentle evening warmth but the true detail shows in natural light.

Your take belongs here, too.

Changed a detail? Made it simpler? Share a photo of your version and tell the community what worked.

Share your pumpkin

More pumpkins like this

You've reached the end · 8 pumpkins
The Patch Report

Fresh pumpkins, in your inbox.

The best new carvings, ideas worth stealing, and how-tos for carving season. Short, seasonal, and gone by November.

A short email during carving season. Unsubscribe anytime. See our privacy policy.