Halloween Pumpkin Carving Contest · Starts October 1st · $500 in prizes
← Back to ideas
@ai_concepts
Sep 14, 2026
Zombies Lettering With Reaching Hands PumpkinAI
0

Zombies Lettering With Reaching Hands Pumpkin

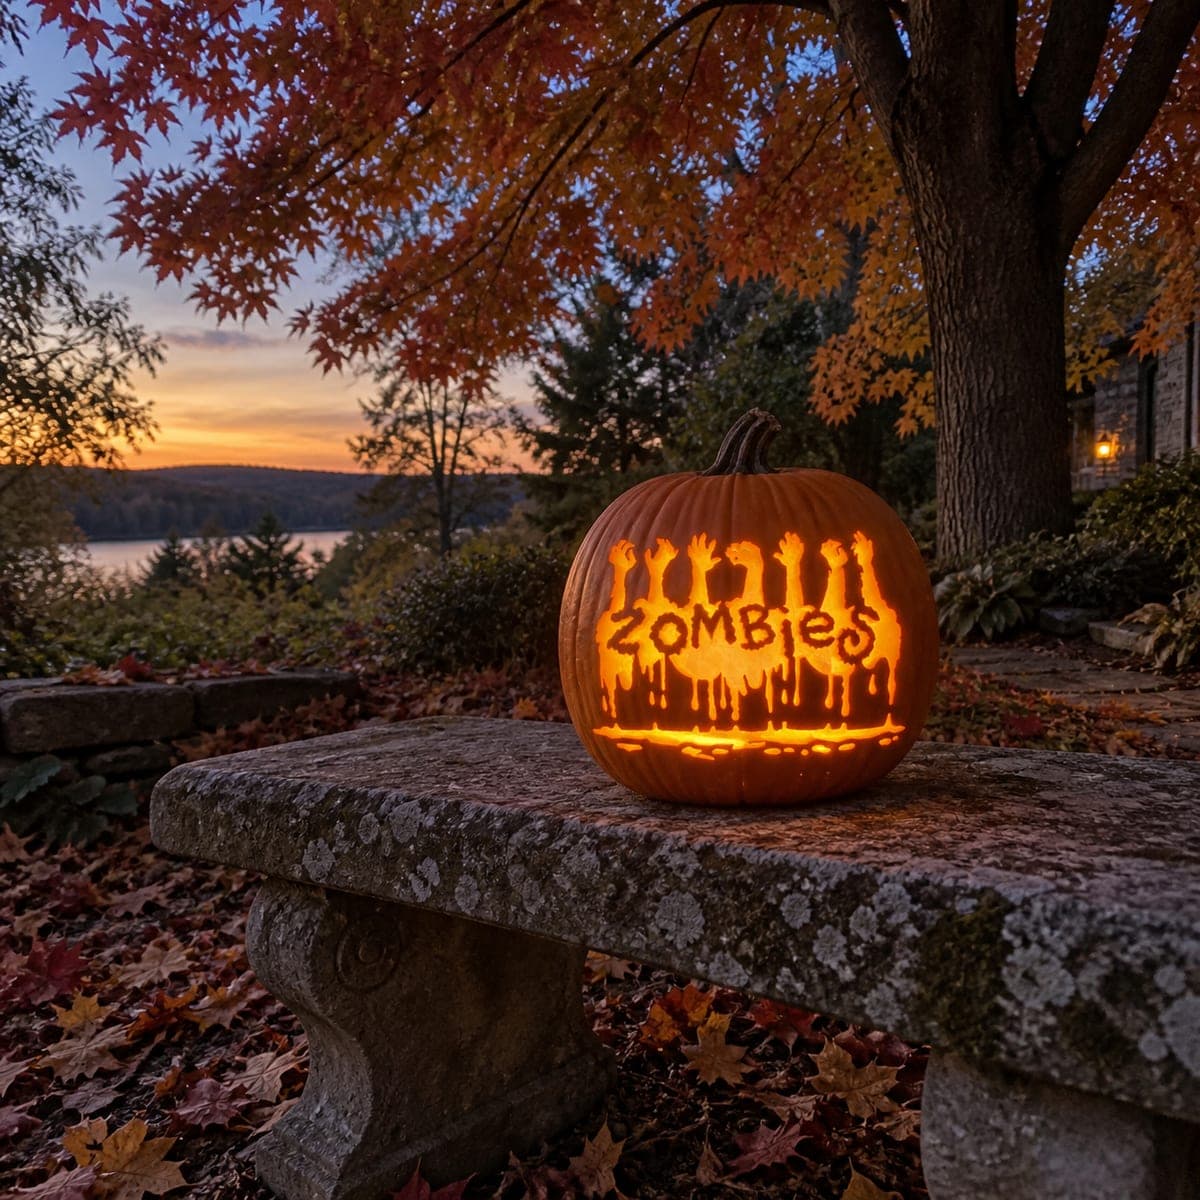
Bold block letters spelling ZOMBIES glow across the center, with a row of upright grasping hands rising from the top edge of the letters and ground-drip shapes descending from the bottom, photographed at an autumn lakeside sunset. All the letter interiors, the hand shapes, and the drip openings are cut through in this words-and-figure cutout pumpkin carving idea. Cut the enclosed letter counters, like the inside of the letter B, before removing the letter outlines, and leave a small bridge at the top of each counter so the interior piece stays in place until you are ready to pop it out.

This is an AI-generated concept image: a realistic, carvable design idea rather than a photo of a finished carve. AI concepts are always labeled and sit out the leaderboard and the contest.
No ratings yet · Sign in to rate

Comments (0)

  • No comments yet — be the first.

Save without an account. Sign in to like or comment.

Our tips for carving a similar design

This design is really one main trick, clean lettering, dressed up with a horde of grasping hand silhouettes above and dripping shapes below. Since a concept like this could be carved from a real pumpkin, treat the letters as full cutouts and let the counters inside letters like O and B stay bridged until the very end. The hands and drips read as shapes against the glow, so plan the spacing before any blade touches skin.

Written by PumpkinCarvingIdeas.com, inspired by the image above. These are our suggestions, not instructions from the uploader. This approach to the AI concept has not been tested on a real pumpkin.

From pumpkin to porch

  1. Pick a tall pumpkin and map the layout

    Choose a large, evenly round pumpkin with a smooth flat face wide enough to hold seven letters in a row. Sketch or tape your stencil in three bands: a top band for the reaching hands, a wide center band for ZOMBIES, and a lower band for the drips. Step back and check that everything sits level and centered before you commit. A little planning here saves crowded, crooked letters later.

  2. Open the pumpkin and thin the wall

    Have an adult cut a lid or, better, a wide hole in the bottom so the pumpkin sits flat on the bench. Scoop out the seeds and pulp, then scrape the inside of the carving face down to about one inch thick. A thinner wall makes the letters and hand shapes much easier to cut cleanly and lets more light through. Keep the shell even so nothing collapses under all those openings.

  3. Cut the letter counters first

    Start with the enclosed centers, the inside of the O and the two loops of the B. Cut each counter and leave a small bridge of skin at the top so the little interior piece stays put until you are ready. Cutting these before the letter outlines keeps the face stable while you work. Do not pop the pieces out yet.

  4. Cut the letter outlines and hand shapes

    Now carve around each full letter with a fine saw blade, working slowly on tight curves like the S and the O. Move up to the hands, cutting each finger as a solid shape and leaving thin skin bridges between crowded fingers so nothing snaps off. Keep your non-cutting hand clear of the blade path at all times. Save the widest openings for a bit later so the shell keeps its strength.

  5. Add the drips and free the bridged pieces

    Carve the ground-drip shapes below the letters last among the cuts, since they are the largest openings and weaken the base. Once everything is cut, gently push out the letter counters you left bridged earlier. Clean up ragged edges with a small detail blade for crisp lines. Work from the center outward so the face stays supported as long as possible.

  6. Light it and photograph at dusk

    Drop in a battery LED light, ideally a warm flickering one, never a candle near all these thin edges. Set the pumpkin outdoors at sunset so the sky glow frames the design like the lakeside scene. If any letter looks dim, scrape a little more from the inside wall behind it. Take your photos in the blue hour when the carved letters read brightest.

Gather your supplies

Check things off as you get ready.

Work on a stable surface, keep your free hand out of the cutting path, and have an adult handle sharp tools.

Three levels of light

  • Leave intact

    The uncarved orange face around and between the shapes stays dark and holds the whole scene together.

  • Peel & shade

    Shallow-peel the drip tips and a faint ground line if you want a soft dim glow fading below the letters.

  • Cut through

    Cut fully through the letter interiors, the reaching hand shapes, and the main drip openings for the brightest light.

Learn the carving basics

Before you start cutting

How do I keep the letters from breaking while I carve?

Cut the enclosed counters like the inside of the O and B first, leaving a small skin bridge at the top of each so the piece stays in place. Then carve the outer letter shapes. Do the biggest drip openings last so the face stays strong the whole time.

Will the thin fingers on the hands snap off?

They can if you cut them too skinny, so keep each finger a bit chunkier than it looks in the sketch. Leave thin bridges of skin between crowded fingers where you can. Thinning the wall to about an inch also lets you cut cleaner without forcing the blade.

How do I keep seven letters readable and evenly spaced?

Tape your stencil down and lightly poke the outline before cutting so you can adjust spacing first. Work on the flattest part of the pumpkin, since curved shoulders distort letters. Step back often to check the word still reads ZOMBIES from a few feet away.

Your take belongs here, too.

Changed a detail? Made it simpler? Share a photo of your version and tell the community what worked.

Share your pumpkin

More pumpkins like this

You've reached the end · 8 pumpkins
The Patch Report

Fresh pumpkins, in your inbox.

The best new carvings, ideas worth stealing, and how-tos for carving season. Short, seasonal, and gone by November.

A short email during carving season. Unsubscribe anytime. See our privacy policy.