Similar to This
View all stencils →About this stencil
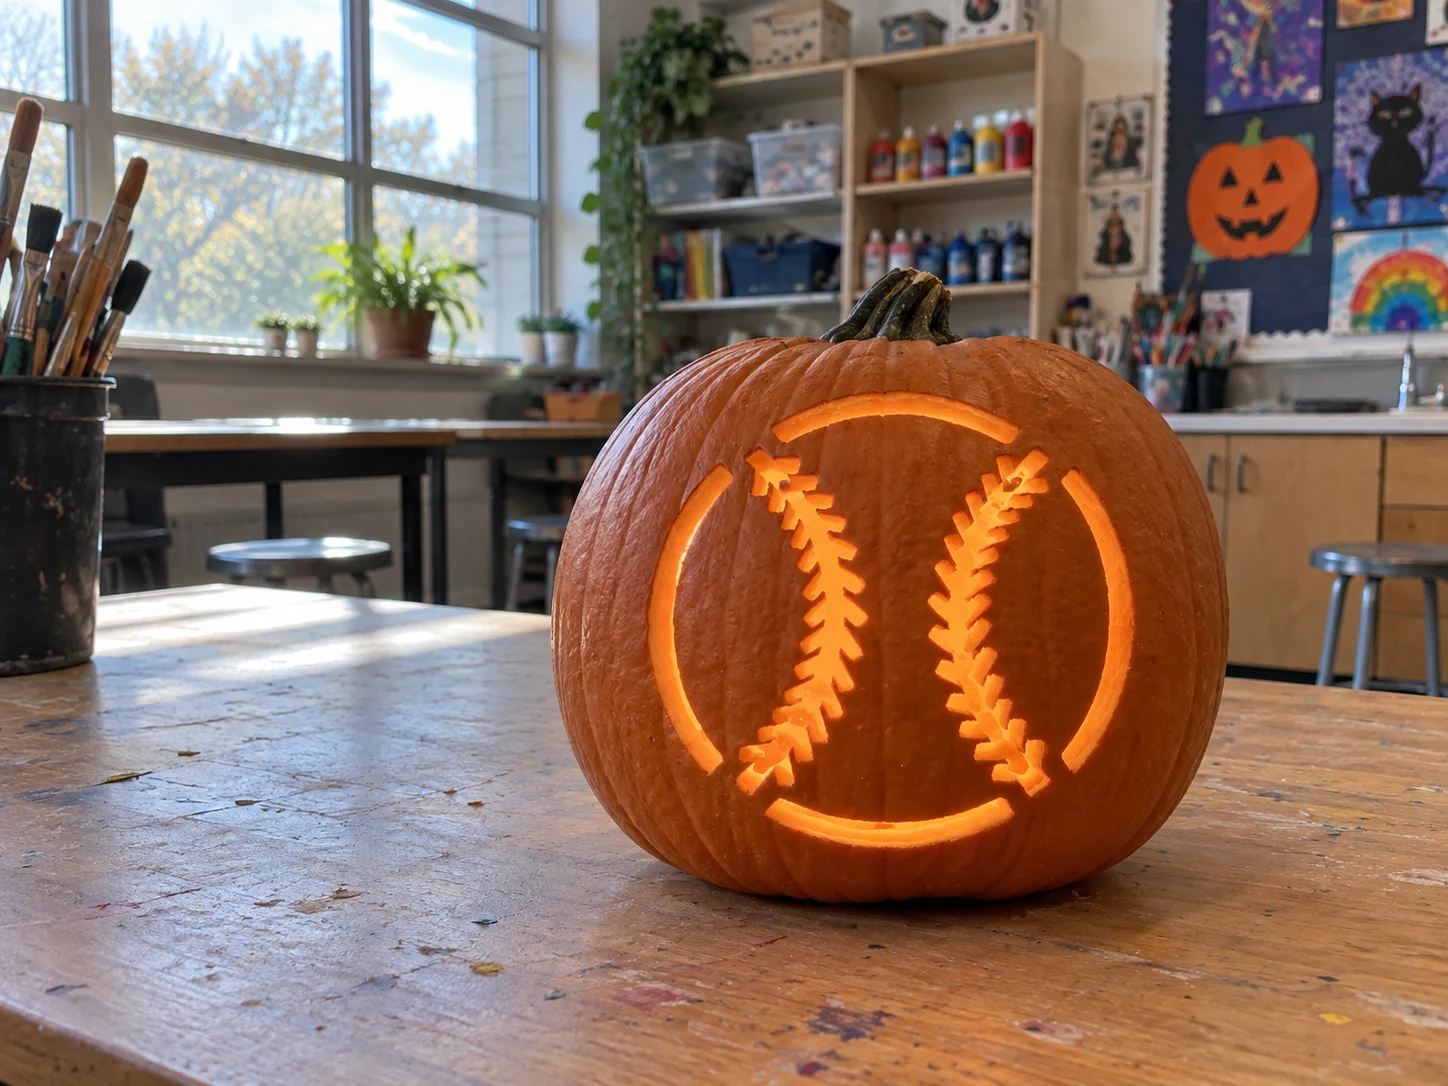
A full-face baseball pumpkin stencil showing the ball's circular outline split into four arc segments, with two curved seam lines running down the center packed with small chevron stitching details. The large pierced sections glow brilliantly when lit, while the narrow seam bridges stay solid to keep the stitching legible. Carve the four outer arc segments first to stabilize the pumpkin wall before tackling the delicate stitching chevrons at the center. This design is rated Advanced and takes most carvers around 150 minutes from trace to glow. Multi-layer cuts with skin-peel shading. Plan your cuts first.
Pumpkin size guide
- 🎃 Small (5–7") — print at 80%
- 🎃 Medium (7–10") — print at 100% (recommended)
- 🎃 Large (11–13") — print at 130%
- 🎃 Giant (14"+) — print at 150% on tabloid paper
Frequently asked questions
Can I resize this stencil?▾
Yes. The PDF is vector so it scales cleanly. Print at 100% for a 7–10 inch pumpkin, 130% for 11–13 inch, or 150% for a giant. Use your printer's "Fit to page" or "Custom scale" setting.
What kind of paper works best?▾
Standard 20 lb letter or A4 printer paper is fine. Heavier paper is harder to bend around the pumpkin curve. If your printer supports it, set the quality to 'best' so the lines are crisp.
How long will the carved pumpkin last?▾
Usually 5–10 days. Coat all cut surfaces with petroleum jelly and store the pumpkin somewhere cool overnight. Avoid direct sun. Battery tea lights produce no heat and double the lifespan.
Can I sell pumpkins carved with this stencil?▾
Yes, the carved pumpkin you make is yours. The license covers personal and small-scale commercial carving (selling carved pumpkins, photographing them, posting on social). You may not resell the PDF file itself.
What if my printer doesn't print the whole stencil?▾
Set 'Page scaling' to 'Fit' in the print dialog and uncheck 'Auto-rotate'. If it still cuts off, the design includes 0.25" of safe-area margin so a small crop won't ruin it.
How to carve this stencil
- Print and tape the stencil to a prepped pumpkin, lining up the ball's circular border with the widest part of the face.
- Pierce-transfer all outlines, then remove the paper.
- Cut the four large outer arc segments first, these are your biggest openings and removing them early relieves wall tension.
- Move inward to the two seam lines, cutting each C-shaped chevron tooth individually from the top of the seam downward.
- Leave the thin bridges between chevron teeth intact; they hold the seam pattern together and read as stitching when lit.
- Light with a small LED puck placed low inside so the seam chevrons cast clean shadows against the glowing arcs.
Tools you'll need
For a advanced carve like this you'll want a linoleum cutter set, x-acto knife, peel tool, and pin transfer wheel. Here's the kit we reach for — start with whatever you already own.

Elmchee Pumpkin Carving Kit
13-piece kit with carrying case
Saws for the larger cutouts, plus a scoop for hollowing. Covers both jobs in one kit.
View on Amazon ↗
Speedball 4131 Lino Cutter Set
Handle + 5 interchangeable cutters
Interchangeable cutters for peeling and shading the face. Useful for the finer details.
View on Amazon ↗
Homemory LED Tea Lights
24-pack of battery-operated lights
Battery-operated, flickering lights for a candle-like glow inside your finished pumpkin.
View on Amazon ↗
Community Pumpkin Carving Ideas
Carving ideas that use stencils like this one.
Related stencils
Carvers who liked this one also downloaded these.
- Beginner-friendly
Volleyball Pumpkin Stencil
A volleyball fills this easy pumpkin stencil from edge to edge, its circular outline and internal panel lines rendered in the classic three-curved-line pattern that divides the ball into panels. The wide panel sections are cut away, leaving the curved dividing strips as solid pumpkin flesh that forms the seam lines. When lit, the jack-o-lantern glows through the large open panels while the seam lines stay dark. Score along each curved seam line with a detail tool before cutting to keep the thin curved strips from tearing under the blade.
- Expert / Pro
Soccer Player Pumpkin Stencil
A chibi-style bearded soccer player in a striped jersey stands with a ball tucked under one arm and his other hand on his hip in this expert sports pumpkin stencil, with a detailed face, layered hair, jersey stripes, and individual fingers all rendered in fine linework. When lit, the figure glows in silhouette with the face and jersey detail visible as pumpkin-skin relief. Start with the most detailed facial features, particularly the brow, ear, and beard cuts, before working downward through the jersey stripes and ball pentagon pattern.
- Advanced
Soccer Ball Pumpkin Stencil
A soccer ball rendered as a flat stencil pattern takes up the full face of this pumpkin carving design, with a central pentagon surrounded by curved hexagonal panels that radiate outward to the edges. The pentagon and several panel sections are cut through, while the curved connecting lines between panels remain as solid orange bridges, recreating the look of a classic black-and-white ball when lit. Carve the central pentagon first, then cut each surrounding hexagonal section in a clockwise order to keep even tension on the skin bridges.
- Beginner-friendly
Football Pumpkin Stencil
An American football seen at a slight angle fills this pumpkin stencil, showing the oval ball body with a central lace strip of intersecting horizontal and vertical bars, plus two pointed corner panels at upper left and lower right that indicate the ball's tips extending beyond the oval. The entire ball outline, including the lace grid, is a single large pierced-through area that blazes with light against the solid pumpkin skin. Keep the lace crossbar strips intact while carving the surrounding oval by making your entry cuts along the ball's outer edge rather than through the lace bars.
- Advanced
Football Helmet Pumpkin Stencil
A football helmet in profile occupies this sports pumpkin stencil, showing the rounded shell, a single face mask with crossbar guards, a chinstrap ball, and a curved bill visor. The large dome of the helmet is a solid pumpkin-skin mass; the face mask bars, voids between them, and the outer rim are all cut through. Carve the small rectangular gaps inside the face mask cage first, while the wall is fully rigid, then cut the large surrounding negative space around the helmet outline.
- Advanced
Golf Cart Pumpkin Stencil
A golf cart seen from the side dominates this sports pumpkin stencil, showing a round-headed driver at the wheel, a bag of clubs clipped to the back, a flat roof canopy overhead, and two large circular wheels below. The cart body is a single large pierced-through shape, while the roof bar, wheel wells, and club bag read as distinct solid bridges that light outlines when the jack-o-lantern is lit. Start by cutting the two big wheel openings at the bottom so the lower wall is relieved before you work upward toward the narrower details around the driver's head.