Halloween Pumpkin Carving Contest · Starts October 1st · $500 in prizes
← Back to ideas
@ai_concepts
Sep 25, 2026
Bare Branch Spooky Tree Silhouette PumpkinAI
0

Report this carving

Tell us what is wrong. Reports are private.

Bare Branch Spooky Tree Silhouette Pumpkin

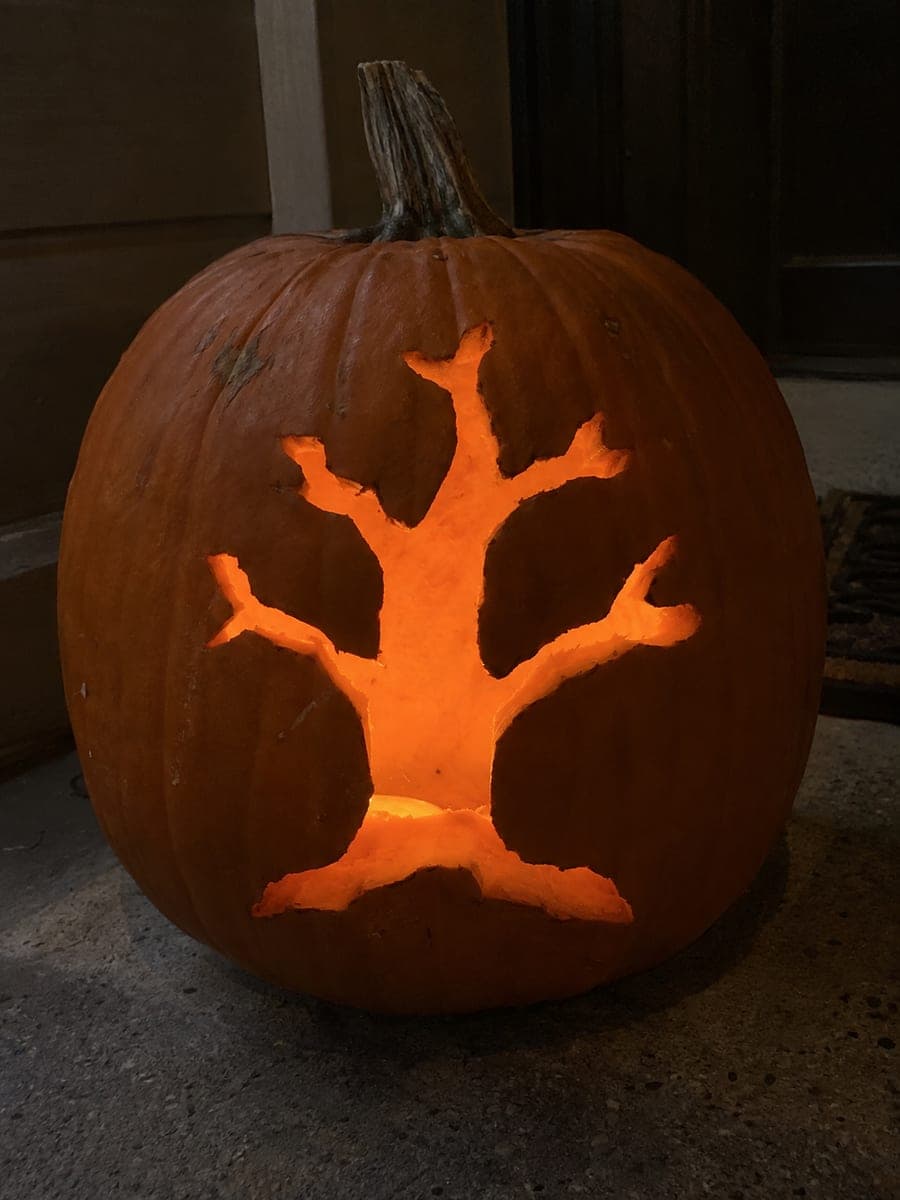
A glowing bare tree with chunky branches fills this silhouette pumpkin, casting dramatic light on a concrete doorstep. Trace the outline onto your pumpkin, then cut the entire tree shape as one open aperture with no interior islands to preserve. Chunky branches are the key: keep them wide so the cutout holds its shape without snapping. A tea light set low inside intensifies the glow through the negative space.

No ratings yet · Sign in to rate

Comments (0)

  • No comments yet — be the first.

Save without an account. Sign in to like or comment.

Our tips for carving a similar design

The design consists of a single open tree silhouette cut as one large aperture: the entire negative space of branches and sky is removed, leaving only the pumpkin shell around the tree's perimeter. Because there are no interior islands to preserve, there is nothing to accidentally knock loose, making this forgiving for beginners. Chunky, wide branches are the key: they make the cut easier to execute and the finished silhouette more durable.

From pumpkin to porch

  1. Prep and gut the pumpkin

    Cut a wide bottom cap and scoop the interior to about an inch of wall thickness. Choose a pumpkin with a large, reasonably flat front face. Dry the surface before transferring the design.

  2. Transfer or sketch the tree outline

    Trace the tree shape onto the pumpkin with a marker, or tape a template and poke through. Make sure each branch is drawn at least half an inch wide, widening them beyond the reference image if needed. Chunky branches are more important than a precise silhouette for a first carve.

  3. Pierce and cut the full tree aperture

    Start by piercing a small hole within the interior of the tree shape, then insert a detail saw and cut along the full outline in one continuous path. Work around curves slowly, rotating the pumpkin into the blade rather than bending the saw. The goal is one clean continuous cut enclosing the whole tree opening.

  4. Remove the tree piece and clean up

    Pop the large piece through to the inside and remove it. Use a linoleum U-tip to clean up any rough edges along the branch curves. Take your time on this step: cleaner branch edges make the silhouette look more intentional from a distance.

  5. Check the pumpkin and smooth the edges

    Press gently around the outer edge of the tree opening to confirm the surrounding shell is solid. Apply a thin layer of petroleum jelly along all cut edges to slow dehydration and extend the display life of the silhouette.

  6. Light and display

    Place a battery-operated tea light inside, positioned low and toward the back, so the glow fills the full tree opening evenly. Display on a step or railing where the silhouette reads at standing eye level or slightly below, with a dark background behind it.

Written with AI to match this design

Gather your supplies

Check things off as you get ready.

Work on a stable surface, keep your free hand out of the cutting path, and have an adult handle sharp tools.

Three levels of light

  • Leave intact

    All surrounding pumpkin rind outside the tree silhouette boundary

  • Peel & shade

    None, this silhouette design uses only through-cuts

  • Cut through

    The entire interior of the bare tree shape as one open aperture

Learn the carving basics

Before you start cutting

How wide should each branch be to stay intact all season?

Aim for at least half an inch on smaller branches and a full inch on main limbs. Thinner branches dry out and snap quickly once cut, especially in cold outdoor temperatures where the rind contracts slightly. It is better to simplify the branch structure to fewer, wider limbs than to try to replicate every detail of the reference image.

Can I add accent holes outside the main tree shape?

Yes. Small round punch holes scattered in the surrounding rind, like stars or falling leaves, add visual interest without much structural risk. Punch these last, after the main tree opening is complete, and keep each one at least three-quarters of an inch from its nearest neighbor.

What if the tree opening looks lopsided after cutting?

Use a linoleum tool to carefully trim one side of the silhouette to better match the other. Work in thin passes and step back regularly to check the overall shape from a distance, since small adjustments look different when the pumpkin is moved to its display position. You can always remove more rind but you cannot add it back.

Your take belongs here, too.

Changed a detail? Made it simpler? Share a photo of your version and tell the community what worked.

Share your pumpkin

More pumpkins like this

You've reached the end · 8 pumpkins
The Patch Report

Fresh pumpkins, in your inbox.

The best new carvings, ideas worth stealing, and how-tos for carving season. Short, seasonal, and gone by November.

A short email during carving season. Unsubscribe anytime. See our privacy policy.