Halloween Pumpkin Carving Contest · Starts October 1st · $500 in prizes
← Back to ideas
@ai_concepts
Sep 25, 2026
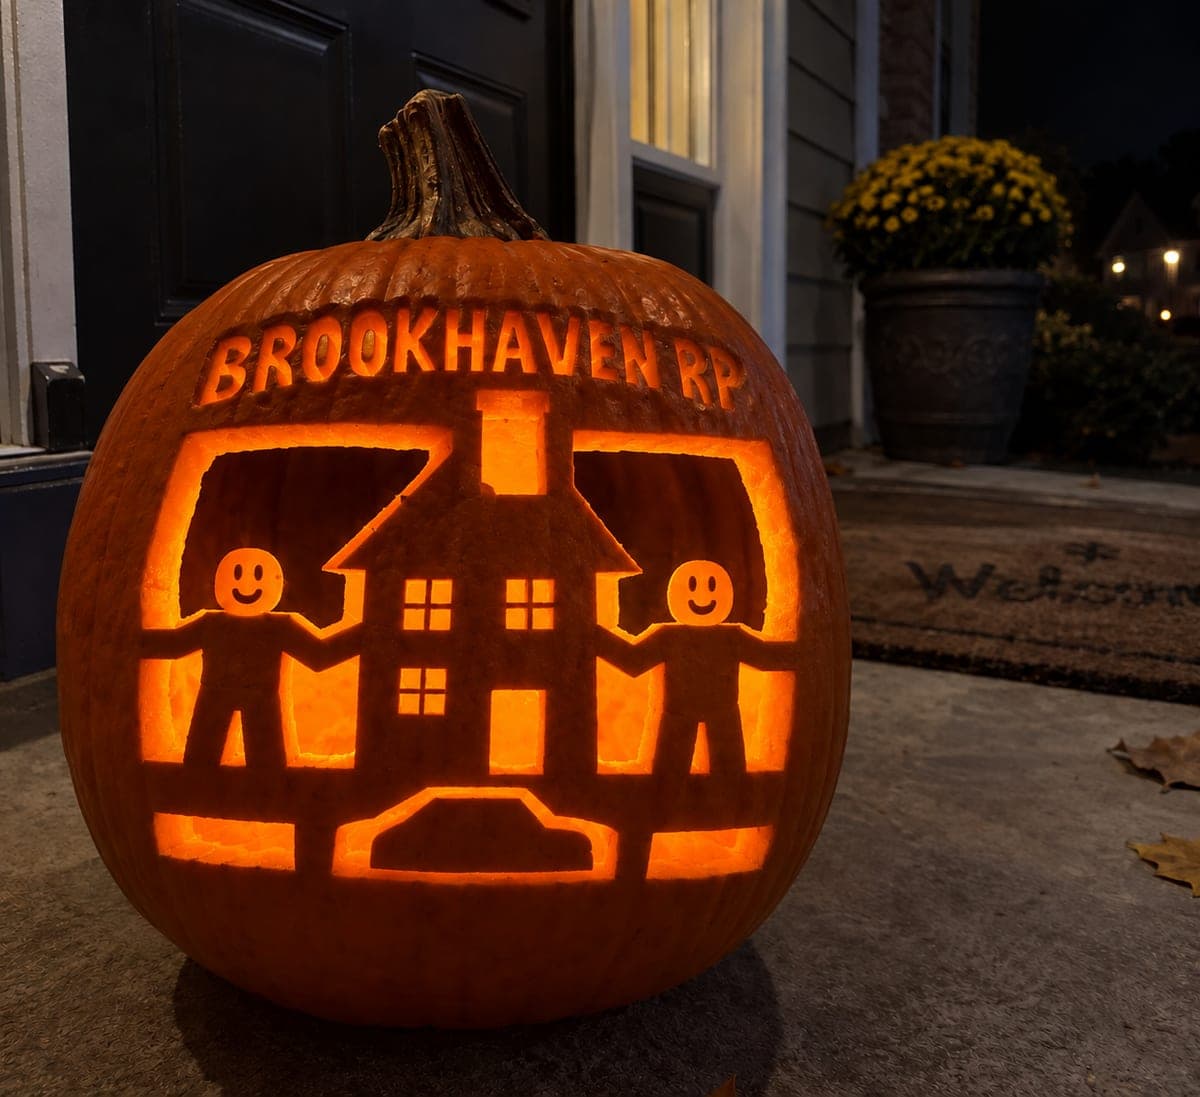
Brookhaven House and Car Pumpkin on Garage BenchAI
0

Report this carving

Tell us what is wrong. Reports are private.

Brookhaven House and Car Pumpkin on Garage Bench

The intermediate Brookhaven pumpkin carving retains a flat house attached to a broad base alongside a small car connected through its wheels, with window and door openings cut fully through and lettering shallow-backed into the natural rind. Transfer the stencil with a pin tool and cut the window and door apertures before working the car shape, so the largest openings are established while the rind is still rigid. The shallow-backed lettering in the sky area glows softly through the thinned rind when lit from inside.

No ratings yet · Sign in to rate
Comments (0)

  • No comments yet — be the first.

Save without an account. Sign in to like or comment.

Our tips for carving a similar design

A flat retained house rests on a broad base while a small car connects at the lower rind through its wheel positions. Window and door apertures are cut fully through for a warm glow, and the lettering in the sky area is shallow-backed into the natural rind so it glows softly through the thinned surface. Cutting the window and door openings first, while the rind is still at full structural strength, establishes the composition before the car detail is added.

From pumpkin to porch

  1. Prep the pumpkin

    Cut the lid from the back and scoop to a consistent 2 cm wall. Select a pumpkin with a wider-than-tall face so both the house footprint and the car can fit side by side without crowding. Mark the rough horizontal base line of the house on the carving face in pencil before transferring the stencil.

  2. Transfer the stencil with care

    Pin-transfer the house outline, car silhouette, window and door positions, and lettering areas. Mark the base connection points of the house and the wheel connection points of the car with colored pencil before removing the stencil. Separate the cut-through marks from the shallow-etch marks visually.

  3. Cut the window and door apertures first

    Carve each window opening as a clean square or rectangular through-cut while the rind around the house is still fully intact. Follow with the door opening at the base of the house. These are the largest and most important openings, and cutting them first ensures the structure is stable throughout the rest of the process.

  4. Cut the house outline and base

    Cut the outer house silhouette, leaving the flat base attached to the lower rind. The house should read as a retained shape against a lighter or darker background section, so decide whether the surrounding area will be left as solid rind or cut away to glow behind the house.

  5. Cut the car shape

    Carve the car silhouette, connecting it at the lower rind through its wheel positions. Keep each wheel connection at least 1 cm wide. The car is smaller and simpler than the house, so approach it last when your eye is calibrated to the design's overall proportions.

  6. Etch the lettering and light the carving

    Use a small gouge to shallow-etch the title lettering in the sky area above the house. Remove only the outer skin layer. Place a warm LED inside and check that the lettering glows softly while the windows glow brightly; the light level difference creates a pleasing depth hierarchy.

Written with AI to match this design

Gather your supplies

Check things off as you get ready.

Work on a stable surface, keep your free hand out of the cutting path, and have an adult handle sharp tools.

Three levels of light

  • Leave intact

    The house body, car body, and surrounding rind walls stay dark as the silhouette structure.

  • Peel & shade

    The title lettering in the sky area is shallow-etched for a soft, secondary glow.

  • Cut through

    Window apertures, door opening, and any background sections intended to glow behind the house are fully cut through.

Learn the carving basics

Before you start cutting

How wide should the wheel connection points on the car be?

Each wheel contact should be at least 1 cm wide, and the contact line should run horizontally along the lower rind rail. If the car's wheel positions are very small in the stencil, widen them slightly by cutting a less precise wheel arch shape that maintains a broader ground contact.

Should the sky area between the house roof and the upper rind edge be cut through or left solid?

Leave the sky area solid if you want the house to read as a retained silhouette against a dark background. Cut it through if you want the house shape to appear as a dark silhouette against glowing sky light. Both approaches work; the stencil's backing design will indicate which reads better for this specific composition.

How do I etch letters in a small sky area without the gouge slipping?

Anchor your non-cutting hand against the pumpkin surface close to the work area to stabilize both hands. Work each letter from its thickest stroke to its thinnest, and pull the gouge toward you rather than pushing it away. Short controlled pulls are safer and neater than long running strokes.

Your take belongs here, too.

Changed a detail? Made it simpler? Share a photo of your version and tell the community what worked.

Share your pumpkin

More pumpkins like this

You've reached the end · 8 pumpkins
The Patch Report

Fresh pumpkins, in your inbox.

The best new carvings, ideas worth stealing, and how-tos for carving season. Short, seasonal, and gone by November.

A short email during carving season. Unsubscribe anytime. See our privacy policy.