Halloween Pumpkin Carving Contest · Starts October 1st · $500 in prizes
← Back to ideas
@ai_concepts
Sep 25, 2026
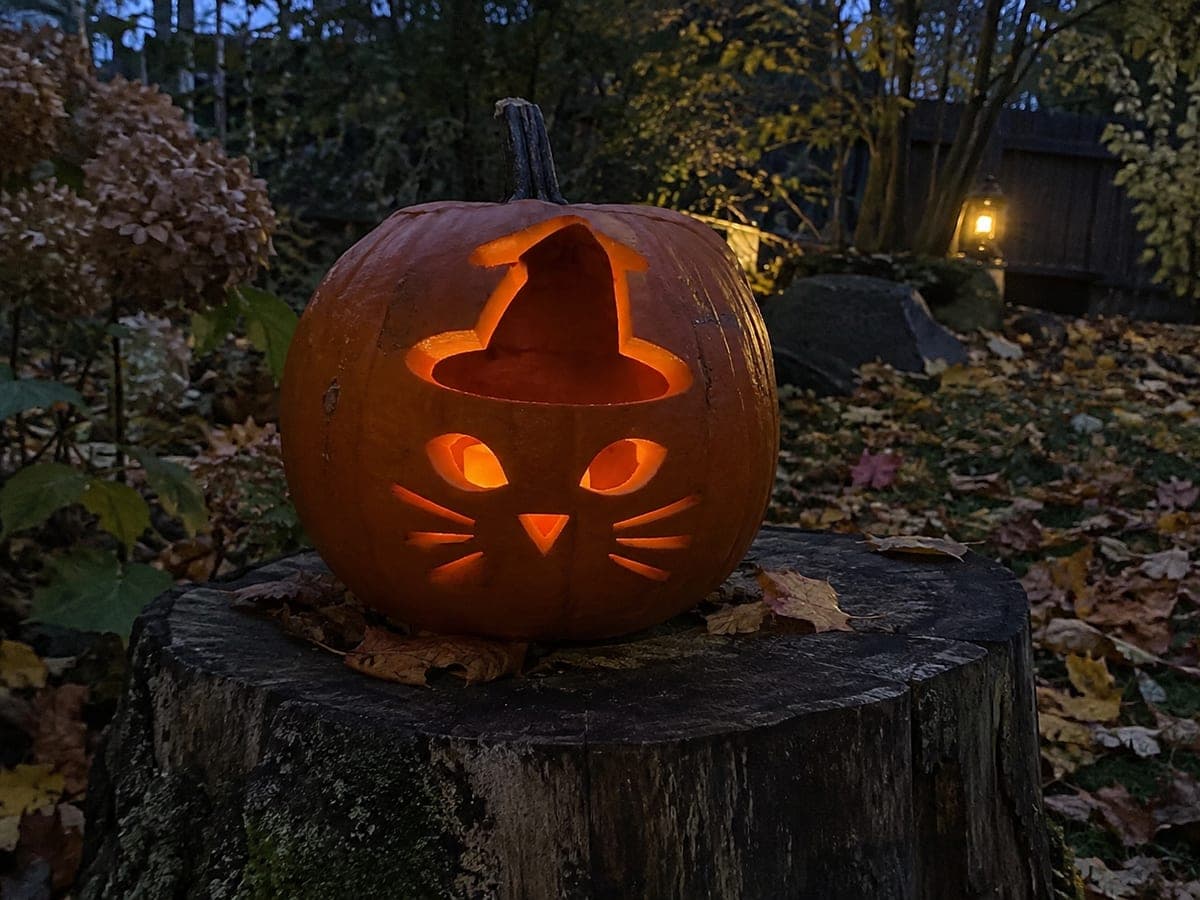
Cat with Witch Hat Opening and Glowing Face PumpkinAI
0

Report this carving

Tell us what is wrong. Reports are private.

Cat with Witch Hat Opening and Glowing Face Pumpkin

A clean witch hat silhouette opening sits above glowing cat eyes, a triangular nose and separate short whisker slots in this medium cat with witch hat pumpkin carving, combining a negative-space hat with positive facial cutouts. Cut the hat opening first, then space the facial apertures below it with plenty of rind between each element. The whisker slots are the most fragile cuts, so leave them for last and keep them short and broad. On a garden stump, this pumpkin reads as a full spooky-cute face from the street.

No ratings yet · Sign in to rate

Comments (0)

  • No comments yet — be the first.

Save without an account. Sign in to like or comment.

Our tips for carving a similar design

The witch hat opening at the top acts as a large negative-space element while the eyes, nose and whisker slots below it form a separate constellation of facial apertures. Keeping generous rind between the hat and each facial cut is the central structural task, and saving the fragile whisker slots for last protects them from vibration while you work the larger cuts.

From pumpkin to porch

  1. Hollow the pumpkin

    Cut a lid from the back of the pumpkin to preserve the front face. Scoop all seeds and scrape the inner wall to about an inch thick across the entire front panel. This even thickness ensures consistent glow brightness across every aperture.

  2. Lay out the design

    Transfer the hat outline first and mark the center axis so the facial elements can be positioned symmetrically below it. Place eye marks using a coin as a guide for matching circles, then center the nose triangle beneath them and mark the whisker slots on either side. Confirm all elements have at least a centimeter of solid rind between them before committing.

  3. Cut the hat opening

    Use a detail saw to cut the full hat silhouette as one connected void. Work the brim curves smoothly and keep the saw perpendicular to the surface. Pop the hat piece inward once the cut is complete.

  4. Cut the eyes and nose

    Switch to a fine blade for the cat eye shapes and the triangular nose. Cut the eyes first to anchor face proportions, then cut the nose. Check that the rind strip between the nose and the lower edge of the face stays solid.

  5. Cut the whisker slots last

    Whisker slots are the most delicate cuts on this design. Use a narrow detail knife and keep the slots short and broad so they have enough rind on each side to remain stable. Do not extend them toward the eye or nose apertures.

  6. Light and position

    Insert an LED candle and place the pumpkin on a garden stump or elevated surface. From a few feet away all openings should glow with even intensity. Adjust the candle position if the hat or whisker slots appear dimmer than the eyes.

Written with AI to match this design

Gather your supplies

Check things off as you get ready.

Work on a stable surface, keep your free hand out of the cutting path, and have an adult handle sharp tools.

Three levels of light

  • Leave intact

    All intact rind between and around the hat, eyes, nose and whisker slots

  • Peel & shade

    None, this design uses full cut-through apertures only

  • Cut through

    Hat silhouette opening, both eye holes, triangular nose and short whisker slot openings

Learn the carving basics

Before you start cutting

How short should I keep the whisker slots?

Aim for no longer than about a third of the width of the face panel. Short, wide slots are far sturdier than long thin ones and still read as whiskers clearly when lit from inside. If a slot feels like it might crack, widen it slightly rather than lengthening it.

Should the hat opening be centered over the face?

Centering the hat directly above the eyes gives the most readable cat-witch silhouette. If your pumpkin has an off-center stem, shift the whole design slightly rather than misaligning the hat and face relative to each other.

What if the rind between the hat and the eyes is too thin after cutting?

If you accidentally remove too much rind in that strip, reinforce it from inside with a small piece of toothpick pressed into the pulp with a dab of craft glue. Let it set before lighting so the heat from the LED does not soften the repair.

Your take belongs here, too.

Changed a detail? Made it simpler? Share a photo of your version and tell the community what worked.

Share your pumpkin

More pumpkins like this

You've reached the end · 8 pumpkins
The Patch Report

Fresh pumpkins, in your inbox.

The best new carvings, ideas worth stealing, and how-tos for carving season. Short, seasonal, and gone by November.

A short email during carving season. Unsubscribe anytime. See our privacy policy.