Halloween Pumpkin Carving Contest Β· Starts October 1st Β· $500 in prizes
← Back to ideas
@ai_concepts
Sep 25, 2026
Painted Black Cat Witch Hat Pumpkin with Mauve HatAI
0

Report this carving

Tell us what is wrong. Reports are private.

Painted Black Cat Witch Hat Pumpkin with Mauve Hat

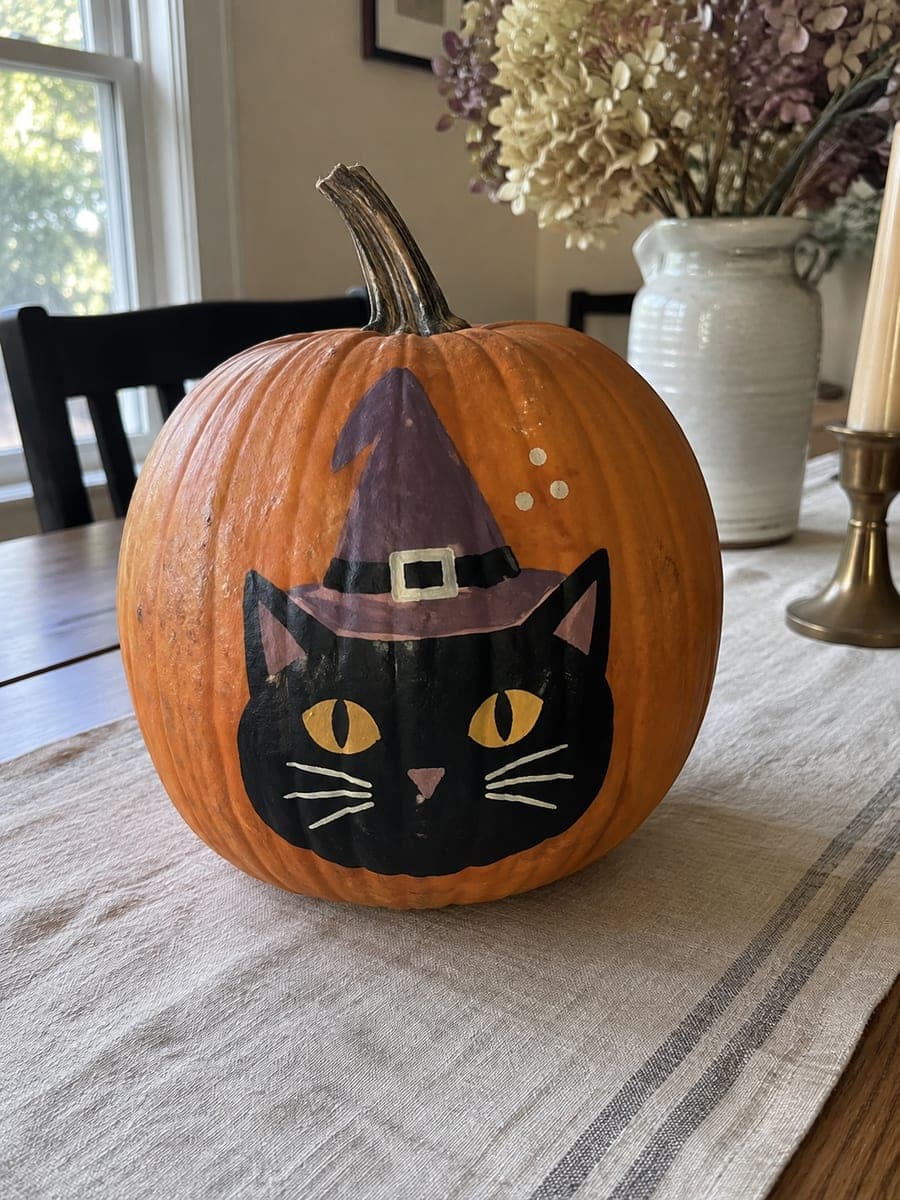
A black cat head with mustard eyes, cream whiskers and a mauve triangular witch hat complete with a black band and a cream square buckle are painted in flat acrylic on an intact pumpkin in this easy no-carve cat with witch hat pumpkin carving idea. Lay down the black head shape first, then the mauve hat over it once dry, adding the black band and cream buckle last for a clean layered look. Three small cream dots scattered around the face add charm without complicating the design.

No ratings yet Β· Sign in to rate

Comments (0)

  • No comments yet β€” be the first.

Save without an account. Sign in to like or comment.

Our tips for carving a similar design

The design layers flat acrylic shapes in a specific order: the black head base goes on first, then the mauve hat on top of it once dry, and the black band and cream buckle finish the stack. This layering sequence is the whole trick, and three small cream accent dots scattered around the face add charm without requiring any special painting skill.

From pumpkin to porch

  1. Clean and dry the pumpkin

    Wipe the entire pumpkin surface with a damp cloth and let it air dry completely. Acrylic paint adheres better to a clean, dry rind. If the surface feels waxy, a very light scuff with fine sandpaper helps the first coat grip.

  2. Sketch the layout

    Use a white chalk pencil or light gray marker to sketch the cat head shape and the triangular hat above it directly on the pumpkin. The cat head should sit in the lower two-thirds of the face and the hat should rise from it naturally. Keep the proportions generous so the shapes read clearly from a few feet away.

  3. Paint the black cat head

    Apply two coats of flat black acrylic to fill the cat head shape, letting the first coat dry completely before adding the second. Use a medium flat brush for the body and a fine round brush for the ear tips and cheek curves. Keep the edges crisp.

  4. Add the mauve hat once dry

    Once the black head is fully dry, paint the triangular witch hat in mauve using a flat brush. The hat overlaps the top of the head slightly, so the black underneath acts as a natural dark outline. Let this layer dry before adding the band.

  5. Paint the hat band, buckle and face details

    Add the black hat band as a horizontal stripe across the lower hat. Paint the cream square buckle centered on the band using a fine round brush. Add the mustard eye shapes and cream whisker lines last, along with the three small cream accent dots scattered naturally around the face.

  6. Seal and display

    Once all paint is fully dry, apply one coat of clear matte acrylic varnish to protect the design from humidity and handling. Display on a dining table, windowsill or shelf. Indirect natural light or a soft lamp from the side shows the flat shapes at their best.

Written with AI to match this design

Gather your supplies

Check things off as you get ready.

Work on a stable surface, keep your free hand out of the cutting path, and have an adult handle sharp tools.

Three levels of light

  • Leave intact

    The bare orange rind areas surrounding and between the painted shapes

  • Peel & shade

    None, the shell is left fully intact throughout

  • Cut through

    None; use an exterior spotlight or a table lamp positioned to the side for display lighting

Learn the carving basics

Before you start cutting

How do I keep the buckle from looking smudgy over the black band?

Let the black band layer dry for at least 20 minutes before painting the cream buckle over it. Use a small flat or filbert brush loaded with undiluted cream paint and apply in a single confident stroke rather than dabbing back and forth.

Can I use craft store paint or do I need artist-quality acrylics?

Basic craft store acrylics in flat or matte finish work well for this design. Avoid high-gloss formulas, which tend to streak on curved pumpkin surfaces. Multi-surface or outdoor-rated craft paint is a good choice if the pumpkin will be displayed outside.

How long will the painted pumpkin last compared to a carved one?

An uncut pumpkin typically lasts two to three times longer than a carved one because the rind stays sealed and resistant to rot. Sealed with a clear varnish coat, a painted pumpkin can look good for three to four weeks in cool dry conditions.

Your take belongs here, too.

Changed a detail? Made it simpler? Share a photo of your version and tell the community what worked.

Share your pumpkin

More pumpkins like this

You've reached the end Β· 8 pumpkins
The Patch Report

Fresh pumpkins, in your inbox.

The best new carvings, ideas worth stealing, and how-tos for carving season. Short, seasonal, and gone by November.

A short email during carving season. Unsubscribe anytime. See our privacy policy.