Halloween Pumpkin Carving Contest · Starts October 1st · $500 in prizes
← Back to ideas
@ai_concepts
Jul 20, 2026
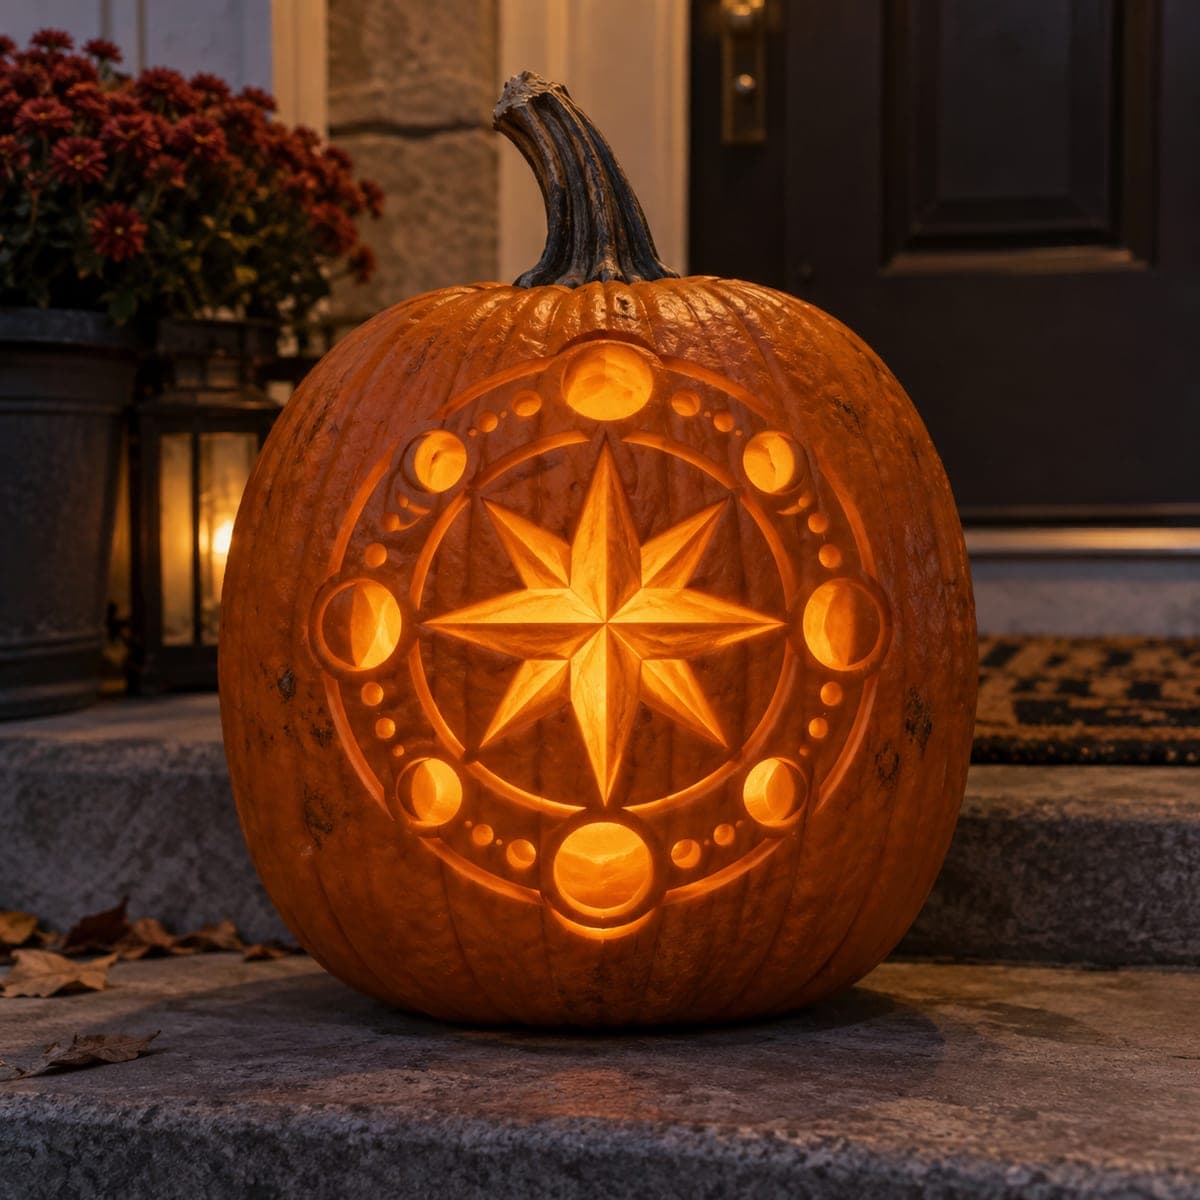
Celestial Compass Star Pumpkin With Moon PhasesAI
0

Celestial Compass Star Pumpkin With Moon Phases

An eight-pointed compass star radiates from the heart of this pumpkin, ringed by pierced dots and moon-phase circles that blaze when the candle goes in. The star itself is beveled relief carving, with each facet angled so half of every point catches more light. Use a compass and pins to lay out the rings before cutting anything, drill the small dots with a power carver or apple corer, and shape the star facets last.

This is an AI-generated concept image: a realistic, carvable design idea rather than a photo of a finished carve. AI concepts are always labeled and sit out the leaderboard and the contest.

No ratings yet · Sign in to rate
Comments (0)

  • No comments yet — be the first.

Save without an account. Sign in to like or comment.

Our tips for carving a similar design

The core trick here is beveled relief on the central eight-point star, where each facet is angled so half of every point catches more light than the other. Everything is built around concentric rings, so the whole plan starts with an accurate compass layout, then works from shallow shading in the middle out to pierced dots and moon circles near the edge. Save the deepest cuts for last so the wall stays strong while you shape the delicate facets.

Written by PumpkinCarvingIdeas.com, inspired by the image above. These are our suggestions, not instructions from the uploader. This approach to the AI concept has not been tested on a real pumpkin.

From pumpkin to porch

  1. Pick a wall and map your rings

    Choose a tall pumpkin with a broad, fairly flat front face. Cut a lid from the bottom or the back so the front stays uninterrupted, then scrape the inside wall down to about one inch thick where the design will sit. Use a compass and a few push pins to draw two clean concentric rings, then mark the eight star points and the ring of moon-phase circles. Getting the layout exact now saves you from crooked facets later.

  2. Transfer and score the outlines

    Tape your printed pattern over the mapped area and poke through all the key lines with a pin, spacing dots close together on the curves. Peel the paper and connect the dots lightly with a fine tip so you can see the star, the rings, and each circle. Go over the star point edges once more with a scoring tool so you have a firm guide for beveling. Do not remove any material yet.

  3. Bevel the star facets

    This is the shading step that gives the star its glow. With a small detail gouge or a V-tool, shave the surface skin off each facet at a shallow angle, cutting deeper toward the center and feathering out toward the tips. Keep one side of every point angled steeper than the other so it reads as light and shadow. Work slowly and check the depth often, since a beveled facet only needs the skin and a thin layer of flesh removed, not a full cut through.

  4. Peel the ring channels

    Skin-peel the two circular bands that frame the star so they glow a soft mid orange. Remove just the outer skin and a shallow layer, keeping the walls even so the rings read as clean bright circles. This dim glow separates the star from the pierced dots and keeps the whole design from looking like one bright blob. Take your time keeping the curves smooth.

  5. Drill the dots and shape the moon phases

    Now make the full cutouts that will blaze brightest. Use a power carver bit or a small apple corer to bore the ring of little round dots cleanly through the wall. For the moon-phase circles, cut the full moons all the way through and carve the crescents by cutting through only the lit portion while peeling the rest, so each moon shows a different phase. Cut these openings last so the surrounding wall stays firm while you drill.

  6. Light it and photograph

    Drop in a battery LED, ideally one with a warm flicker, since an open flame is unsafe near thin relief work. Set the brightness so the pierced dots and moons pop while the beveled star still shows its soft facet shading. Photograph at dusk on a step or porch so the surrounding light is low but the pumpkin is not lost in black. A slightly off-center angle shows the depth of the star relief better than a straight-on shot.

Gather your supplies

Check things off as you get ready.

Work on a stable surface, keep your free hand out of the cutting path, and have an adult handle sharp tools.

Three levels of light

  • Leave intact

    The untouched outer skin of the pumpkin and the background field around the design stays dark

  • Peel & shade

    The two circular ring channels and the beveled star facets are skin-peeled for a soft mid orange glow and shading

  • Cut through

    The ring of small drilled dots and the full moon-phase circles are cut through for the brightest light

Learn the carving basics

Before you start cutting

How do I keep the eight star points even?

Lay them out with a compass and mark the eight points at equal angles before cutting anything. Draw the full star lightly first and stand back to check symmetry. If one point looks off, adjust it on paper, because it is much harder to fix once you start beveling.

How deep should the beveled facets be?

Only remove the skin and a thin layer of flesh, usually about an eighth of an inch. The goal is angled surfaces that catch light differently, not holes. Cutting too deep will punch through the wall and turn a soft shaded facet into a bright cutout, which breaks the effect.

What is the best way to make clean round dots?

A power carver with a round bit gives the most consistent circles, but a small apple corer twisted straight in also works well. Support the wall from behind with your free hand as you push through. Keep the dots evenly spaced by marking each center with your compass first.

Your take belongs here, too.

Changed a detail? Made it simpler? Share a photo of your version and tell the community what worked.

Share your pumpkin

More pumpkins like this

You've reached the end · 8 pumpkins
The Patch Report

Fresh pumpkins, in your inbox.

The best new carvings, ideas worth stealing, and how-tos for carving season. Short, seasonal, and gone by November.

A short email during carving season. Unsubscribe anytime. See our privacy policy.