Halloween Pumpkin Carving Contest Β· Starts October 1st Β· $500 in prizes
← Back to ideas
@ai_concepts
Aug 18, 2026
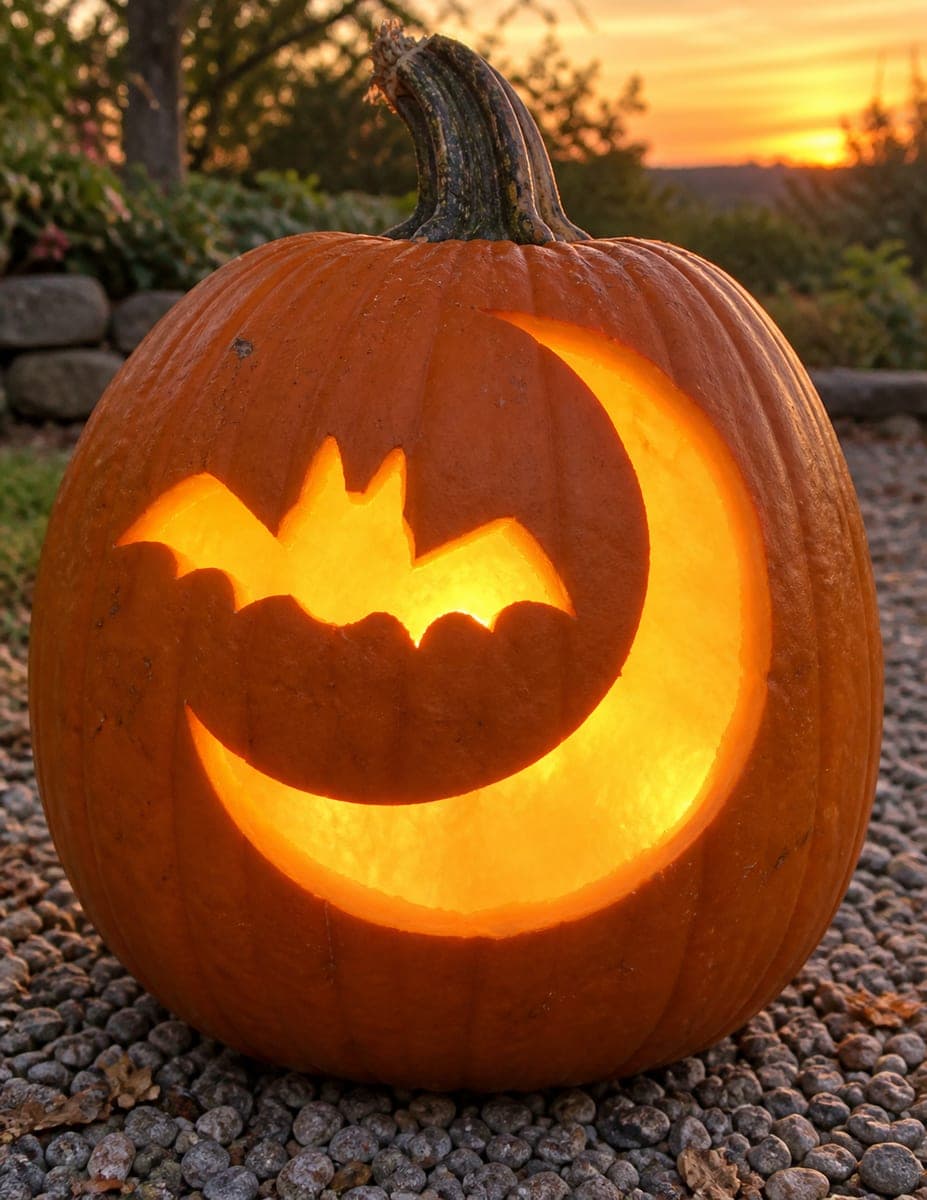
Crescent Moon and Bat Cutout Pumpkin CarvingAI
0

Crescent Moon and Bat Cutout Pumpkin Carving

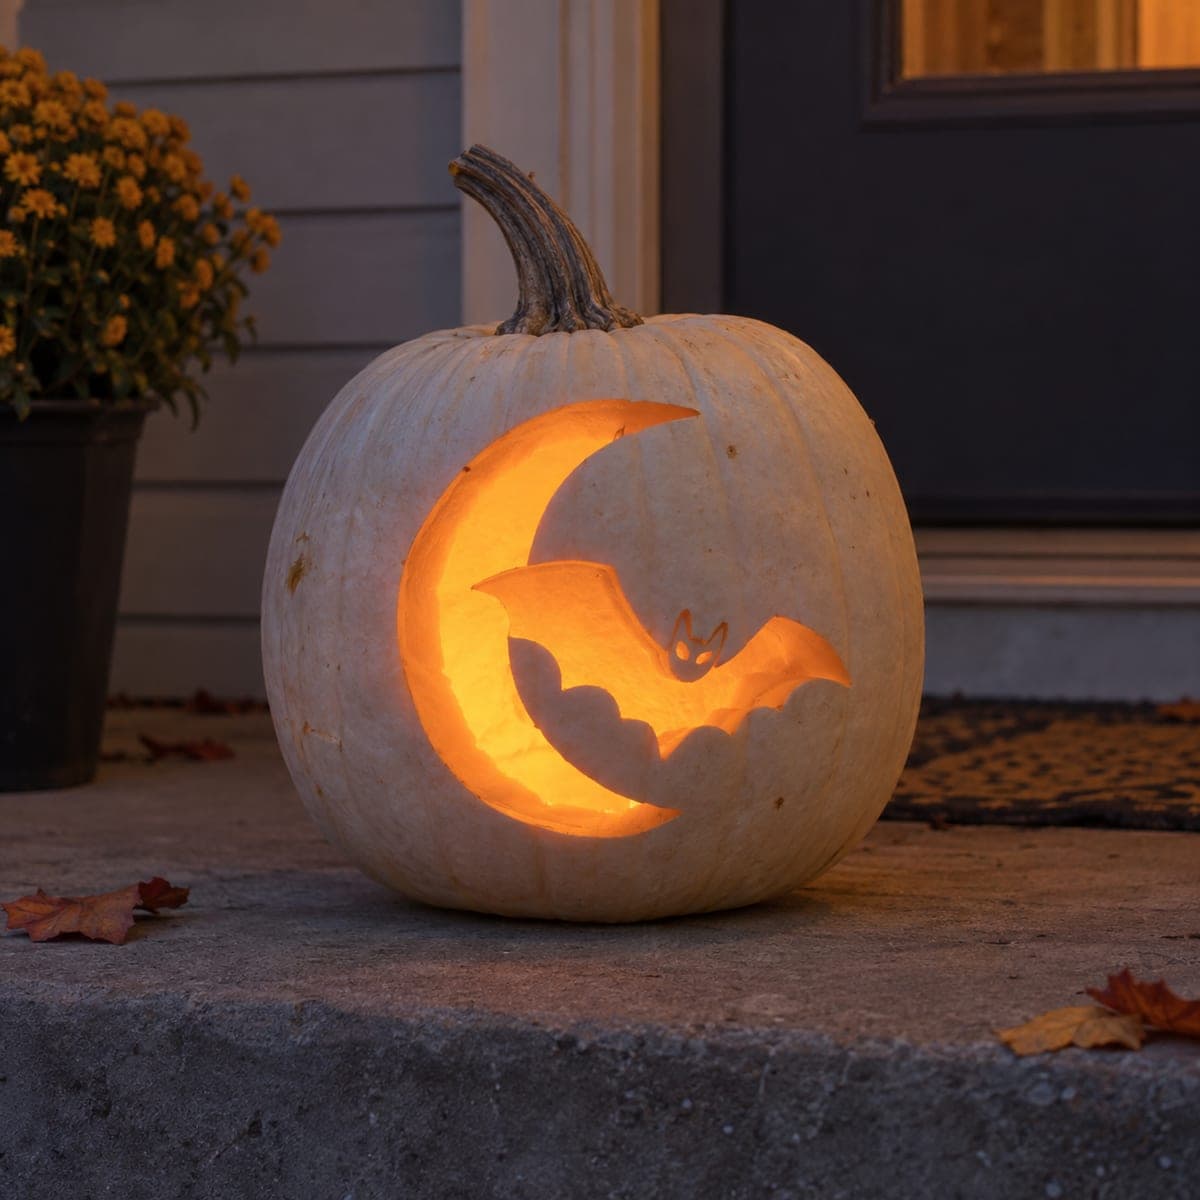
A large carved crescent moon cradles a bat in mid-flight, both shapes cut through the pumpkin wall so the inner glow outlines every wing detail against the orange surface. The bat is left as a silhouette within the moon cavity, connected by a thin bridge of pumpkin to prevent it from falling free. Start by cutting the moon arc first, then carefully remove the bat's negative space around the body while keeping the wing tips attached to the moon edges. This classic Halloween pumpkin carving design looks especially atmospheric on a kitchen table with an LED light inside.

This is an AI-generated concept image: a realistic, carvable design idea rather than a photo of a finished carve. AI concepts are always labeled and sit out the leaderboard and the contest.
No ratings yet Β· Sign in to rate

Comments (0)

  • No comments yet β€” be the first.

Save without an account. Sign in to like or comment.

Our tips for carving a similar design

The core trick here is contrast: a skin-peeled crescent moon glows soft orange while the bat stays as a darker silhouette resting inside it. You build the moon first as a shaded surface, then define the bat by peeling around it and adding thin cut lines to sharpen the wings. Because this is a concept image, treat it as a plan you could follow on a real pumpkin, keeping the bat attached to the moon edges so nothing drops free.

Written by PumpkinCarvingIdeas.com, inspired by the image above. These are our suggestions, not instructions from the uploader. This approach to the AI concept has not been tested on a real pumpkin.

From pumpkin to porch

  1. Prep and transfer the design

    Choose a large pumpkin with one broad, fairly flat face for the scene. Cut a lid from the bottom or back so the front stays unbroken, then scrape the inside wall down to about one inch on the design side. Tape your crescent and bat pattern flat and poke the outlines with a pin or transfer tool. Step back and check the bat sits fully inside the curve of the moon before you cut.

  2. Shade the crescent moon

    Use a ribbon or loop tool to peel away just the outer skin inside the crescent shape, leaving the pale flesh exposed. Keep the depth even so the glow reads as a smooth moon. Feather the inner edge of the crescent slightly so it looks rounded rather than stamped. Do not cut through the wall here; this layer should glow dim, not bright.

  3. Establish the bat silhouette

    Leave the bat body and the main span of its wings as untouched or only lightly scored skin so it stays dark against the moon. Peel the small gaps of moon showing between and around the wings to make the bat pop. Work slowly around the wing scallops with a small detail blade. Keep both wing tips connected to the moon edge so the bat is supported.

  4. Add the face and wing detail

    Score the bat's ears, eyes, and body ridge shallowly for definition without removing much material. For the tiny eyes you can make two small pokes that catch a hint of light. Keep the fang and ear points blunt and thick enough to survive handling. Save any true cut-throughs for the next step.

  5. Cut the accent openings last

    If you want extra brightness, cut a few narrow slots fully through the wall in the moon gaps around the wings, but leave generous bridges of pumpkin between them. Cut these openings last so the surrounding shaded areas stay strong while you work. Clear any loose bits from inside the shell. Test-fit an LED before you finish.

  6. Light it and photograph

    Drop a battery LED puck inside and set the pumpkin on a table in a dim room. The peeled moon should glow warm while the bat reads as a clean shadow. Rotate the light or add a second LED if one side looks dark. Coat cut edges with a little petroleum jelly to slow drying, then snap your photo while the flesh is fresh.

Gather your supplies

Check things off as you get ready.

Work on a stable surface, keep your free hand out of the cutting path, and have an adult handle sharp tools.

Three levels of light

  • Leave intact

    The bat body, wings, ears, and face stay as untouched skin so they read as a dark silhouette.

  • Peel & shade

    The crescent moon and the small gaps around the wings are skin-peeled for a soft dim orange glow.

  • Cut through

    A few narrow slots through the wall in the moon gaps, kept small with bridges, give the brightest accents.

Learn the carving basics

Before you start cutting

How do I keep the bat from falling out of the moon?

Leave the bat mostly as unshaded or lightly peeled skin rather than cutting it free, and keep both wing tips connected to the moon edge. If you add any cut-through slots for brightness, leave thick bridges of pumpkin between them. The bat should always stay anchored to the surrounding wall.

Should I cut all the way through or just peel the skin?

This design looks best as mostly a peeled, shaded moon with the bat left dark on top. Full cut-throughs are optional and should be small accents in the moon gaps. Peeling gives you a controlled glow and much stronger structure than cutting the whole moon open.

What light works best for this scene?

Use a battery LED puck or string, never a candle, since the peeled areas are thin and the enclosed shape traps heat. A warm white LED brings out the orange in the moon. Set it low and slightly behind the bat so the silhouette stays crisp.

Your take belongs here, too.

Changed a detail? Made it simpler? Share a photo of your version and tell the community what worked.

Share your pumpkin

More pumpkins like this

You've reached the end Β· 8 pumpkins
The Patch Report

Fresh pumpkins, in your inbox.

The best new carvings, ideas worth stealing, and how-tos for carving season. Short, seasonal, and gone by November.

A short email during carving season. Unsubscribe anytime. See our privacy policy.