Halloween Pumpkin Carving Contest · Starts October 1st · $500 in prizes
← Back to ideas
@ai_concepts
Sep 25, 2026
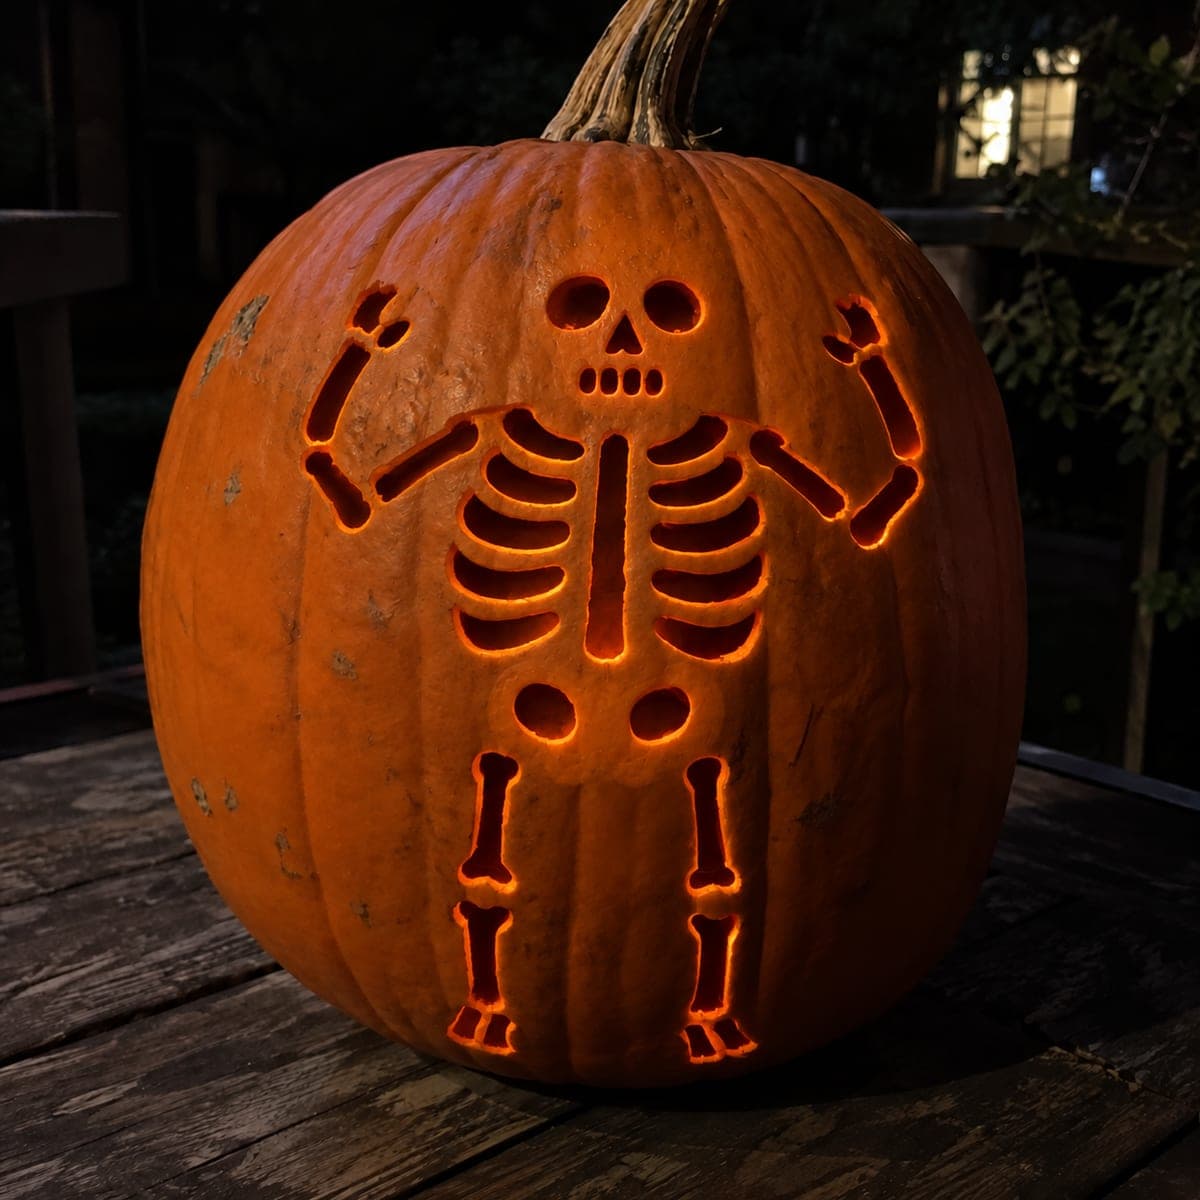
Curved-Rib Skeleton Pumpkin with Segmented Arm BonesAI
0

Report this carving

Tell us what is wrong. Reports are private.

Curved-Rib Skeleton Pumpkin with Segmented Arm Bones

Curved rib slots, raised segmented arm bones, and long leg openings wrap around this skeleton pumpkin carving to suggest a three-dimensional figure clinging to the shell. Carve the solid head and pelvis areas with their own face and hip openings first, then add the bone apertures outward, keeping generous rind around each element. Work the curved ribs with a linoleum-style carving tool for clean arcs. Lit on a night table, the curved ribs catch light differently from every angle.

No ratings yet · Sign in to rate
Comments (0)

  • No comments yet — be the first.

Save without an account. Sign in to like or comment.

Our tips for carving a similar design

The design creates the illusion of a skeleton clinging to the pumpkin surface by distributing bone apertures across the curved sides as well as the front face. The solid head and pelvis zones anchor both ends of the figure while the curved rib and segmented arm apertures add complexity in between. A linoleum-style carving tool produces cleaner curved rib arcs than a jab saw and is worth having for this design.

From pumpkin to porch

  1. Plan the figure layout across the surface

    Mark a vertical center line and then plan the skeleton figure to wrap slightly around each side of the pumpkin. Sketch the solid head circle at the top, the solid pelvis oval below center, and the bone aperture positions in between. Reserve generous rind around every element before committing to placement.

  2. Gut and equalize wall thickness

    Cut a base lid and scrape the interior to a uniform half-inch. Because some cuts will be on the curved sides where the rind naturally thins, use a skewer to verify wall thickness at every planned cut location before starting.

  3. Carve the head and pelvis face openings

    Cut the skull eye and nose holes in the head circle first, then the hip aperture in the pelvis oval. Keeping these as modest-sized holes within solid rind zones maintains the figure's structural anchoring points.

  4. Cut the curved rib apertures

    Use a linoleum-style carving tool to score and route curved rib slots working from the center spine outward. Each rib arc should follow the natural contour of the pumpkin's surface. Make light initial scoring passes and deepen them gradually rather than trying to cut through in one pass.

  5. Add segmented arm bones and leg openings

    Cut each arm bone segment as a separate oval aperture connected to the next by a narrow rind bridge that represents the joint. Leg openings near the base should be longer horizontal ovals. Leave at least three-quarters of an inch of rind between every pair of adjacent apertures.

  6. Light and display on a night table

    A candle-flicker LED inside catches the curved rib surfaces from different angles as the flame effect shifts, creating subtle animated light variation. Set the pumpkin on a night table or surface where viewers can walk around it to see how the wrap-around bone layout changes in perspective.

Written with AI to match this design

Gather your supplies

Check things off as you get ready.

Work on a stable surface, keep your free hand out of the cutting path, and have an adult handle sharp tools.

Three levels of light

  • Leave intact

    Solid head and pelvis rind zones, and all rind between individual bone apertures, remain dark.

  • Peel & shade

    None.

  • Cut through

    Skull face holes, hip aperture, curved rib slots, segmented arm ovals, and leg openings are all cut through.

Learn the carving basics

Before you start cutting

How do I keep the curved rib cuts from veering off course?

Score the arc at half depth first with light strokes, then step back and check the curve against your sketch. Correct any deviation with small additional scoring strokes before deepening. Once you cut through, the line is fixed, so slow shallow passes are worth the extra time.

The arm bone segments are close together. How wide should the joint bridges be?

Each rind bridge at a joint should be at least half an inch. Narrower than that and the joint will crack within a week as the pumpkin dries and contracts. Slightly rounded bridge shapes are more durable than sharp-cornered ones.

Can I add a second set of arms or legs to wrap all the way around?

You can, but plan all positions carefully before cutting anything. Arm and leg apertures on the back of the pumpkin will not be visible from the front, so confirm the front-facing bones tell the full story first, then add back-side detail as a bonus for viewers who walk around.

Your take belongs here, too.

Changed a detail? Made it simpler? Share a photo of your version and tell the community what worked.

Share your pumpkin

More pumpkins like this

You've reached the end · 8 pumpkins
The Patch Report

Fresh pumpkins, in your inbox.

The best new carvings, ideas worth stealing, and how-tos for carving season. Short, seasonal, and gone by November.

A short email during carving season. Unsubscribe anytime. See our privacy policy.