Halloween Pumpkin Carving Contest · Starts October 1st · $500 in prizes
← Back to ideas
@ai_concepts
Sep 25, 2026
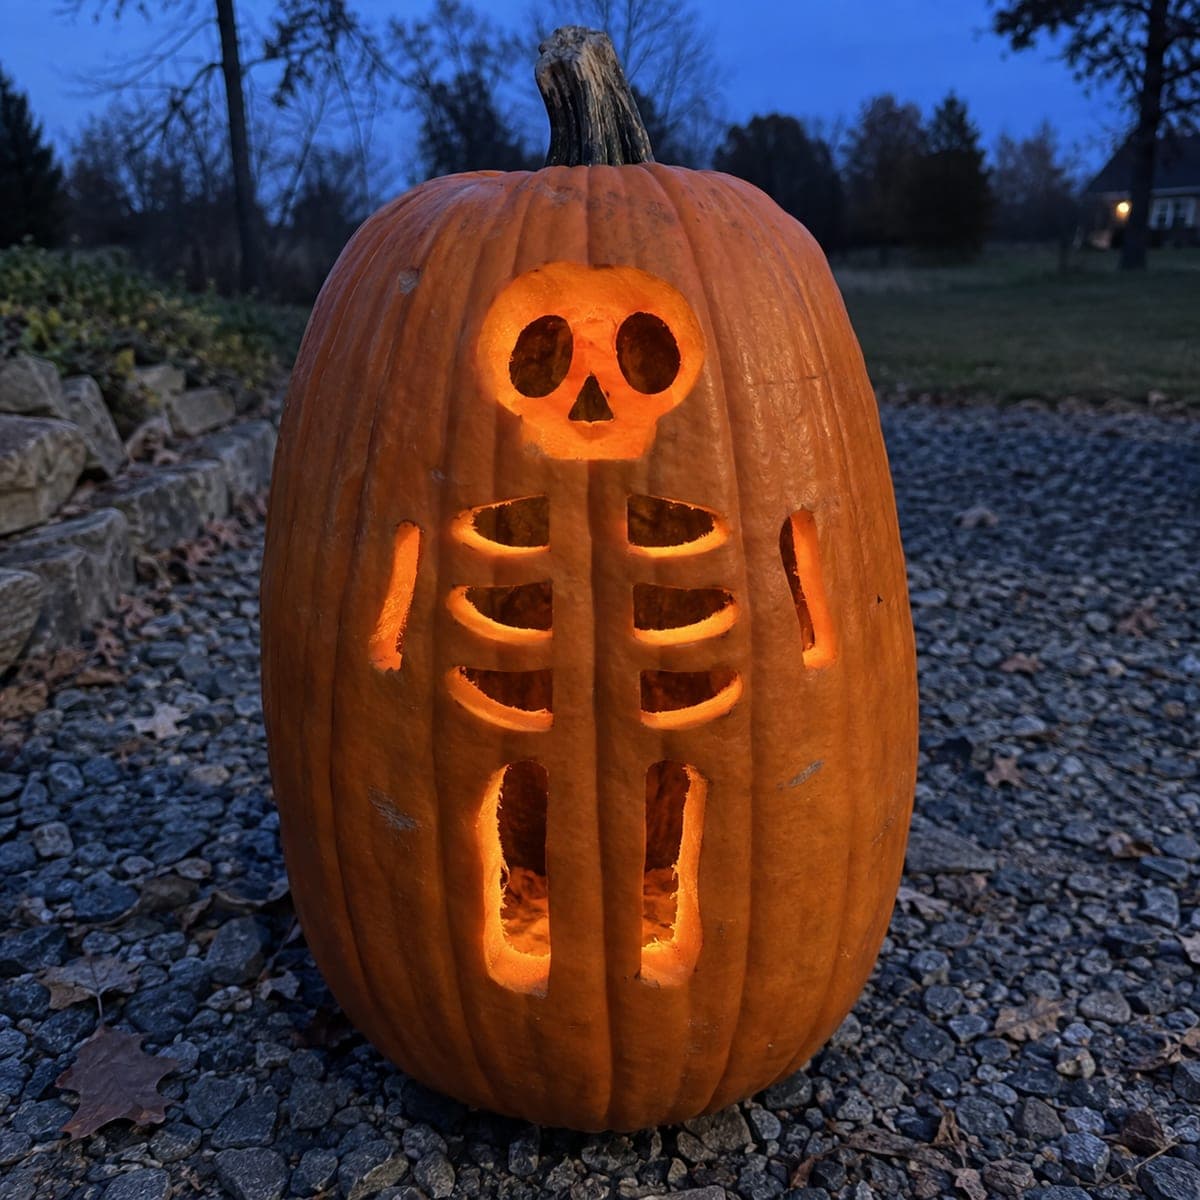
Full-Body Skeleton Pumpkin with Ribs and Limb BonesAI
0

Report this carving

Tell us what is wrong. Reports are private.

Full-Body Skeleton Pumpkin with Ribs and Limb Bones

This skeleton pumpkin carving idea stacks skull, ribcage, and limb-bone openings on a tall pumpkin for a full skeletal figure effect. A solid central spine strip runs between the rib apertures keeping the design stable, while separate eye and nose holes sit in a shallow-backed skull area above. Cut the ribs as independent slots working from the spine outward, and leave the limb bones for last since they sit near the pumpkin's edges. Placed beside a gravel path, the tall silhouette is visible from the street.

No ratings yet · Sign in to rate
Comments (0)

  • No comments yet — be the first.

Save without an account. Sign in to like or comment.

Our tips for carving a similar design

The trick is treating the pumpkin as a vertical canvas with distinct zones: skull above, ribcage in the middle, and limb bones near the bottom. A solid central spine strip running between the rib apertures acts as the structural backbone of the design. Cutting ribs as independent slots working outward from the spine strip keeps the midsection stable while the peripheral limb bones are added near the end.

From pumpkin to porch

  1. Choose and prep a tall pumpkin

    Select a pumpkin at least twelve inches tall for enough surface area to show skull, ribs, and limbs distinctly. Cut a base lid and scoop the walls to half an inch. Mark a vertical center line to guide symmetrical rib and limb placement.

  2. Divide the face into skeleton zones

    Using a wax marker, divide the carving face into three horizontal bands: top quarter for the skull face, middle half for the ribcage, bottom quarter for the limb bones. Mark the solid central spine strip running vertically through the ribcage band. Keep the spine at least an inch wide.

  3. Carve the skull face

    Cut small round eye sockets and a tiny nose hole in the skull zone. Keep them simple since the skull is small relative to the full-figure design. A narrow horizontal slit for the mouth completes the skull face without requiring complex tooth cuts.

  4. Cut the rib slots from spine outward

    Working from the spine center outward on each side, cut individual rib slot apertures as curved or angled narrow ovals. Carve left and right ribs at the same level together before moving up or down to the next pair. Confirm the spine strip remains solidly attached at both top and bottom after each pair.

  5. Add limb bone openings near the edges

    The limb bone shapes sit near the pumpkin's curved side edges, where rind is naturally thicker. Cut elongated ovals or dumbbell shapes for upper and lower limb segments, leaving rind between each segment. Joints between limb bones can be suggested by a narrow pinch point in the opening shape.

  6. Light and display beside a path

    Place a tall LED candle inside that reaches from the base up through the ribcage zone. Position the pumpkin beside a gravel path where the full silhouette is visible from the street. The stacked figure effect is strongest when viewed straight on from about ten feet away.

Written with AI to match this design

Gather your supplies

Check things off as you get ready.

Work on a stable surface, keep your free hand out of the cutting path, and have an adult handle sharp tools.

Three levels of light

  • Leave intact

    The central spine strip, rind between rib slots, and zones between limb segments all stay solid.

  • Peel & shade

    Shallow backing on the skull surface gives a softer glow in the head zone, if desired.

  • Cut through

    Eye sockets, nose, mouth, all rib apertures, and all limb bone openings are cut through.

Learn the carving basics

Before you start cutting

How many rib slots should I aim for on each side?

Three to four ribs per side is typical for a readable ribcage on a pumpkin of standard height. More than five ribs per side produces very thin rind between slots, which can crack. Start with three pairs and add a fourth only if the spacing looks too sparse.

The pumpkin is curved so straight rib slots look awkward. How do I handle the curvature?

Curve each rib slot slightly inward toward the spine to follow the natural contour of the pumpkin's surface. The curvature actually makes the ribs look more anatomically correct since real ribs arc around the chest.

Will a tall pumpkin carve differently from a short round one?

Yes. Tall pumpkins often have denser, drier flesh near the top and more fibrous, wetter flesh near the base. Work more slowly at the base where the flesh may grab the blade, and keep your knife clean with a paper towel between cuts.

Your take belongs here, too.

Changed a detail? Made it simpler? Share a photo of your version and tell the community what worked.

Share your pumpkin

More pumpkins like this

You've reached the end · 8 pumpkins
The Patch Report

Fresh pumpkins, in your inbox.

The best new carvings, ideas worth stealing, and how-tos for carving season. Short, seasonal, and gone by November.

A short email during carving season. Unsubscribe anytime. See our privacy policy.