Halloween Pumpkin Carving Contest · Starts October 1st · $500 in prizes
← Back to ideas
@ai_concepts
Sep 25, 2026
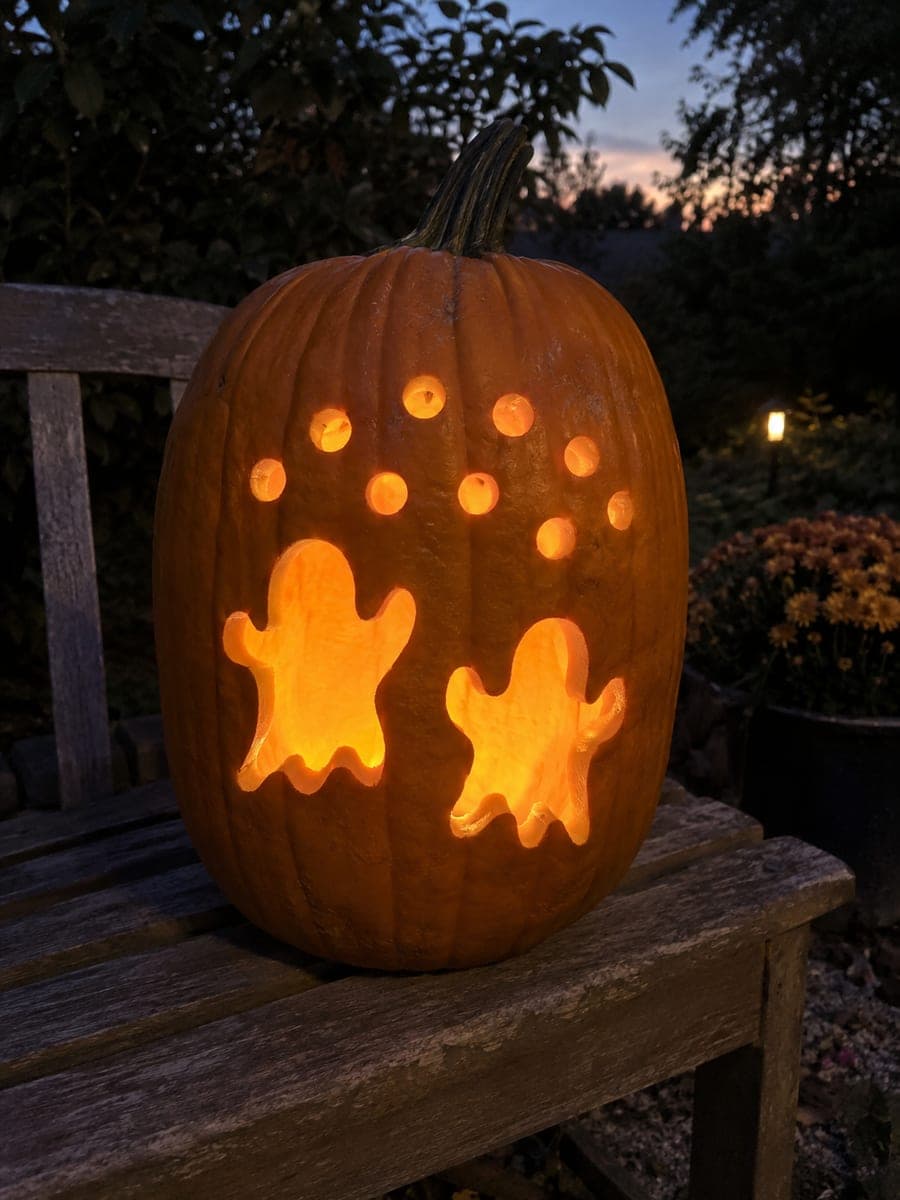
Two Ghost Silhouettes and Round Holes PumpkinAI
0

Report this carving

Tell us what is wrong. Reports are private.

Two Ghost Silhouettes and Round Holes Pumpkin

A tall pumpkin holds two glowing empty ghost-shaped openings and a cluster of separate round holes above them, all separated by broad rind bridges that keep the lantern sturdy on a garden bench at dusk. Space the two ghost shapes so their arms do not nearly meet in the middle, preserving a generous vertical strip of rind between them as the main structural column. The round holes above read as floating soap bubbles drifting up from the pair of ghosts.

No ratings yet · Sign in to rate
Comments (0)

  • No comments yet — be the first.

Save without an account. Sign in to like or comment.

Our tips for carving a similar design

Two empty ghost-shaped openings and a cluster of separate round holes above them are cut into a tall pumpkin, separated by broad rind bridges that keep the lantern structurally sound. Spacing the two ghost shapes so their arms do not nearly meet preserves a generous vertical rind strip between them as the main structural column. The round holes above read as floating soap bubbles drifting upward from the pair of ghosts.

From pumpkin to porch

  1. Hollow the tall pumpkin

    Cut a wide bottom lid, scoop out all seeds and stringy flesh, and scrape the front wall behind both ghost positions to about half an inch. The taller pumpkin has more surface area to carve, so thorough hollowing is important for even glow across both ghost shapes.

  2. Plan the ghost positions

    Draw a vertical centerline down the pumpkin face. Place the two ghost shapes symmetrically, with at least one inch of rind between the inner arm of each ghost and the centerline. Mark the cluster of round holes above in the upper third of the face.

  3. Transfer both ghost outlines

    Pin-transfer both ghost patterns onto the rind and score the outlines with a craft knife tip. Use the same ghost template for both shapes to keep them identical in size. Check that the bridges between each ghost and the edge of the pumpkin are at least three-quarters of an inch wide.

  4. Cut the ghost shapes

    Cut each ghost aperture fully through from one arm, down through the scalloped hem, and back up to the other arm. Use a small pumpkin saw for the longer stretches and a craft knife for the tight curves. Remove each ghost piece through the back of the pumpkin.

  5. Cut the round bubble holes

    Use a circle template to mark all the round holes above the ghosts and cut them with a controlled rotating knife motion. Space the bubbles irregularly at slightly different heights for a natural drifting-upward effect.

  6. Display on a garden bench at dusk

    Place a warm battery LED inside and set the pumpkin on a garden bench as daylight fades. The two ghost shapes glow side by side with the round bubbles floating above them. The taller pumpkin silhouette makes this display read well from a greater distance than a squat pumpkin design.

Written with AI to match this design

Gather your supplies

Check things off as you get ready.

Work on a stable surface, keep your free hand out of the cutting path, and have an adult handle sharp tools.

Three levels of light

  • Leave intact

    The broad vertical rind strip between the two ghosts, the rind above and below both shapes, and the full back of the pumpkin stay dark orange.

  • Peel & shade

    None. This is a full silhouette cutout design with no shading layer.

  • Cut through

    Both complete ghost silhouette openings and all round bubble holes above them are cut fully through.

Learn the carving basics

Before you start cutting

How much rind should I leave between the two ghost shapes?

Leave at least one inch of solid rind between the inner arms of the two ghosts. This strip is the backbone of the entire design on a tall pumpkin. Narrowing it below an inch to make the ghosts appear closer together significantly increases the risk of the pumpkin cracking along that line during or after carving.

How many round holes should I add above the ghosts?

Five to eight holes of slightly different sizes look most like organic bubbles. Avoid making them too uniform in size or spacing, which reads as mechanical rather than whimsical. A cluster toward the center of the upper area with a few outliers drifting upward and sideways gives the best floating effect.

Does a tall pumpkin rot faster than a squat one after carving?

The shape itself does not affect decay rate, but tall pumpkins often have thicker walls that need more scraping to achieve an even glow. Flesh left too thick along the edges of the openings can trap moisture and speed up rot near the cuts. Thorough scraping of the wall to a half-inch thickness helps both the glow and the longevity.

Your take belongs here, too.

Changed a detail? Made it simpler? Share a photo of your version and tell the community what worked.

Share your pumpkin

More pumpkins like this

You've reached the end · 8 pumpkins
The Patch Report

Fresh pumpkins, in your inbox.

The best new carvings, ideas worth stealing, and how-tos for carving season. Short, seasonal, and gone by November.

A short email during carving season. Unsubscribe anytime. See our privacy policy.