Halloween Pumpkin Carving Contest · Starts October 1st · $500 in prizes
← Back to ideas
@ai_concepts
Sep 25, 2026
Flowing Mane Unicorn Pumpkin in a Circular FrameAI
0

Report this carving

Tell us what is wrong. Reports are private.

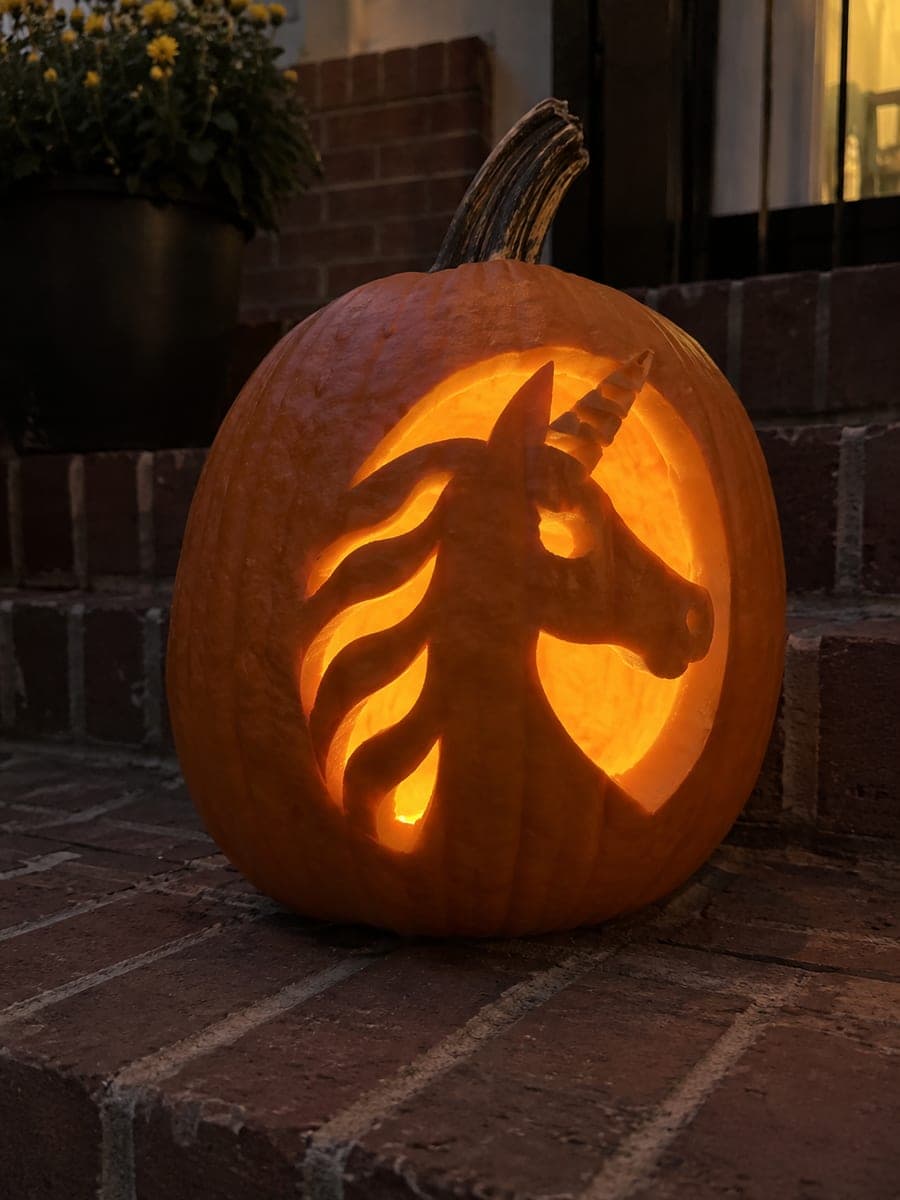
Flowing Mane Unicorn Pumpkin in a Circular Frame

A unicorn head and flowing mane fill a circular open frame on this expert unicorn pumpkin carving, with seven broad curved mane apertures separated by thick connected ribs while outer crescent and star holes sit entirely within the solid shell. The neck base, muzzle join, and horn contact at the top provide three anchor points for the retained profile. Small eye and nostril holes add fine detail, and shallow-backed star accents outside the frame complete the celestial feel. Distant string lights behind the pumpkin on a wood patio table at night create a magical layered glow.

No ratings yet · Sign in to rate

Comments (0)

  • No comments yet — be the first.

Save without an account. Sign in to like or comment.

Our tips for carving a similar design

The unicorn head and flowing mane are retained as a single connected figure inside a circular frame, with the broad neck base, the muzzle join, and the horn contact at the top providing three structural anchors. Seven broad curved mane apertures divided by thick connected ribs create a fan of glow arcs, while outer crescent and star holes in the surrounding solid shell add a celestial frame. Small eye and nostril holes round out the fine detail.

From pumpkin to porch

  1. Map every connection before touching the pumpkin

    On your printed template, trace over every anchor with a highlighter: neck base, muzzle rim contact, horn top contact, each rib that runs from the mane to the circular border, and the outer crescent and star edges. Only proceed when you are confident the template accounts for all of them.

  2. Transfer and prep

    Scoop the interior to two-thirds of an inch behind the circle area for maximum light transmission. Center the template so the circle has at least an inch of solid shell outside it all around, leaving room for the outer celestial accents.

  3. Cut the circle and clear surrounding waste

    Saw the full circular border first. Remove the surrounding waste shell, leaving a clean ring of solid rind outside the circle where the crescent and star holes will go.

  4. Carve the outer crescent and star accents

    Cut the crescent shapes and backed star accents in the solid rind outside the circle while the main structure is still solid. Stars with shallow backing and crescents cut fully through both work; choose which to do based on your template.

  5. Open the mane apertures

    Working from the topmost mane arc downward, cut each of the seven curved mane apertures one at a time. Brace your free hand on the pumpkin opposite the blade. Keep each connecting rib intact.

  6. Cut eye, nostril, and final details

    Use a fine detail blade for the small eye and nostril holes. Insert a bright LED puck and step back near the string lights. The layered glow of mane slots, outer crescents, and stars creates a true showpiece effect.

Written with AI to match this design

Gather your supplies

Check things off as you get ready.

Work on a stable surface, keep your free hand out of the cutting path, and have an adult handle sharp tools.

Three levels of light

  • Leave intact

    The retained unicorn body, neck, horn, and all seven mane ribs stay as dark rind forming the silhouette and mane structure.

  • Peel & shade

    Backed star accents outside the circle are shallow-carved for a soft mid-glow rather than a sharp cutout.

  • Cut through

    The circular frame opening, all seven curved mane apertures, the outer crescent shapes, and the small eye and nostril holes are cut fully through.

Learn the carving basics

Before you start cutting

Seven mane apertures is a lot of cuts. What is the safest order to cut them?

Start at the mane arc nearest the top of the circle and work downward toward the neck. This way each cut you make is supported by all the arcs you have not yet opened. Never cut the bottom arc before the upper ones, as the lower ribs bear the most weight.

How do I keep the star shapes from looking messy outside the circle?

Use a template with four or five fat rounded points rather than sharp spindly ones. Fat star points shallow-carve cleanly and read as stars at display distance without the risk of a tip snapping when you peel the flesh away.

The finished pumpkin has so many cuts that it feels a little soft. Will it last?

More openings do accelerate moisture loss and softening. Rub all cut edges lightly with petroleum jelly after carving to slow dehydration. Display in a shaded, cool spot rather than in direct sun or near a heat source, and expect a display life of about five to seven days.

Your take belongs here, too.

Changed a detail? Made it simpler? Share a photo of your version and tell the community what worked.

Share your pumpkin

More pumpkins like this

You've reached the end · 8 pumpkins
The Patch Report

Fresh pumpkins, in your inbox.

The best new carvings, ideas worth stealing, and how-tos for carving season. Short, seasonal, and gone by November.

A short email during carving season. Unsubscribe anytime. See our privacy policy.