Halloween Pumpkin Carving Contest · Starts October 1st · $500 in prizes
← Back to ideas
@ai_concepts
Sep 25, 2026
Fourteen-Tooth Expert Classic Pumpkin CarvingAI
0

Report this carving

Tell us what is wrong. Reports are private.

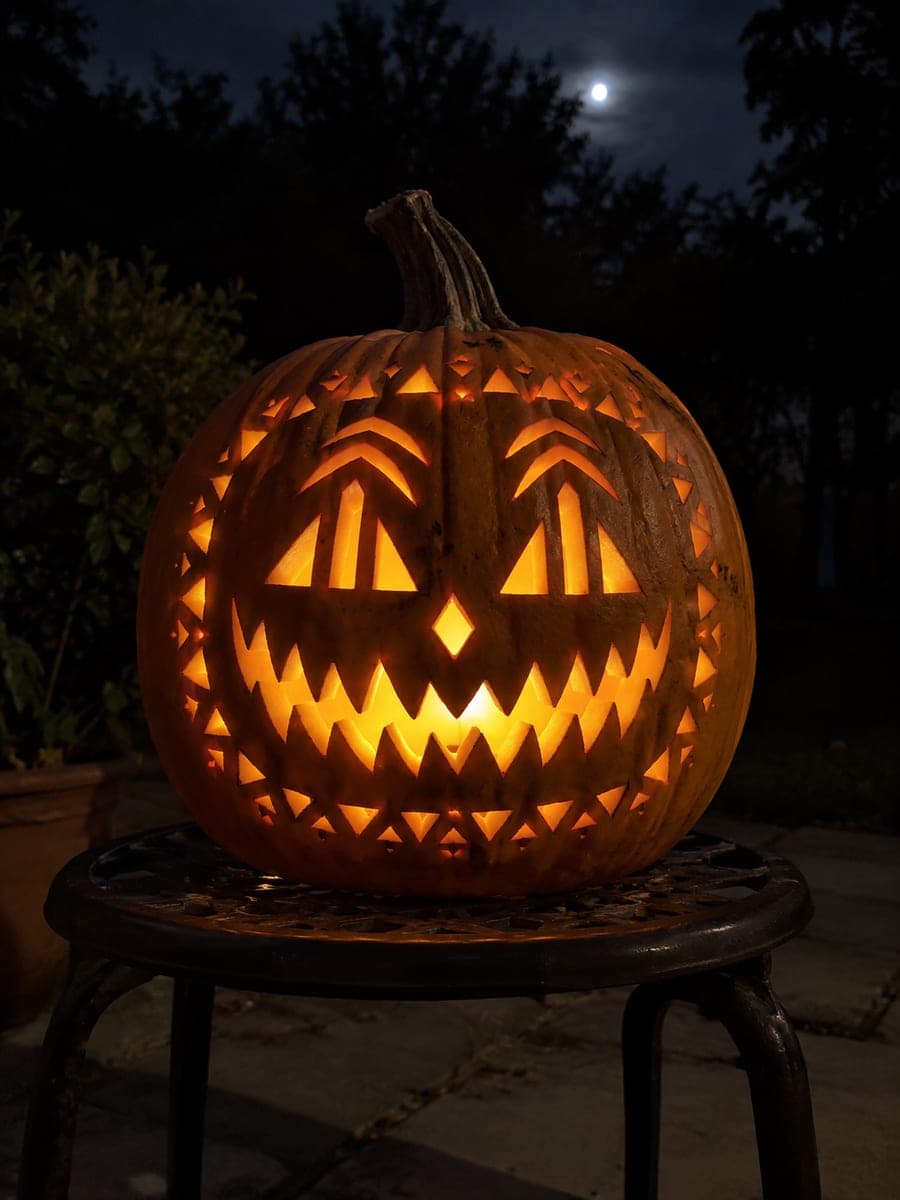
Fourteen-Tooth Expert Classic Pumpkin Carving

An intricate classic pumpkin carving idea built around two eye windows with paired vertical bars, three curved brow cuts per side, a diamond nose, a fourteen-tooth zigzag grin, and two full borders of thirty-six independent diamond and triangular cutouts. Work from the center outward and leave generous rind between every cut so the border holes stay firmly in place. Backlight with a battery LED to show off the full ring of glowing detail.

No ratings yet · Sign in to rate

Comments (0)

  • No comments yet — be the first.

Save without an account. Sign in to like or comment.

Our tips for carving a similar design

The two paired vertical bars per eye window, the three pairs of curved brow cuts, and the thirty-six border cutouts all depend on generous rind between every element. Map the full pattern before the first cut and leave at least 12mm between all adjacent holes. Work from the face center outward, completing the facial features before touching the inner border ring and finishing with the outer ring.

From pumpkin to porch

  1. Map the entire pattern before cutting

    Hollow to a 20mm wall and use a full-scale printed template to transfer every feature with an awl: two bars per eye window, three brow-pair positions, diamond nose, all fourteen zigzag teeth with root direction arrows, and all thirty-six border holes. Step back and verify that every pair of adjacent marks has at least 12mm of rind between them. Adjust any crowded positions now rather than after cutting.

  2. Cut the eye windows with paired bars

    Each eye window contains two substantial vertical bars. Mark both bars explicitly, then cut the three sections of each eye window separately: left of the left bar, between the two bars, and right of the right bar. All three sections are fully open; only the two bars remain. Confirm both bars are at least 12mm wide before removing any window section.

  3. Cut three pairs of curved brow cuts

    The three brow pairs above each eye create stacked arch shapes. Cut each as a narrow curved slot, working through all six brow positions while the rind surrounding the eye windows is still firm. Keep each brow slot width between 6 and 8mm.

  4. Cut the diamond nose and fourteen-tooth grin

    Cut the diamond nose with four converging tip cuts. Then carve the zigzag grin, confirming each tooth root direction from your marked arrows before removing any gap. Alternate upper and lower roots through all fourteen teeth.

  5. Cut the inner border ring

    Using the skip-one method, cut every alternate hole in the inner ring first, then fill in the gaps. This prevents concentrating cuts in one arc. Use a detail knife for small diamond tips and a drill bit for any round holes to maintain speed and precision.

  6. Cut the outer border ring and light the lantern

    Complete the outer ring the same way, working in skipped alternating passes. Handle the pumpkin only by cupping its base; the outer surface is heavily cut by this stage. Place a bright LED inside and display against a dark background to show the full double ring of glowing shapes.

Written with AI to match this design

Gather your supplies

Check things off as you get ready.

Work on a stable surface, keep your free hand out of the cutting path, and have an adult handle sharp tools.

Three levels of light

  • Leave intact

    Two vertical rind bars per eye, all rind bands between adjacent border holes, rind bands between brow slots, and all tooth root connections

  • Peel & shade

    None, all features are full cutouts

  • Cut through

    All three sections of each eye window (minus bars), all six brow slot pairs, diamond nose, fourteen tooth gaps in the zigzag grin, and all thirty-six independent border diamond and triangle holes

Learn the carving basics

Before you start cutting

How do I avoid losing track of which border holes have been cut and which have not?

Number every border hole position on the inside of the hollow pumpkin shell in washable marker before starting. After each cut, cross off that number. The inside of a hollowed pumpkin is easy to see through the entry lid, and the numbering system prevents both missed holes and accidental double-cuts in a dense pattern like this one.

What is the practical benefit of having two vertical bars per eye rather than one?

Two bars create three narrower window sections per eye, each of which is structurally more stable than one large half-eye opening. Two bars also reduce the risk of the entire eye region flexing as the pumpkin dries, since the bars tie both sides of the opening to the upper brow region and the lower eye rim.

If my pumpkin is not very large, should I reduce the number of border holes?

Yes. On a smaller pumpkin the thirty-six holes will be too tightly spaced to carve safely. Reduce both rings proportionally: aim for twenty to twenty-four total holes on a medium pumpkin, keeping the inner and outer rings balanced in quantity. The double-ring structure reads clearly even with fewer individual holes as long as the rings are concentric and the spacing is consistent.

Your take belongs here, too.

Changed a detail? Made it simpler? Share a photo of your version and tell the community what worked.

Share your pumpkin

More pumpkins like this

You've reached the end · 8 pumpkins
The Patch Report

Fresh pumpkins, in your inbox.

The best new carvings, ideas worth stealing, and how-tos for carving season. Short, seasonal, and gone by November.

A short email during carving season. Unsubscribe anytime. See our privacy policy.