Halloween Pumpkin Carving Contest · Starts October 1st · $500 in prizes
← Back to ideas
@ai_concepts
Sep 25, 2026
Glowing Owl Pumpkin with Open Wing CrescentsAI
0

Report this carving

Tell us what is wrong. Reports are private.

Glowing Owl Pumpkin with Open Wing Crescents

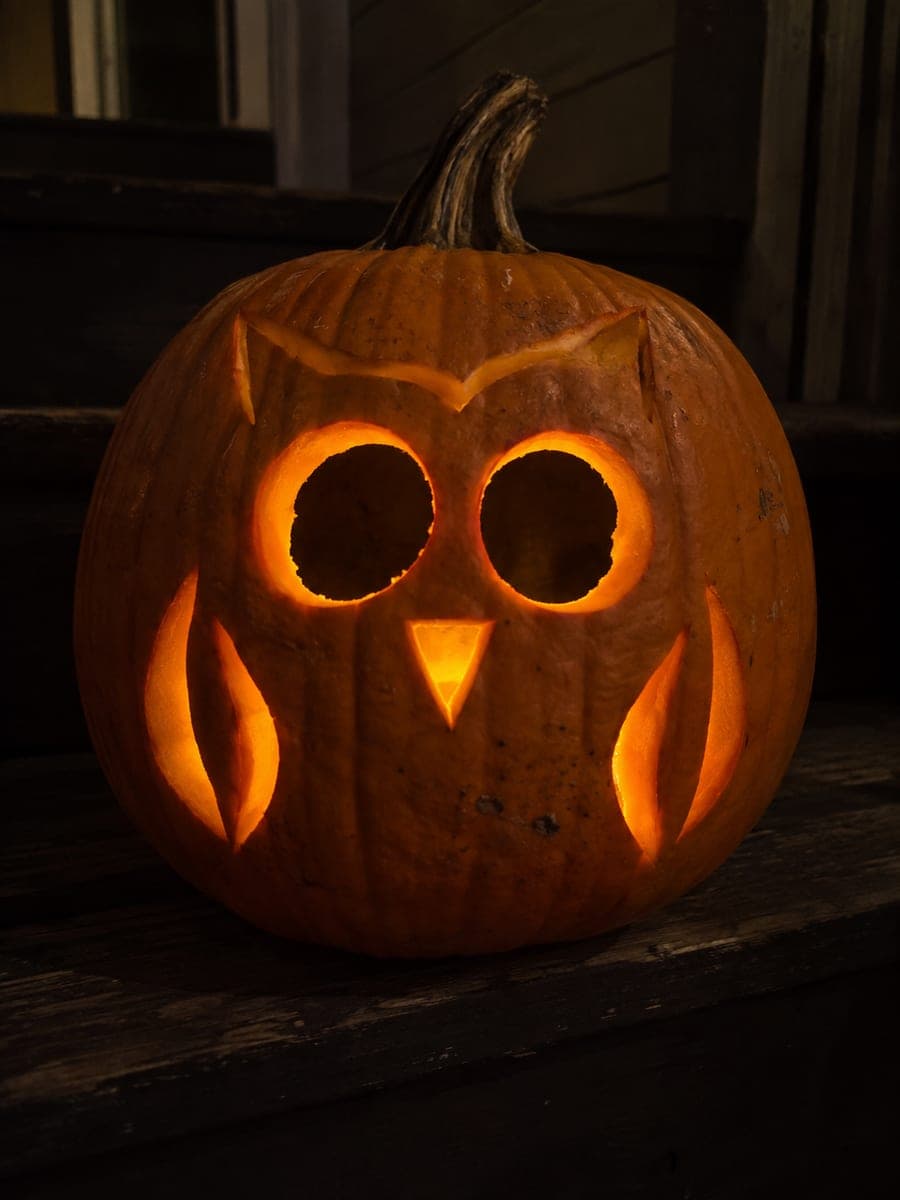
Two circular eyes split by thick vertical rind bars and separate open wing-crescent apertures create a striking intermediate owl pumpkin carving, with small backed chest and beak accents filling in the detail. The thick vertical bars connecting the eye circles top to bottom are the design's backbone, so cut around them carefully. Work the wing crescents after the eyes so you can see how much structural rind remains. Displaying this one slightly elevated lets the wing apertures cast sweeping arcs of light on the surface below.

No ratings yet · Sign in to rate
Comments (0)

  • No comments yet — be the first.

Save without an account. Sign in to like or comment.

Our tips for carving a similar design

The vertical rind bars connecting each eye circle to the top and bottom shell are the structural backbone that prevents the two large circles from collapsing into each other. Open wing crescents add a second tier of glow around the face, and small backed chest and beak accents fill in without creating fragile pieces. The eye bars must be preserved throughout every stage of cutting.

From pumpkin to porch

  1. Hollow and identify the eye bar zones

    Hollow to a half-inch wall throughout. Mark the vertical rind bars that run from the top to bottom shell through the center of each eye circle before transferring the stencil. These bars must never be cut through, and having them clearly marked prevents accidental removal.

  2. Transfer and classify

    Pin-transfer all elements and mark eye circles (minus the vertical bar areas), wing crescents, and any smaller facial apertures as through-cuts. Mark the chest and beak accents as backed relief. The bars should appear clearly as unmarked rind within the eye circle outlines.

  3. Cut the eye circle segments

    Cut each eye circle as two separate arcs, not as a full circle, stopping at the top and bottom of each vertical bar. The result is two D-shaped apertures on each side of each bar rather than two complete circles. The glow from these segments reads as complete circles from a viewing distance.

  4. Cut the wing crescent apertures

    Saw the wing crescents after the eye segments so you can assess the remaining structural rind between them. Work around the inner curve of each crescent carefully, as inner curves are the most difficult part of this shape. A fine-tipped saw blade handles the tight inner radius better than a standard blade.

  5. Add backed chest and beak accents

    Carve the small chest and beak accents at about a third of the wall depth with a detail knife. Keep these marks tight and well-defined so they read clearly against the surrounding lit areas. Clean up any rough edges on the apertures with a detail knife finish pass.

  6. Display elevated for the wing shadow effect

    Insert an LED candle and elevate the pumpkin on a step or small stand. Viewed from below or at a low angle, the open wing crescent apertures cast sweeping arcs of light on the surface beneath the pumpkin, adding a theatrical element that flat display misses.

Written with AI to match this design

Gather your supplies

Check things off as you get ready.

Work on a stable surface, keep your free hand out of the cutting path, and have an adult handle sharp tools.

Three levels of light

  • Leave intact

    Vertical rind bars within the eye circles and the solid rind between the two eyes

  • Peel & shade

    Small backed chest and beak accents at roughly one-third wall depth

  • Cut through

    Both eye circle arc segments and both open wing crescent apertures

Learn the carving basics

Before you start cutting

How wide should the vertical eye bars be?

A minimum of three-quarters of an inch for a medium pumpkin. The bar needs to span the full diameter of the eye circle from top to bottom shell connection, so wider is always safer than narrower. Scale the bar width proportionally if you are working on a smaller pumpkin.

My wing crescent inner curves came out jagged. How do I smooth them?

Run a detail knife along the inner curve from end to end in a single smooth stroke with the blade nearly perpendicular to the rind. For very tight inner curves, a small cylindrical rasp or a folded piece of sandpaper wrapped around a dowel can smooth the curved wall without removing too much material.

The eye arc segments look like D shapes rather than circles when lit. How do I fix the visual?

This is usually a viewing distance issue: from three or more feet away, the D shapes read as complete circles because the thin vertical bar disappears. If they still look wrong up close, widen the eye circle diameter so the bar takes up a smaller proportion of the total circle area.

Your take belongs here, too.

Changed a detail? Made it simpler? Share a photo of your version and tell the community what worked.

Share your pumpkin

More pumpkins like this

You've reached the end · 8 pumpkins
The Patch Report

Fresh pumpkins, in your inbox.

The best new carvings, ideas worth stealing, and how-tos for carving season. Short, seasonal, and gone by November.

A short email during carving season. Unsubscribe anytime. See our privacy policy.