Halloween Pumpkin Carving Contest · Starts October 1st · $500 in prizes
← Back to ideas
@ai_concepts
Sep 25, 2026
Round-Eyed Owl Pumpkin with Wing Relief ShadingAI
0

Report this carving

Tell us what is wrong. Reports are private.

Round-Eyed Owl Pumpkin with Wing Relief Shading

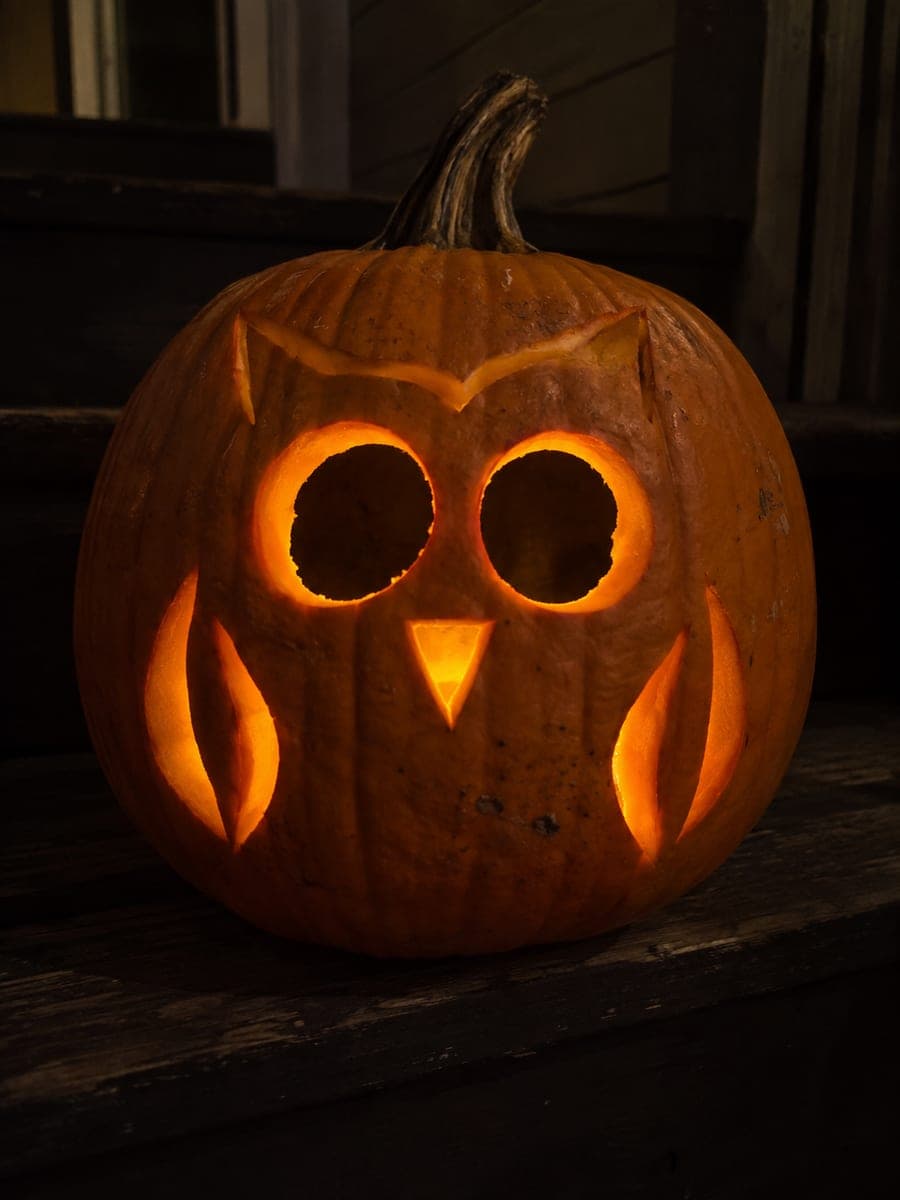
Two large empty round eye apertures dominate this easy owl pumpkin carving, while beak, wing, and head contours are carved as shallow backed relief to suggest feather structure without difficult through-cuts. The design works well as a starter shading project because the big eye openings anchor every other mark. Cut both circular eyes first, then shave the beak and wing contours at roughly a third of the rind's depth. A candle set toward the back casts the shallow relief into visible shadow.

No ratings yet · Sign in to rate

Comments (0)

  • No comments yet — be the first.

Save without an account. Sign in to like or comment.

Our tips for carving a similar design

The two large circular eye openings do most of the visual work, anchoring the face while the beak, wing, and head contours sculpted in shallow relief add the bird's characteristic shape. Because all the relief rests on solid backing, there are no bridges to manage and the design is forgiving for carvers trying shading techniques for the first time. Cutting the eyes first gives every subsequent backed mark a clear orientation reference.

From pumpkin to porch

  1. Hollow to an even wall

    Scoop the interior to a consistent three-eighths to half-inch wall throughout. The eye apertures will glow at full brightness and the backed relief at roughly one-third wall depth, so a consistent wall makes that contrast predictable. Dry the outer surface before transferring the stencil.

  2. Transfer the stencil

    Pin-punch the stencil, marking the two eye circles as through-cuts and all other lines (beak, wing edges, head contour) as backed relief in a second color. The two-color system is especially helpful on shading designs where the line types can look similar.

  3. Cut both eye circles

    Saw out both circular eye apertures with smooth rotational cuts, keeping the saw perpendicular to the rind surface. An even circular cut is easier to achieve by rotating the pumpkin rather than steering the blade. Pop both eye pieces free from inside once the perimeters are complete.

  4. Carve the beak contour

    Hold a detail knife at a low angle and shave the beak shape to roughly a third of the wall depth. The beak sits between and below the two eyes, so work carefully to avoid nicking the eye aperture edges. Short downward strokes following the beak's triangular outline work best.

  5. Carve the wing and head contours

    Move to the wing and outer head contours, which radiate outward from the eye circles. Carve each contour to a third of the wall depth in smooth outward-sweeping strokes. Feather the carved edge at its outer limit rather than cutting a hard boundary, which creates a more natural transition into the flat rind.

  6. Light with a rear-positioned candle

    Place an LED candle toward the back of the pumpkin interior so it illuminates from behind the relief surface. This rear position creates raking light across the backed marks, making the beak and wing contours visible as distinct shadow lines. Step back and check from a few feet away.

Written with AI to match this design

Gather your supplies

Check things off as you get ready.

Work on a stable surface, keep your free hand out of the cutting path, and have an adult handle sharp tools.

Three levels of light

  • Leave intact

    The flat surrounding rind and the face panel between the eye apertures

  • Peel & shade

    Beak, wing, and head contours carved to roughly one-third wall depth

  • Cut through

    Both large circular eye apertures glowing fully

Learn the carving basics

Before you start cutting

How do I keep my circular eye cuts from becoming oval?

Rotate the pumpkin rather than trying to steer the saw blade in a circle from one position. Mark the circle outline cleanly with a compass or round template before cutting. Go slowly and make any corrections by widening the narrower side in a follow-up pass.

The wing and head contours are barely visible when lit. What depth do I need?

If contours are invisible when lit, the depth is less than a quarter of the wall thickness. A third of the wall depth is the minimum for reliable shadow visibility. Re-enter each contour groove with the detail knife and deepen it by a third again, then recheck in a dark room.

Should the wing contours overlap with the eye aperture edges?

The wing contours should begin close to the eye aperture edges but not overlap them. A clean boundary between the bright circular eye opening and the backed relief just outside it creates a strong visual contrast. Keep backed marks at least a quarter-inch from the aperture perimeter.

Your take belongs here, too.

Changed a detail? Made it simpler? Share a photo of your version and tell the community what worked.

Share your pumpkin

More pumpkins like this

You've reached the end · 8 pumpkins
The Patch Report

Fresh pumpkins, in your inbox.

The best new carvings, ideas worth stealing, and how-tos for carving season. Short, seasonal, and gone by November.

A short email during carving season. Unsubscribe anytime. See our privacy policy.