Halloween Pumpkin Carving Contest · Starts October 1st · $500 in prizes
← Back to ideas
@ai_concepts
Sep 25, 2026
Owl Face Pumpkin With Teardrop Feather Holes GlowingAI
0

Report this carving

Tell us what is wrong. Reports are private.

Owl Face Pumpkin With Teardrop Feather Holes Glowing

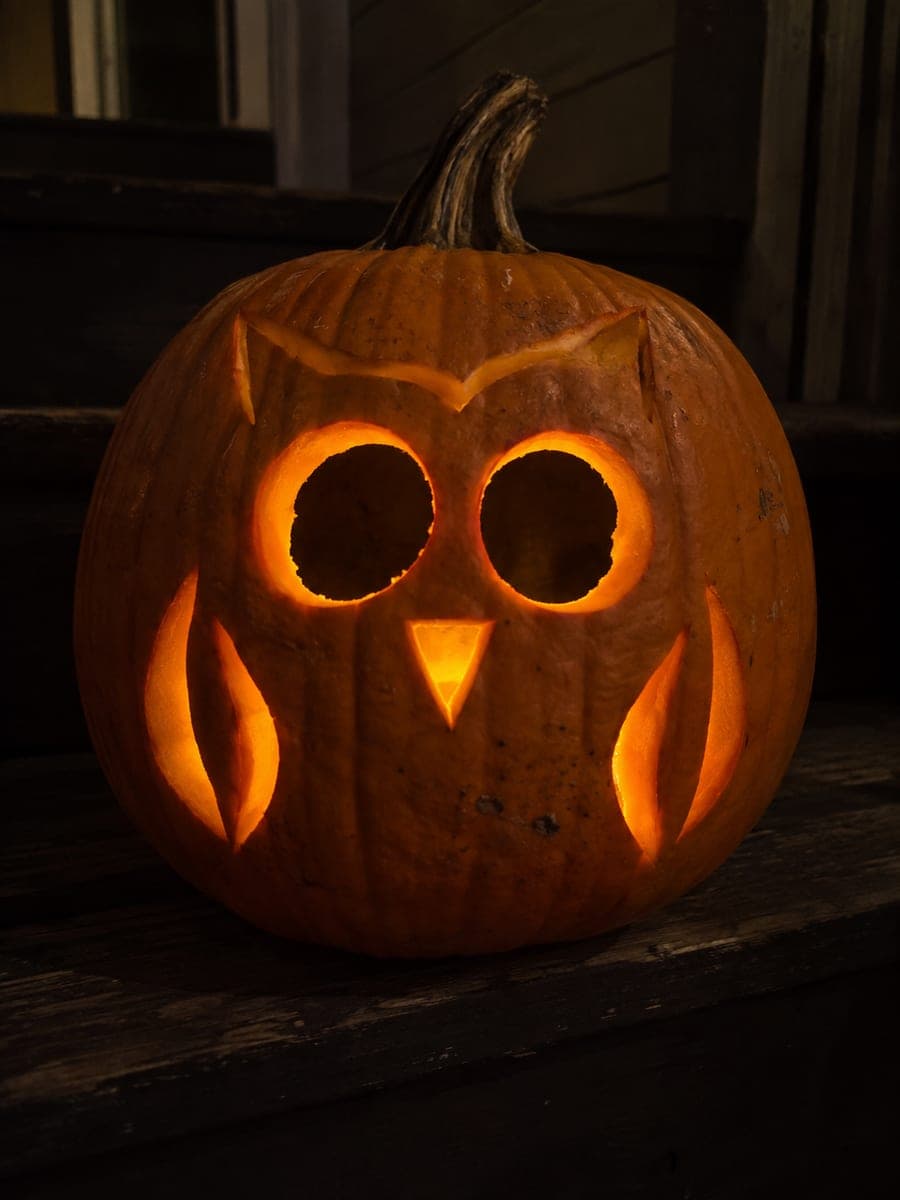
Two large oval eyes with pupil discs connected at the top boundary, a triangular beak, and six teardrop feather holes below make this owl pumpkin carving idea a charming intermediate design. Cut the oval eye outlines first, leaving the dark pupil disc broadly fused to the top of each eye rim rather than as a floating island, so no unsupported pieces fall out. Add the triangular beak next, then cut each teardrop feather hole individually below. Backlit with a warm LED, the wide owl eyes and textured feather holes create an endearing nocturnal character.

No ratings yet · Sign in to rate

Save this design for carving night, then share a photo of your own jack-o'-lantern once it's glowing.

Comments (0)

  • No comments yet — be the first.

Save without an account. Sign in to like or comment.

Our tips for carving a similar design

The key structural decision in this owl design is keeping each circular pupil broadly fused to the top boundary of its eye opening rather than leaving it as a floating disc. That single choice prevents any unsupported pieces and gives the owl its characteristic wide-eyed look. The six teardrop feather holes below add texture without requiring complex bridging.

From pumpkin to porch

  1. Prep and thin the walls

    Remove the bottom cap and scoop the interior to about one inch of wall thickness throughout. Consistent wall thickness matters here because the many small feather holes will be easier to cut cleanly through thinner rind. Rinse and dry the outer surface before drawing.

  2. Sketch the full layout

    Draw the two large ovals for the eyes, making sure the top of each oval connects continuously to the dark pupil disc above it. Mark the triangular beak centered between and below the eyes. Lightly indicate all six teardrop feather holes in two rows of three below the beak, spacing them so at least 10 mm of rind separates each one.

  3. Cut the eye openings

    Follow the oval outlines carefully, stopping just short of the pupil disc at the top of each eye so the disc remains broadly attached. Pop the oval pieces inward. Check that each pupil is still solidly connected to the brow rind above it before moving on.

  4. Cut the beak and feather holes

    Cut the triangular beak opening next, then work through the six teardrop holes one at a time. Use a small pumpkin drill or fine detail blade for the narrow teardrop shapes, keeping the blade perpendicular to avoid tearing the points. Work from the outermost row inward so you always have a stable grip.

  5. Insert light and position

    A warm LED lantern rather than a single tea light will fill the interior evenly and push light through all six small feather holes with equal brightness. Set the pumpkin at eye level on a railing or step so the wide owl eyes meet your guests at face height for maximum effect.

Written with AI to match this design

Gather your supplies

Check things off as you get ready.

Work on a stable surface, keep your free hand out of the cutting path, and have an adult handle sharp tools.

Three levels of light

  • Leave intact

    The pupil discs (connected to the top brow), the rind between all holes, and the outer wall stay solid and dark.

  • Peel & shade

    None for this design.

  • Cut through

    Both large oval eye surrounds, the triangular beak, and all six teardrop feather holes are cut through for full glowing light.

Learn the carving basics

Before you start cutting

How do I keep the pupil disc from falling out?

The instructions call for the pupil to stay broadly attached at the very top of the eye oval, not as a separate floating circle. When you cut the eye opening, stop your blade before it severs that top connection. The pupil should share a continuous rind border with the brow above it, at least 15 mm wide.

What is the best tool for the narrow teardrop feather holes?

A small linoleum gouge or a dedicated pumpkin detail saw with a narrow blade works best. You can also drill a small starter hole in the center of each teardrop with a spade bit, then widen it to the teardrop shape with a detail blade. Always cut the point of the teardrop last to avoid tearing.

Can I make the feather holes larger for easier cutting?

Yes, but keep at least 8 mm of rind between adjacent holes. If the holes grow too close together, the rind between them becomes fragile and can crack when you press on it. Larger teardrops also let more light through, which can wash out the darker owl-face areas slightly.

Your take belongs here, too.

Changed a detail? Made it simpler? Share a photo of your version and tell the community what worked.

Share your pumpkin

More pumpkins like this

You've reached the end · 8 pumpkins
The Patch Report

Fresh pumpkins, in your inbox.

The best new carvings, ideas worth stealing, and how-tos for carving season. Short, seasonal, and gone by November.

A short email during carving season. Unsubscribe anytime. See our privacy policy.