Halloween Pumpkin Carving Contest · Starts October 1st · $500 in prizes
← Back to ideas
@ai_concepts
Sep 25, 2026
Hard Shrunken Head Bob Pumpkin With Long NeckAI
0

Report this carving

Tell us what is wrong. Reports are private.

Hard Shrunken Head Bob Pumpkin With Long Neck

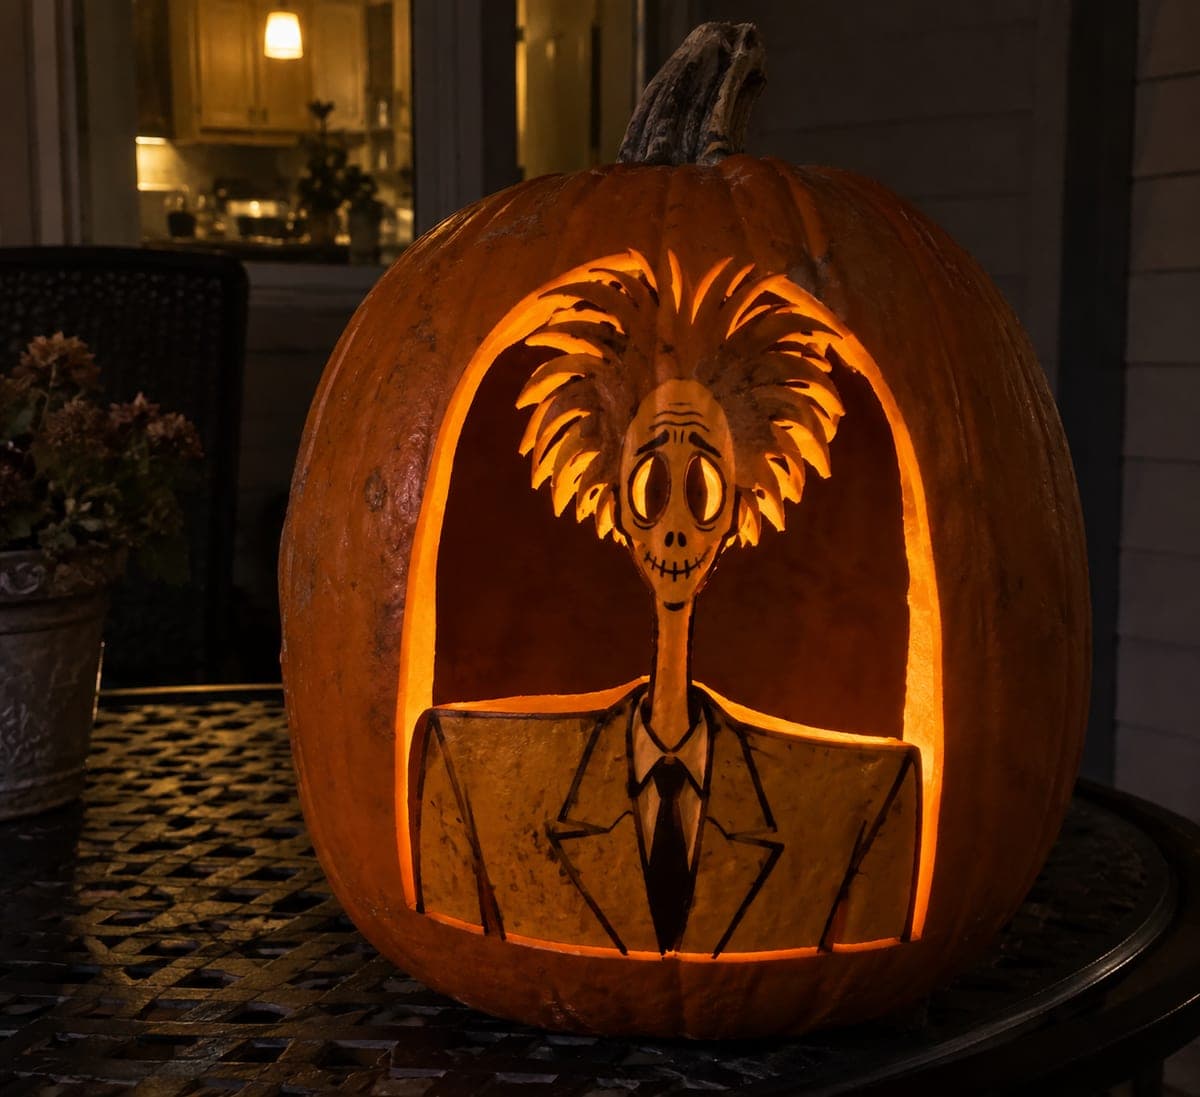
At the hard difficulty, this shrunken head Bob pumpkin carving idea retains the small head, long neck, and oversized jacket as a connected piece supported by upper hair joins and a broad jacket base. The open arch background and eye openings are cut through, while mouth wrinkles, tie, and jacket lines are painted onto the retained rind. Paint the tie and wrinkle details after carving the arch so you can use the open background as a reference for proportions.

No ratings yet · Sign in to rate

Comments (0)

  • No comments yet — be the first.

Save without an account. Sign in to like or comment.

Our tips for carving a similar design

The small head, long neck, and oversized jacket are retained as a single connected piece, anchored at the top by upper hair joins to the arch and at the bottom by a broad jacket base root. The open arch background provides the main glow, while the two eye holes cut through the head add secondary points of light. Mouth wrinkles, tie, and jacket lines are painted onto the retained rind rather than carved, keeping the face strong throughout. Painting the tie and wrinkle details after the arch is cut makes it easy to use the glowing background as a proportional reference.

From pumpkin to porch

  1. Prep and stencil

    Choose a tall pumpkin that can accommodate the vertical head-neck-jacket composition. Gut and scrape the interior to 2 cm. Transfer the arch boundary, portrait silhouette, upper hair join locations, jacket base extent, and eye hole positions with a pin tool. Mark all root contact points in bold.

  2. Cut the open arch

    Cut the arch background that surrounds the retained portrait. Work from the base of the arch upward on both sides, stopping precisely at the upper hair join points. The arch removes the most rind at once so completing it first establishes the glow source and the portrait stability in one step.

  3. Verify the portrait connections

    Gently press the retained head, neck, and jacket to confirm that the upper hair joins and the broad jacket base are both firm. Any looseness at this stage means a root join is thinner than planned. If needed, widen the jacket base join slightly downward before proceeding.

  4. Cut the eye holes

    Cut the two eye openings through the retained head. These are now the design's most delicate cuts because the head is already suspended on only a few connection points. Use a narrow blade and cut each eye in a single careful pass around its outline. Keep the rind between the eyes and between each eye and the outer head edge at least 1 cm.

  5. Paint the facial details

    With the arch and eyes complete, use a fine liner brush to paint the mouth wrinkle lines, the tie shape, and the jacket seam lines onto the retained rind. The open arch glow behind the portrait helps you judge the proportions of the painted elements. Let paint dry fully before handling further.

  6. Light and display

    Insert a battery LED and position it low in the pumpkin so it shines upward into the arch. The tiny head silhouetted in the arch against the warm glow, with glowing eye holes and painted wrinkle details, creates a genuinely unsettling but comedic display. Place at eye level for maximum impact.

Written with AI to match this design

Gather your supplies

Check things off as you get ready.

Work on a stable surface, keep your free hand out of the cutting path, and have an adult handle sharp tools.

Three levels of light

  • Leave intact

    Retained small head, long neck, and large jacket as a connected dark-rind silhouette

  • Peel & shade

    None, this version uses paint rather than engraving for the detail areas

  • Cut through

    Open arch background and two eye holes through the retained head

Learn the carving basics

Before you start cutting

The long neck of the retained portrait seems very thin. How do I make sure it does not snap?

Keep the neck at least 1.5 cm wide throughout its length, and make sure both the top connection to the head and the base connection to the jacket are wider than the neck mid-section. If the stencil shows a very narrow neck, widen it slightly in your traced outline. A battery LED rather than a candle also removes the heat risk that can soften thin rind.

Why does painting after the arch cut make it easier?

With the arch open and a light source inside, you can see exactly where the tie and wrinkle details should sit relative to the jacket shape and the glowing background. The contrast between the bright arch and the dark retained rind makes it much easier to position and scale the painted elements than working blind on an intact surface.

Can I add painted mouth wrinkles before cutting to avoid paint drying time issues?

You can sketch the wrinkle positions in pencil before cutting, but painting them before the arch is cut means painting blind without the glow reference. The sequence of cut arch first, then paint details is genuinely better for this design. The paint drying time is short enough that it does not significantly delay the project.

Your take belongs here, too.

Changed a detail? Made it simpler? Share a photo of your version and tell the community what worked.

Share your pumpkin

More pumpkins like this

You've reached the end · 8 pumpkins
The Patch Report

Fresh pumpkins, in your inbox.

The best new carvings, ideas worth stealing, and how-tos for carving season. Short, seasonal, and gone by November.

A short email during carving season. Unsubscribe anytime. See our privacy policy.