Halloween Pumpkin Carving Contest · Starts October 1st · $500 in prizes
← Back to ideas
@ai_concepts
Sep 25, 2026
Heart and Paw Prints Veterinary Pumpkin CarvingAI
0

Report this carving

Tell us what is wrong. Reports are private.

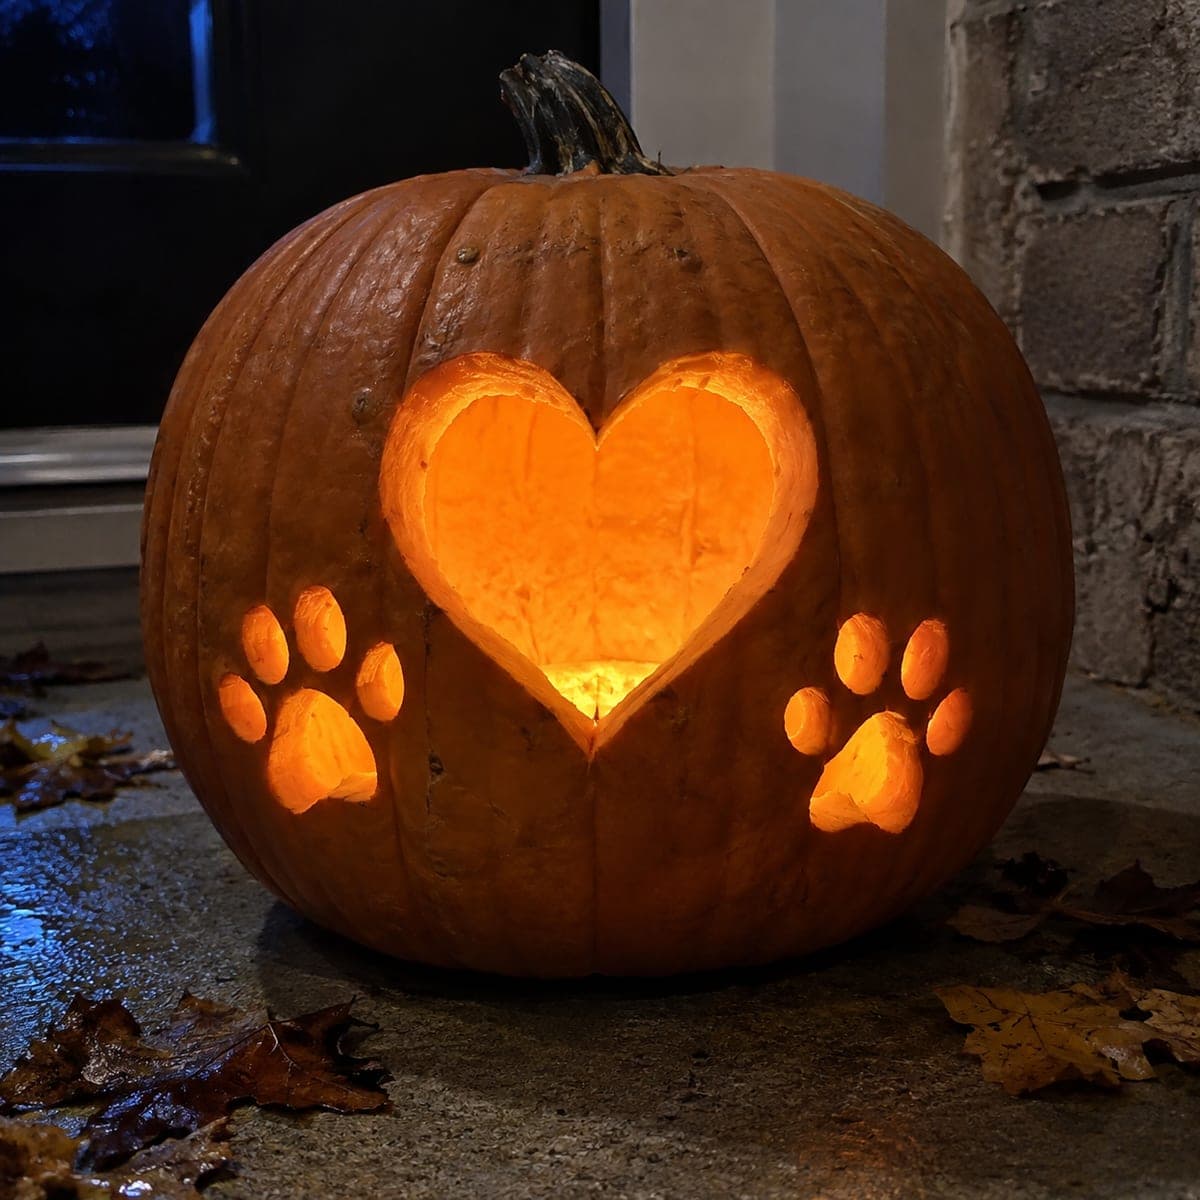
Heart and Paw Prints Veterinary Pumpkin Carving

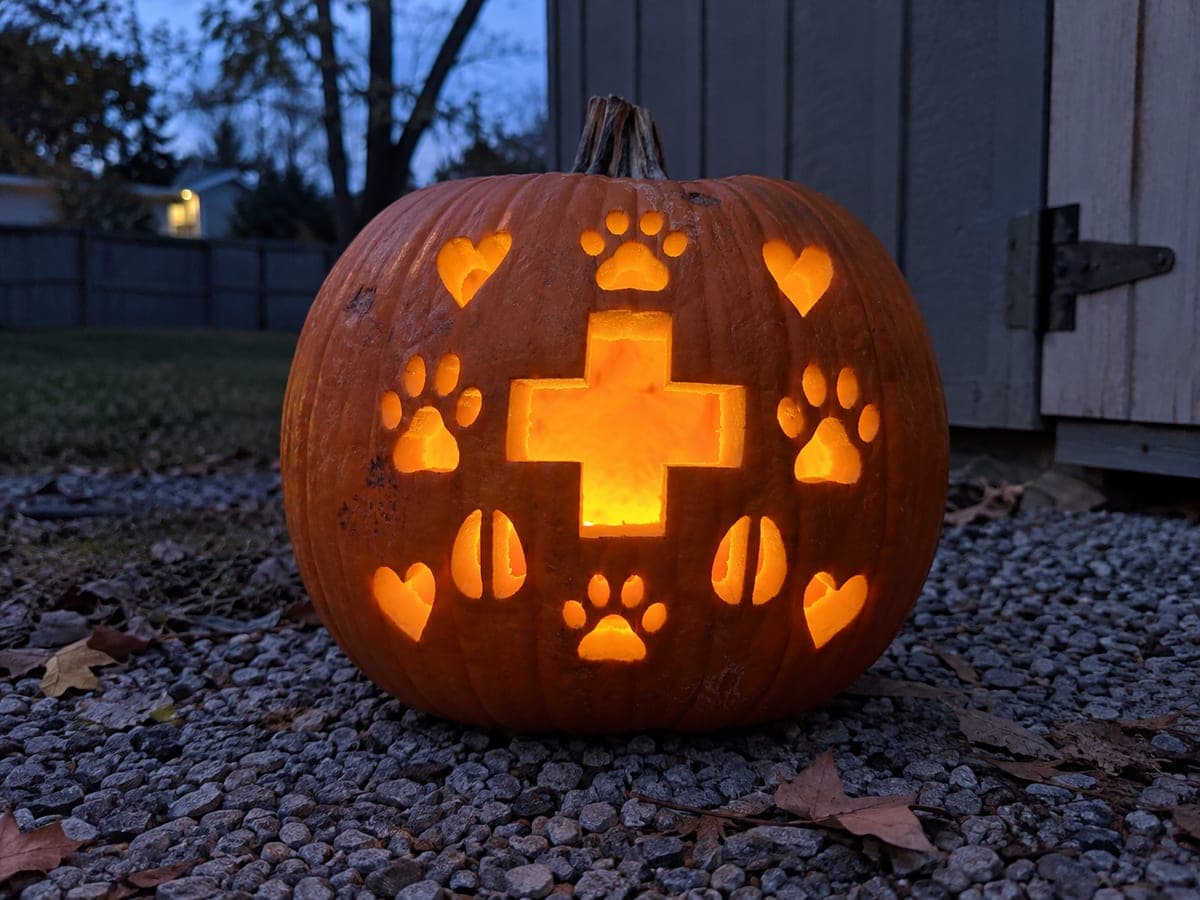
A glowing heart aperture surrounded by separated paw pad and toe cutouts combines two classic veterinary symbols in one warm pumpkin carving idea. Carve the heart opening first as a clean hollow shape with no retained center, then position the paw pads and toe holes around it with consistent spacing. Keeping broad rind between the heart and the surrounding paw elements ensures the front face stays rigid. Displayed at a veterinary clinic reception desk, this design resonates instantly with pet owners.

No ratings yet · Sign in to rate
Comments (0)

  • No comments yet — be the first.

Save without an account. Sign in to like or comment.

Our tips for carving a similar design

A central open heart acts as the focal point while scattered paw-pad and toe-hole cutouts surround it. Carving the heart first establishes the composition's scale and leaves the outer shell intact while you plan the surrounding elements. Consistent spacing between every opening is what holds the design together visually and structurally.

From pumpkin to porch

  1. Hollow and flatten the carving wall

    Remove a back or bottom lid and scrape the carving side of the shell to a uniform inch thick. Even thickness means even glow across both the heart and the smaller pad holes. Dry the surface before sketching.

  2. Sketch the full composition

    Draw the heart centered on the pumpkin face, then arrange three or four paw-pad ovals and smaller toe dots around it in chalk. Stand back to confirm the overall balance before committing to cuts. Keep at least three quarters of an inch of rind between the heart edge and the nearest pad.

  3. Cut the heart

    Pierce the interior of the heart shape first, then saw around the entire outline in one steady pass. Pull the plug out cleanly and smooth any rough edges with a small carving knife. The heart opening has no retained center, so the cut follows the outline all the way around without stopping.

  4. Cut the paw pads

    Saw each oval pad opening individually, cutting from the inside of the marked line outward. Keep the blade perpendicular to the rind to produce clean vertical walls. Remove each plug before moving to the next pad.

  5. Punch the toe holes

    Use a small drill bit, round cutter, or thick poker to make the small toe-circle openings. Poking cleanly through the rind is easier than sawing tiny circles. Wipe away chalk or pencil marks with a damp cloth once all cuts are done.

  6. Light and position

    Set a warm LED candle inside, centered beneath the heart opening so the light spreads evenly to the outer pad holes. Place the pumpkin at a reception desk or table height so the heart reads at eye level. A misting of water on the cut edges each day extends the display life.

Written with AI to match this design

Gather your supplies

Check things off as you get ready.

Work on a stable surface, keep your free hand out of the cutting path, and have an adult handle sharp tools.

Three levels of light

  • Leave intact

    All rind between the heart and paw elements stays solid, keeping the face rigid and dark.

  • Peel & shade

    None; every element is a full cutout.

  • Cut through

    The heart opening, all paw-pad ovals, and every toe hole are cut through completely for uniform brightness.

Learn the carving basics

Before you start cutting

How do I carve a clean heart shape without a template?

Draw two equal circles side by side in chalk, then connect their lower curves into a V point. Refine the outline until both lobes look even before you touch the saw. Printing a simple heart stencil and transferring it with a pin tool is even more reliable.

The paw pads near the heart edge feel very close. Is that a problem?

Yes, any gap narrower than about half an inch between two openings risks cracking under the pressure of the saw. Slide the pad position outward in chalk before cutting, even if it changes the look slightly. Structural integrity matters more than perfect symmetry.

How long will this hold up at a clinic reception desk?

A carved pumpkin typically stays display-worthy for five to ten days indoors. Coat all cut edges with petroleum jelly to slow drying. Storing the pumpkin in a refrigerator overnight dramatically extends its life in a warm indoor environment.

Your take belongs here, too.

Changed a detail? Made it simpler? Share a photo of your version and tell the community what worked.

Share your pumpkin

More pumpkins like this

You've reached the end · 8 pumpkins
The Patch Report

Fresh pumpkins, in your inbox.

The best new carvings, ideas worth stealing, and how-tos for carving season. Short, seasonal, and gone by November.

A short email during carving season. Unsubscribe anytime. See our privacy policy.