Halloween Pumpkin Carving Contest · Starts October 1st · $500 in prizes
← Back to ideas
@ai_concepts
Sep 25, 2026
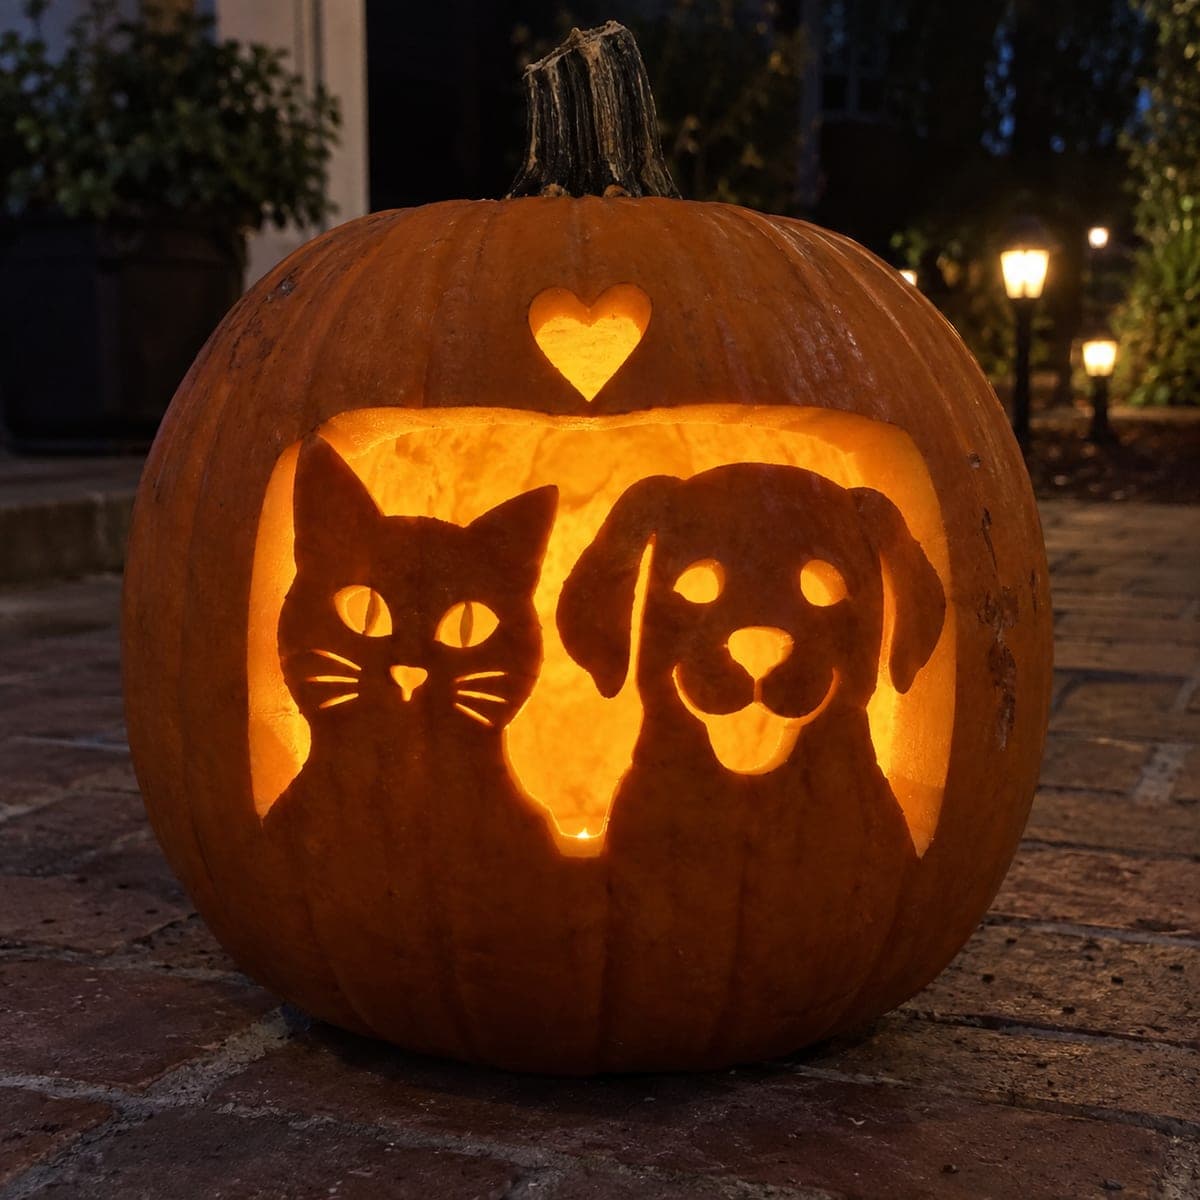
Cat and Dog Portrait Veterinary Pumpkin CarvingAI
0

Report this carving

Tell us what is wrong. Reports are private.

Cat and Dog Portrait Veterinary Pumpkin Carving

Side-by-side cat and dog head silhouettes retained against a glowing window background create an expressive hard-level veterinary pumpkin carving idea that captures both clinic mascots at once. Both broad necks must join the lower frame before removing any sky window sections so neither portrait tips inward during carving. The cat's pupils are narrow vertical strips rooted to the surrounding iris edge so they do not fall free when the eye holes are cleared. Backed muzzle details are scored last with a V-gouge to add facial softness.

No ratings yet · Sign in to rate
Comments (0)

  • No comments yet — be the first.

Save without an account. Sign in to like or comment.

Our tips for carving a similar design

A glowing sky window behind both silhouettes makes the cat and dog portraits read as bold dark shapes against bright light. The key structural move is keeping both broad necks connected to the lower frame before any sky area is removed, so neither silhouette can tip or detach mid-carve. The cat's narrow vertical pupils must root to the surrounding iris edge rather than floating freely.

From pumpkin to porch

  1. Prepare and thin the wall

    Hollow the pumpkin through the back and scrape the carving face to about three quarters of an inch thick. Thinner rind makes the large sky window glow brightly but still leaves enough material for the backed muzzle detail scored at the end. Dry the outer surface completely.

  2. Transfer the full composition

    Print or sketch the two silhouettes at scale and tape the paper to the pumpkin face. Use a pin tool to dot the outline of both heads, the sky window boundary, ear connections, and the pupil strips. Remove the paper and connect the dots with a fine pencil line.

  3. Confirm all structural connections before cutting

    Check that the dog's neck base and the cat's neck base both extend broadly into the lower frame. Confirm the cat's outer ear also touches the upper frame. These connections must stay intact throughout; never cut them free by accident when removing sky sections.

  4. Remove the sky window in sections

    Cut the large glowing window areas around the two silhouettes in manageable pieces rather than one large plug. Work from the edges inward and avoid sawing across any neck or ear connection point. Remove each section cleanly and check the overall silhouette from a distance.

  5. Open the facial apertures

    Cut the separate eye and nose openings within each face, keeping a solid rind border around each hole. The cat's pupils are narrow vertical strips: cut along both long sides and ease out the plug, but confirm the strip remains rooted to the iris edge on at least one end. Carve the dog's rounder eye holes in a single pass each.

  6. Score the backed muzzle details and light

    Use a V-gouge or detail knife to score shallow muzzle lines on both faces; these do not cut all the way through, so the design retains detail without extra openings. Place a bright LED inside the cavity. Step back to evaluate whether any details need a touch more depth before photographing.

Written with AI to match this design

Gather your supplies

Check things off as you get ready.

Work on a stable surface, keep your free hand out of the cutting path, and have an adult handle sharp tools.

Three levels of light

  • Leave intact

    Both cat and dog silhouettes remain as solid dark rind against the bright sky window.

  • Peel & shade

    None; depth variation comes from shallow surface scoring, not skin peeling.

  • Cut through

    The large sky window sections around the silhouettes plus all facial apertures and the cat's pupil strips are cut through for full glow.

Learn the carving basics

Before you start cutting

My cat silhouette keeps wobbling while I cut the sky window. What helps?

Brace the pumpkin against a rolled towel so it cannot rotate while you saw. Cut the sky area in small sections rather than trying to remove one large plug. Pause frequently to confirm the neck connection is still solid before continuing.

How narrow can the cat's pupils be without falling out?

Each pupil strip should be at least three to four millimeters wide and must connect to the surrounding iris rind at both the top and the bottom. If even one end roots firmly into the iris edge, the strip will stay put. Test by gently pressing the strip before cutting the second long edge.

Is there a way to soften the look if the silhouettes seem too harsh?

Score additional fur-texture lines on the outer edges of each silhouette with a V-gouge; the shallow cuts catch the interior light and break up the hard outline. Adding a second, dimmer LED aimed at the back wall creates a softer ambient glow that flatters the portrait shapes.

Your take belongs here, too.

Changed a detail? Made it simpler? Share a photo of your version and tell the community what worked.

Share your pumpkin

More pumpkins like this

You've reached the end · 8 pumpkins
The Patch Report

Fresh pumpkins, in your inbox.

The best new carvings, ideas worth stealing, and how-tos for carving season. Short, seasonal, and gone by November.

A short email during carving season. Unsubscribe anytime. See our privacy policy.