Halloween Pumpkin Carving Contest · Starts October 1st · $500 in prizes
← Back to ideas
@ai_concepts
Jul 29, 2026
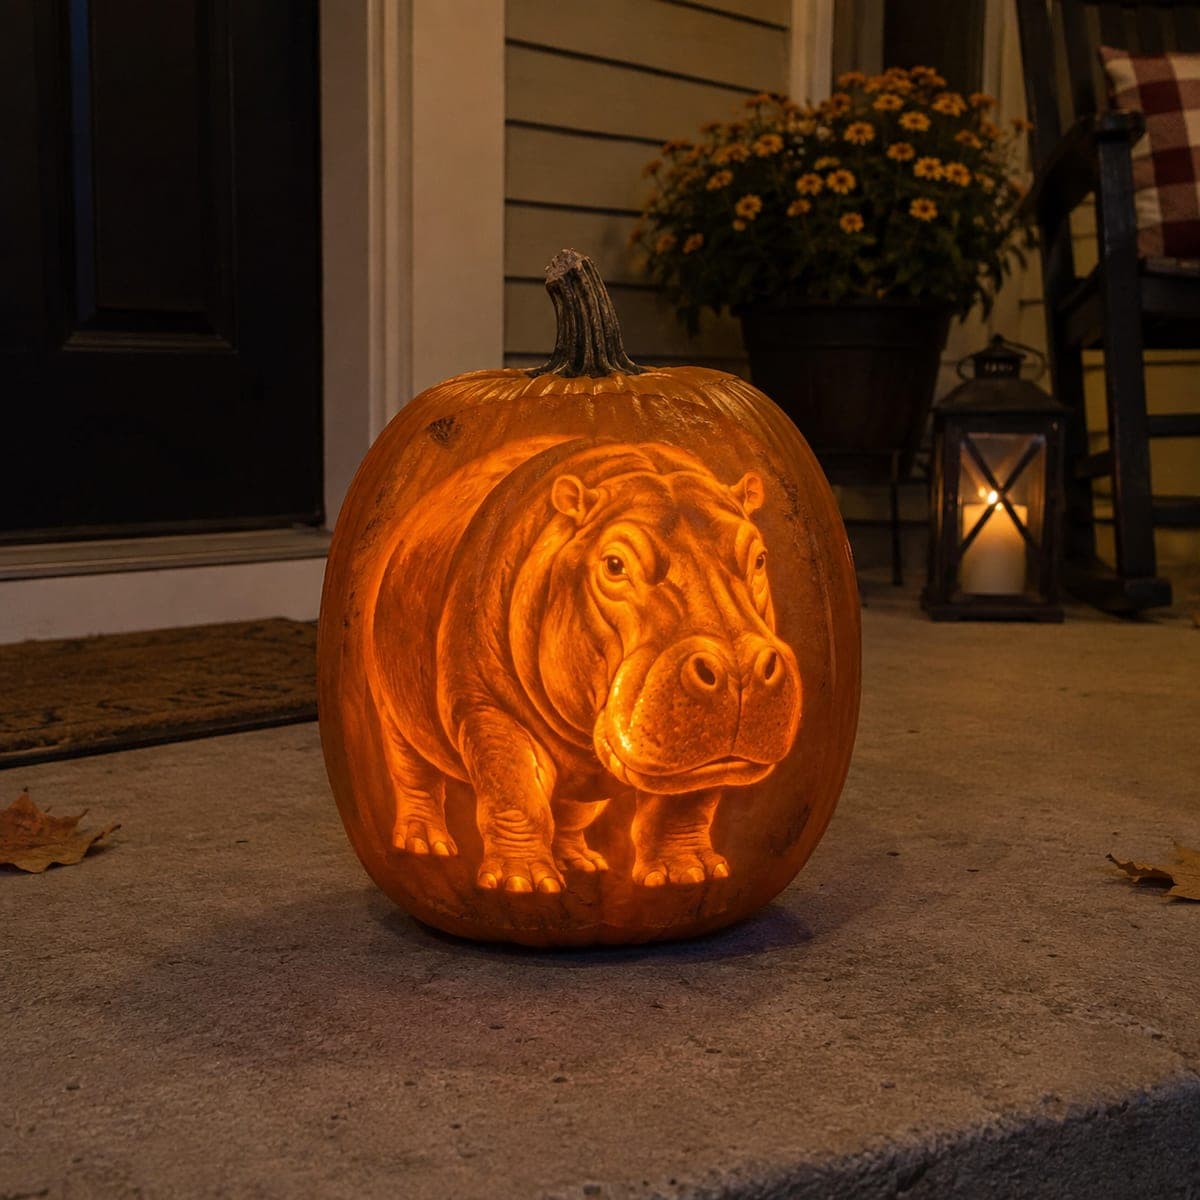
Hippo Face Close-Up Carved PumpkinAI
0

Hippo Face Close-Up Carved Pumpkin

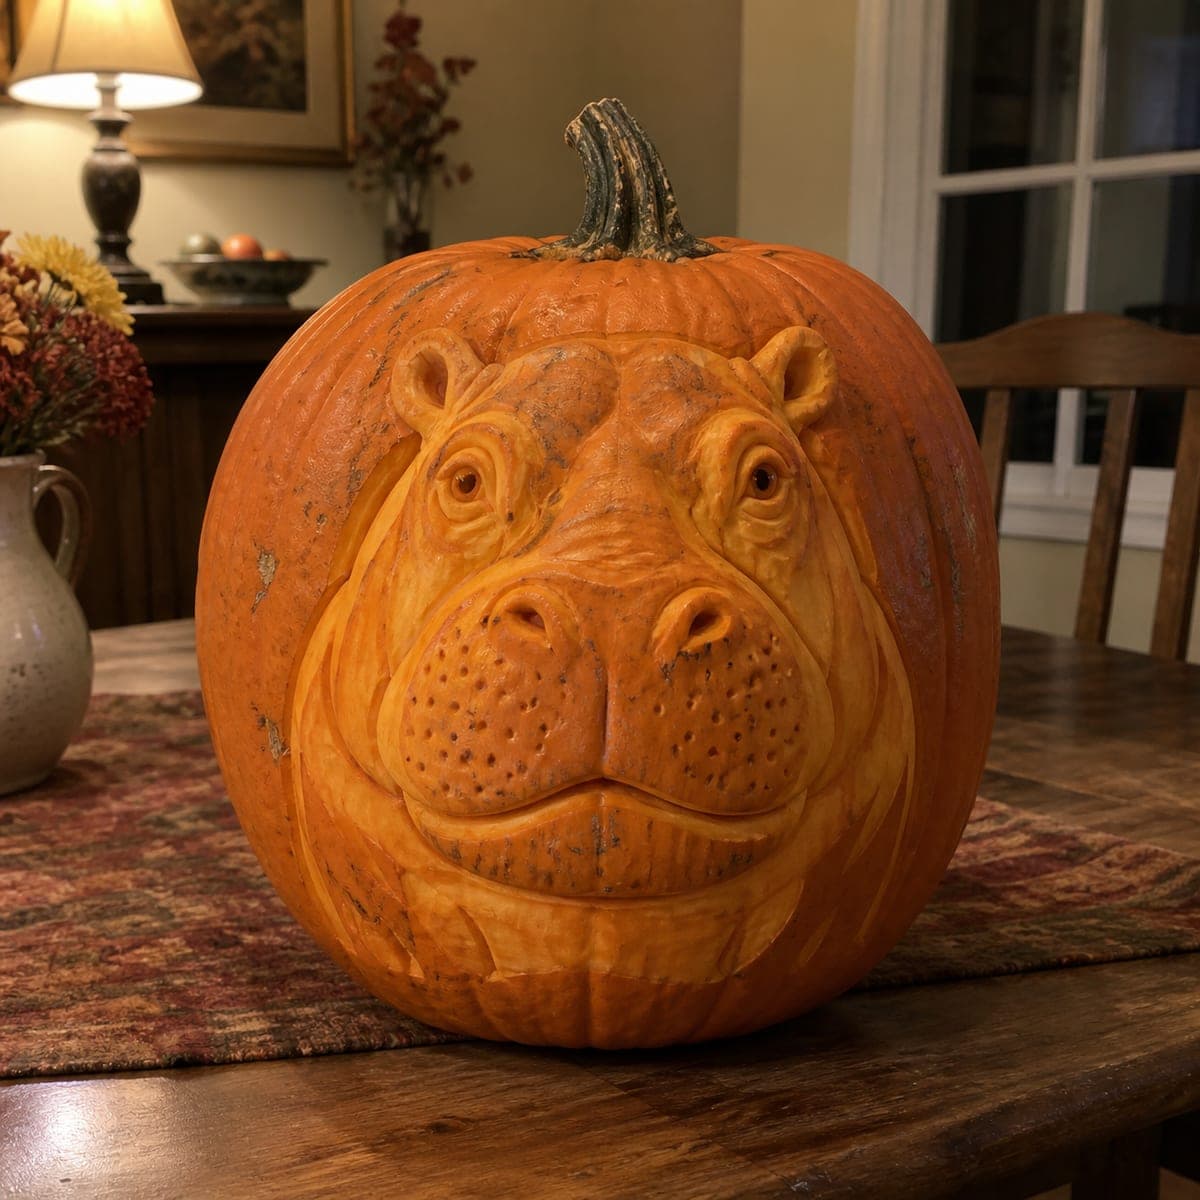
A hippopotamus face fills a large pumpkin from cheek to cheek, its broad nostrils, kind eyes, and dotted whisker spots carved in deep three-dimensional relief that makes the animal seem to push outward from the pumpkin's surface. The rounded pumpkin shape mirrors the hippo's own rotund form, giving the design a clever visual harmony. This pumpkin carving idea works best on a large, relatively round pumpkin so the proportions of the face stay intact. Carve the nostril openings as the deepest voids, then build out to the cheeks and brow in gradually shallower relief.

This is an AI-generated concept image: a realistic, carvable design idea rather than a photo of a finished carve. AI concepts are always labeled and sit out the leaderboard and the contest.

No ratings yet · Sign in to rate

Comments (0)

  • No comments yet — be the first.

Save without an account. Sign in to like or comment.

Our tips for carving a similar design

The core trick here is relief carving, where you shave away the outer skin at different depths instead of cutting all the way through. The nostrils sit as the deepest voids, the muzzle and cheeks build outward in gradually shallower layers, and the untouched skin frames the whole face. Plan it on a large, round pumpkin so the hippo's rotund head fills the surface cheek to cheek.

Written by PumpkinCarvingIdeas.com, inspired by the image above. These are our suggestions, not instructions from the uploader. This approach to the AI concept has not been tested on a real pumpkin.

From pumpkin to porch

  1. Pick the pumpkin and map the face

    Choose a big, evenly round pumpkin with a smooth front and a sturdy wall. Wipe it clean and dry, then sketch the hippo in soft pencil or a washable marker: broad muzzle low and centered, small eyes up high, tiny rounded ears near the top. Keep the face symmetrical by marking a light center line first. Leave a wide untouched border around the head so the design reads as a portrait.

  2. Open a back door, not the top

    Because this is a relief carving with no big front cutouts, cut a round access hole in the back or bottom rather than the lid so the front stays intact. Scoop the inside and thin only the front wall to about one inch so light can glow through the shaved areas later. Keep the wall even; a ribbon tool helps you feel the thickness as you go. An adult should handle all the cutting and scooping.

  3. Rough in the deepest layers

    Start with the nostrils as your deepest points, carving two rounded openings that can go fully through or nearly through for the darkest shadows. Then step outward and shave the muzzle sides and the recesses beside the eyes a little shallower. Work in thin passes with a loop or gouge tool, checking depth often so you do not blow through the wall. Establishing the deep spots first gives you a reference for every shallower layer.

  4. Build the rounded relief

    Round the big cheeks, the bridge of the muzzle, and the brow so they swell forward, leaving the highest points closest to the original skin. Blend each transition with smooth scoops instead of hard steps so the hippo looks soft and full. Curl the small ears and settle the eyes into gentle hollows so they feel kind rather than fierce. Step back frequently to check that both sides match.

  5. Add the whisker dots and skin texture

    Use a small round tool or a clean drill bit spun by hand to poke the shallow whisker spots across the muzzle. Vary their depth slightly so some catch more light than others. Lightly scrape the surface where you want a soft glow, and leave a few natural mottled marks for realistic hide. Take your time here since this fine texture is what sells the close-up look.

  6. Light it and photograph

    Set a battery LED puck or a string of warm LEDs inside, never a candle, since the thin shaved wall can scorch. Dim the room and see where light bleeds through; deepen any spots that stay too dark. Mist the cut edges and refrigerate the pumpkin between showings to keep the relief crisp. Shoot it slightly above eye level so the muzzle reads as the closest point to the camera.

Gather your supplies

Check things off as you get ready.

Work on a stable surface, keep your free hand out of the cutting path, and have an adult handle sharp tools.

Three levels of light

  • Leave intact

    The wide border around the head and the darkest hide markings stay as untouched skin.

  • Peel & shade

    The cheeks, muzzle, brow, and whisker area get skin-shaved to different depths for a soft mid glow.

  • Cut through

    The nostrils are cut deepest, nearly or fully through, for the brightest, darkest-contrast accents.

Learn the carving basics

Before you start cutting

Do I cut any openings all the way through?

Almost none. This is a relief carving, so the glow comes from shaving the skin at varied depths rather than cutting windows. Only the nostrils go deep enough to punch through or nearly through. Everything else stays as thinned, glowing surface.

How thick should I leave the front wall?

Aim for about one inch on the front before you start the relief. That gives you room to carve several depth layers without breaking through, while still letting an LED glow warmly. Check the thickness often with a ribbon tool as you shave the muzzle and cheeks.

This looks expert level. Can a first-timer try it?

The full three-dimensional relief takes patience and tool control, so it is a stretch for a beginner. If you are new, start with a simpler flat hippo outline or a single-plane face and add just a few shaded areas. You can work up to full sculptural relief on your next pumpkin.

Your take belongs here, too.

Changed a detail? Made it simpler? Share a photo of your version and tell the community what worked.

Share your pumpkin

More pumpkins like this

You've reached the end · 8 pumpkins
The Patch Report

Fresh pumpkins, in your inbox.

The best new carvings, ideas worth stealing, and how-tos for carving season. Short, seasonal, and gone by November.

A short email during carving season. Unsubscribe anytime. See our privacy policy.