Halloween Pumpkin Carving Contest · Starts October 1st · $500 in prizes
← Back to ideas
@ai_concepts
Jul 24, 2026
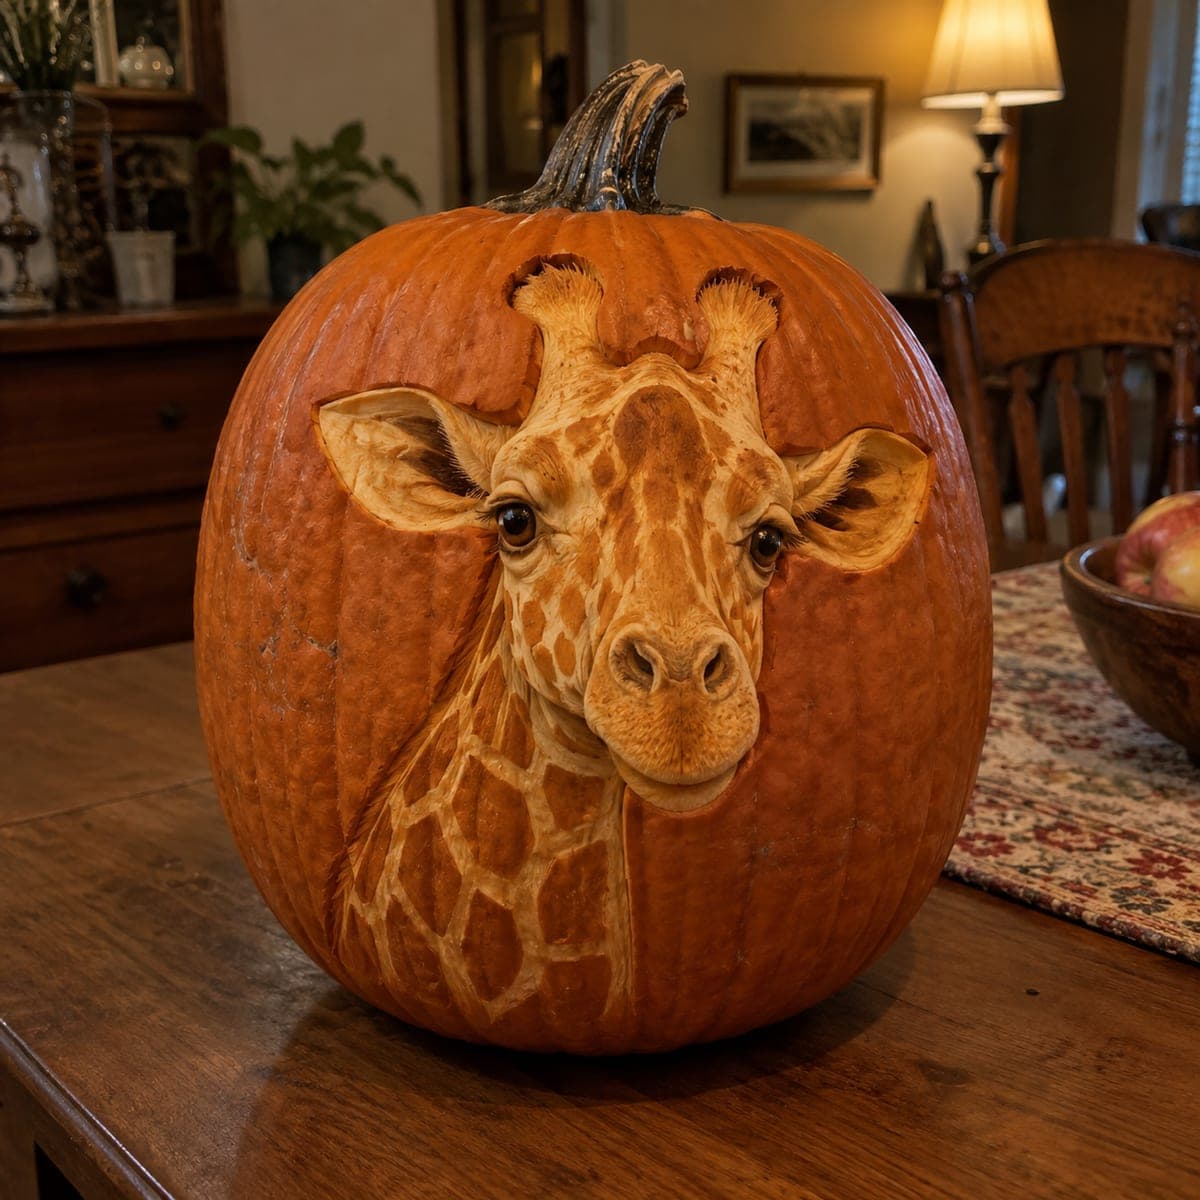
Lifelike Giraffe Head Sculpted Pumpkin MasterpieceAI
0

Lifelike Giraffe Head Sculpted Pumpkin Masterpiece

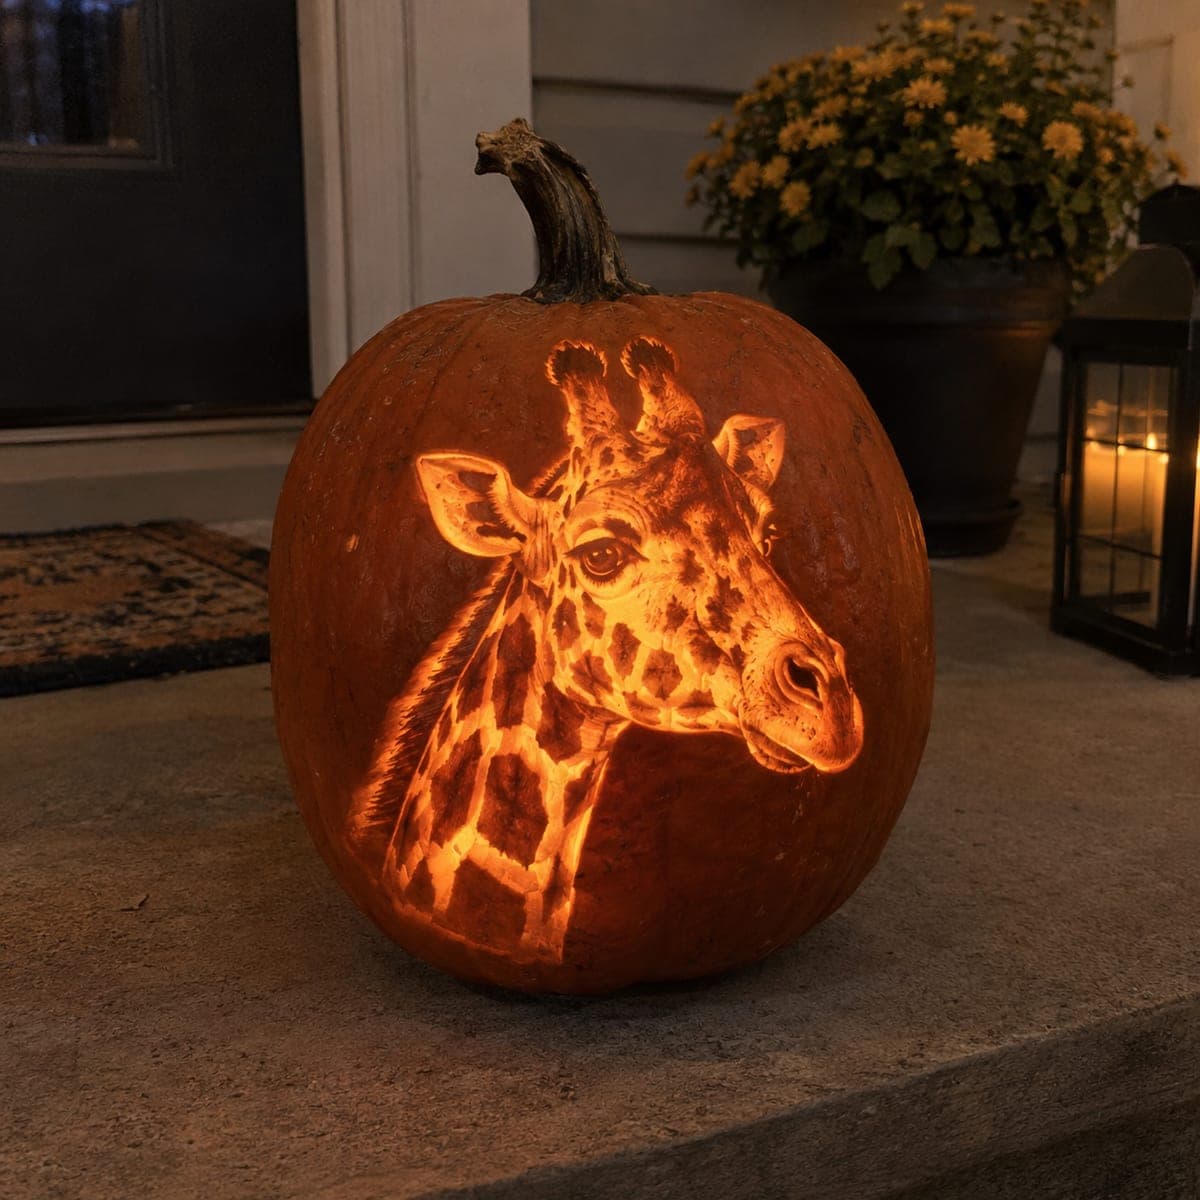
A giraffe tilts its head toward the viewer in this astonishing sculpted pumpkin, complete with ossicones, fringed ears, and a patch pattern flowing down the neck. Deep relief like this means removing an inch or more of flesh around the head so the muzzle can project forward, then refining the eyes and nostrils with detail knives. Photograph it the same day you finish; sculpted pumpkins dehydrate fast, so a spritz of water and plastic wrap overnight helps.

This is an AI-generated concept image: a realistic, carvable design idea rather than a photo of a finished carve. AI concepts are always labeled and sit out the leaderboard and the contest.

No ratings yet · Sign in to rate

Comments (0)

  • No comments yet — be the first.

Save without an account. Sign in to like or comment.

Our tips for carving a similar design

This is a relief sculpture, not a cutout: nothing is cut all the way through. The trick is depth, removing more flesh around the muzzle so the head projects forward, then shading the coat patches and refining the eyes and nostrils with detail tools. Work from broad shapes to fine detail and check the light often.

Written by PumpkinCarvingIdeas.com, inspired by the image above. These are our suggestions, not instructions from the uploader. This approach to the AI concept has not been tested on a real pumpkin.

From pumpkin to porch

  1. Choose a large pumpkin and map the head

    Pick a big pumpkin with a thick, smooth wall so you have plenty of flesh to sculpt into. Sketch the giraffe's head, ossicones, ears, and the neck flowing down. Mark the muzzle area, which will project the furthest forward, and the recessed areas around it.

  2. Skin the whole portrait area

    Peel the outer skin off the entire giraffe shape with a ribbon or loop tool so you are working in bare flesh. Keep the surface even at this stage. This peeled zone is your mid-tone; everything you carve deeper will glow brighter.

  3. Establish depth around the muzzle

    Remove more flesh from the areas behind and beside the muzzle so the nose and mouth stand proud of the face. Take thin passes and set an LED inside frequently to judge the glow, since a millimeter of depth changes the brightness a lot. Stop before the wall gets fragile.

  4. Carve the coat patches and features

    Shade the giraffe's patch pattern by carving the lighter patches deeper and leaving the dividing lines thicker and darker. Define the eyes, nostrils, and ear interiors with a fine detail knife, working from the center outward. Leave a backing of flesh under every fine line so nothing falls out.

  5. Refine, hydrate, and photograph the same day

    Adjust any areas that look too dark by shaving a little deeper, keeping delicate edges supported. Sculpted pumpkins dry and slump quickly, so a spritz of water and plastic wrap between sessions helps. Photograph it the day you finish, once lit and once in soft daylight.

Gather your supplies

Check things off as you get ready.

Work on a stable surface, keep your free hand out of the cutting path, and have an adult handle sharp tools.

Three levels of light

  • Leave intact

    The unpeeled skin and the thickest dividing lines stay darkest.

  • Peel & shade

    The whole coat is peeled to a mid glow, then patches are shaded deeper.

  • Cut through

    Only the very deepest relief areas approach a true cut-through brightness.

Learn the carving basics

Before you start cutting

Do I need to cut all the way through anywhere?

Not really. This is relief sculpting, where you vary the flesh depth to control brightness. Keeping the wall intact is what gives the portrait its soft, lifelike glow instead of hard silhouette lines.

How do I stop it from drying out mid-carve?

Sculpted pumpkins dehydrate fast because so much skin is removed. Mist the carved surface with water and wrap it in plastic in the fridge between sessions, and carve it as close to display day as you can.

This looks very hard. Where should a beginner start?

Try a simpler safari-animal stencil as a cutout first to get comfortable, then work up to shading. Relief portraits like this reward practice with loop tools on scrap pumpkin before you commit.

Your take belongs here, too.

Changed a detail? Made it simpler? Share a photo of your version and tell the community what worked.

Share your pumpkin

More pumpkins like this

You've reached the end · 8 pumpkins
The Patch Report

Fresh pumpkins, in your inbox.

The best new carvings, ideas worth stealing, and how-tos for carving season. Short, seasonal, and gone by November.

A short email during carving season. Unsubscribe anytime. See our privacy policy.