Halloween Pumpkin Carving Contest · Starts October 1st · $500 in prizes
← Back to ideas
@ai_concepts
Aug 8, 2026
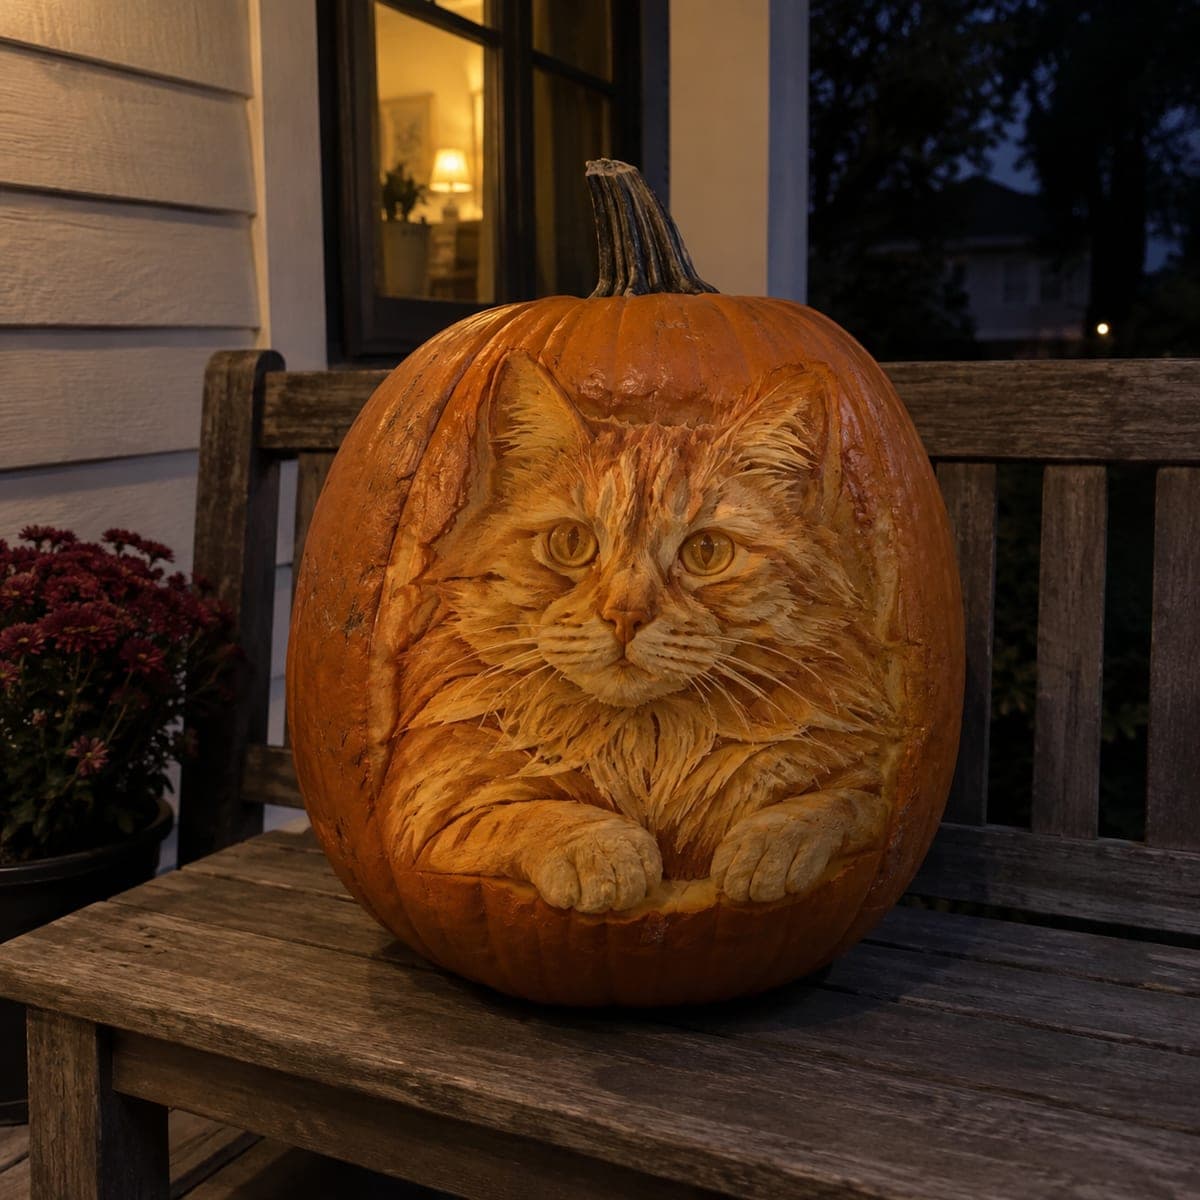
Tabby Cat Lounging Sculpted PumpkinAI
0

Tabby Cat Lounging Sculpted Pumpkin

An orange tabby lounges inside this pumpkin with its paws draped over the carved rim, the striped coat sculpted in long flowing ridges that catch the evening light. The trick is carving the cat and its window as one deep relief, leaving the paws attached to the ledge for support. Rough in the head and shoulders before detailing stripes, and pick a pumpkin whose color matches a real ginger cat for maximum double-take.

This is an AI-generated concept image: a realistic, carvable design idea rather than a photo of a finished carve. AI concepts are always labeled and sit out the leaderboard and the contest.

No ratings yet · Sign in to rate

Comments (0)

  • No comments yet — be the first.

Save without an account. Sign in to like or comment.

Our tips for carving a similar design

The core trick here is treating the whole face as one deep relief carving rather than a set of cut-through holes, so the tabby seems to lounge inside a carved window with its paws draped over the rim. You build the head and shoulders as raised forms first, then shave down the surrounding skin to push the cat forward. The paws stay attached to the ledge so they support themselves and read as three dimensional.

Written by PumpkinCarvingIdeas.com, inspired by the image above. These are our suggestions, not instructions from the uploader. This approach to the AI concept has not been tested on a real pumpkin.

From pumpkin to porch

  1. Pick the pumpkin and plan the window

    Choose a large, round pumpkin with thick walls and a warm ginger color close to a real orange tabby. Scoop the guts from a lid on top and thin the front wall to about one inch where the face will sit. Draw an oval window opening on the front, then sketch the cat's head, shoulders, and two front paws inside it. Keep the paws overlapping the bottom edge so they anchor to the rim.

  2. Rough in the big forms

    Using a loop or ribbon tool, skin the pumpkin around the cat to knock the whole figure back and make it stand out in relief. Block the head as a rounded mass and the shoulders as a wider base below it. Do not detail anything yet, just establish which areas are high and which are low. Step back often to check that the head reads as a clear dome above the body.

  3. Shape the face features

    Carve the eye sockets, brow ridges, muzzle, and nose as gentle scooped planes. Leave the eyes as raised rounded forms so they catch light and look glassy. Define the two ears as triangles set into the top of the head, keeping their bases thick and attached. Work shallow and check symmetry from straight on before going deeper.

  4. Sculpt the flowing fur

    Switch to a small detail loop and carve the coat as long directional ridges that sweep down from the crown, cheeks, and chest. Vary the depth so some ridges catch light and others fall into shadow, which is what gives the fur its flow. Add fine whisker lines and short strokes around the muzzle. Take your time here, since this shading step is what sells the tabby texture.

  5. Finish the paws and rim

    Carve the two front paws as rounded shapes resting on the bottom ledge, keeping them fully attached to the rim for strength. Define the toes with shallow grooves rather than cutting all the way through. Skin-peel a few spots on the paws and chest for a soft mid glow. Clean up any ragged edges around the window opening last.

  6. Light it and photograph

    Set a battery LED puck or string inside, never a candle, since the thin relief walls can scorch. Warm white light pushes the ginger tones and makes the peeled fur glow. Rub cut edges with petroleum jelly to slow drying and keep detail crisp for a couple of days. Shoot at dusk on a porch to capture the double-take effect.

Gather your supplies

Check things off as you get ready.

Work on a stable surface, keep your free hand out of the cutting path, and have an adult handle sharp tools.

Three levels of light

  • Leave intact

    The untouched outer pumpkin skin around the window stays dark and frames the scene.

  • Peel & shade

    The sculpted fur, face, and paws are skin-peeled to thin layers that glow soft orange.

  • Cut through

    Only the window opening edge and a few deep shadow grooves are cut through for brighter accents.

Learn the carving basics

Before you start cutting

How thick should I leave the wall for the relief?

Aim for about one inch on the front where the cat sits, which gives you room to carve raised and recessed forms. Thinner than that and the peeled fur will glow evenly with no depth. Check your thickness with a skewer as you go so you do not accidentally cut through the face.

Will the paws break off the rim?

They should not if you keep them fully attached to the bottom ledge and never cut all the way around them. Define the toes with shallow grooves instead of open cuts. The connected base acts as a bridge that supports the whole paw form.

This is an AI concept, so can a real pumpkin look like this?

Yes, a skilled carver can get close using relief sculpting and patient shading, though real fur texture takes practice. Pick a pumpkin whose natural color matches a ginger cat to boost the illusion. Keep ears and whisker ridges thick enough to hold, since real pumpkin flesh is more fragile than a rendered image.

Your take belongs here, too.

Changed a detail? Made it simpler? Share a photo of your version and tell the community what worked.

Share your pumpkin

More pumpkins like this

You've reached the end · 8 pumpkins
The Patch Report

Fresh pumpkins, in your inbox.

The best new carvings, ideas worth stealing, and how-tos for carving season. Short, seasonal, and gone by November.

A short email during carving season. Unsubscribe anytime. See our privacy policy.