Halloween Pumpkin Carving Contest · Starts October 1st · $500 in prizes
← Back to ideas

Comments (0)

  • No comments yet — be the first.

Save without an account. Sign in to like or comment.

Our tips for carving a similar design

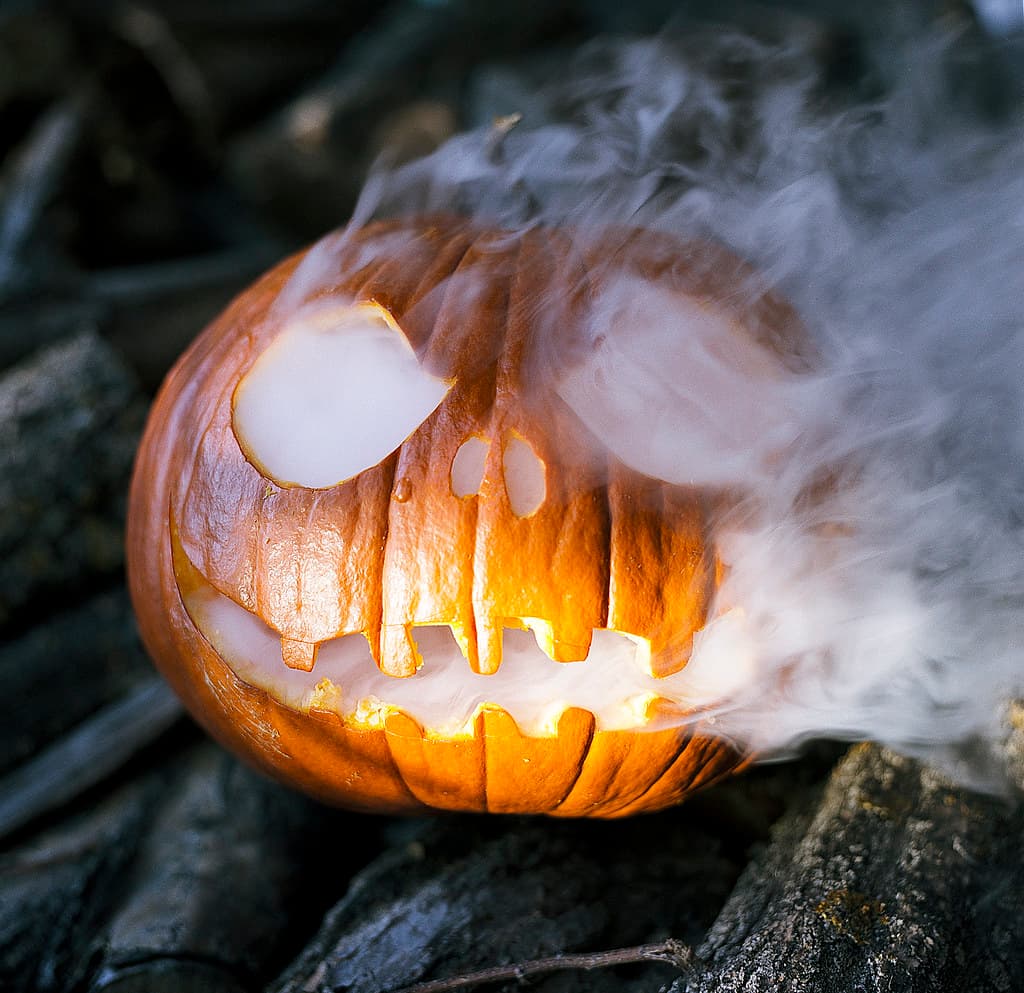
The whole effect leans on clean cutouts and a wide grin broken up by narrow tooth bridges, all fed with dry-ice fog from inside. Keep the eyes as smooth ovals and the nostrils as tiny slits so the smoke reads as pouring from a face. Plan the mouth so the bridges between teeth stay wide enough to hold up while the smoke passes through.

Written by PumpkinCarvingIdeas.com, inspired by @porchglow's photo above. These are our suggestions, not instructions from the uploader, and this approach hasn't been tested on their exact carve.

From pumpkin to porch

  1. Prep and open the pumpkin

    Pick a rounded pumpkin that can rest on its side without rolling. Cut a lid from the back or bottom rather than the top so the opening stays hidden when displayed on its side. Scoop the inside clean and thin the front wall to about one inch so your blade passes through easily. A thinner wall also lets the smoke escape faster.

  2. Transfer the face

    Tape your Jack Skellington stencil to the front and poke the outlines with a pin or awl. Mark the two tall ovals for the eyes, the two small triangle or slit nostrils, and the long curved grin. Draw light guide dots for the vertical tooth bridges inside the mouth so they stay even. Step back and check the spacing before any blade touches the skin.

  3. Carve the eyes and nostrils

    Start with the smaller openings while the pumpkin is still strong. Cut the ovals with a fine saw, following your pin lines and keeping the edges smooth and rounded. Slice the nostril slits as short, narrow openings so they do not blow out into a big hole. Ease the pieces out gently to avoid cracking the surrounding wall.

  4. Cut the stitched grin

    Outline the full grin, then carve the top and bottom edges of the mouth. Leave narrow vertical strips standing between each tooth gap so they act as bridges and hold the smile shape. Cut each gap one at a time rather than removing the whole mouth at once. This is the widest opening, so save it for last to keep the face rigid.

  5. Add the smoke and light

    Set a battery LED inside to underlight the face with a warm glow. Place a small container of warm water and drop in dry ice just before showtime, wearing gloves and never touching the ice bare-handed. The fog will sink and pour out of the eyes, nostrils, and grin. Keep the area ventilated and let an adult handle the dry ice.

  6. Stage and photograph

    Rest the pumpkin on its side on a dark surface like charred wood or bark for contrast. Shoot in low light so the LED glow and the pale smoke stand out against the shadows. Snap frames right after adding fresh dry ice when the smoke is thickest. Refresh the ice between shots to keep the flow steady.

Gather your supplies

Check things off as you get ready.

Work on a stable surface, keep your free hand out of the cutting path, and have an adult handle sharp tools.

Three levels of light

  • Leave intact

    The full outer skin of the face and the tall forehead stay untouched and dark.

  • Peel & shade

    Shave a shallow skin layer around the eye and mouth edges if you want a soft halo where the smoke drifts.

  • Cut through

    The two oval eyes, the nostril slits, and the gaps between the grin teeth cut all the way through for full light and smoke flow.

Learn the carving basics

Before you start cutting

How do I keep the grin teeth from breaking?

Leave each vertical bridge between the teeth at least a quarter inch wide and carve the gaps one by one. Cut the mouth last, after the eyes and nostrils, so the wall stays firm while you work. If a bridge starts to sag, a dab of toothpick support from behind can hold it.

Where should the smoke come from?

The fog sinks and flows out of the lowest openings, so on a side-lying pumpkin it will pour from the grin and eyes. Thin the front wall and keep the openings clean-edged so nothing blocks the flow. Place the dry-ice container directly behind the face for the strongest stream.

Can I use a candle instead of dry ice for the glow?

Use a battery LED, not a candle. Dry ice fog and open flame do not mix well, and a candle can be snuffed by the moisture or tipped over on a side-lying pumpkin. An LED gives a steady warm glow that shows through the smoke.

Your take belongs here, too.

Changed a detail? Made it simpler? Share a photo of your version and tell the community what worked.

Share your pumpkin

More pumpkins like this

You've reached the end · 8 pumpkins
The Patch Report

Fresh pumpkins, in your inbox.

The best new carvings, ideas worth stealing, and how-tos for carving season. Short, seasonal, and gone by November.

A short email during carving season. Unsubscribe anytime. See our privacy policy.