Halloween Pumpkin Carving Contest Β· Starts October 1st Β· $500 in prizes
← Back to ideas
@ai_concepts
Aug 14, 2026
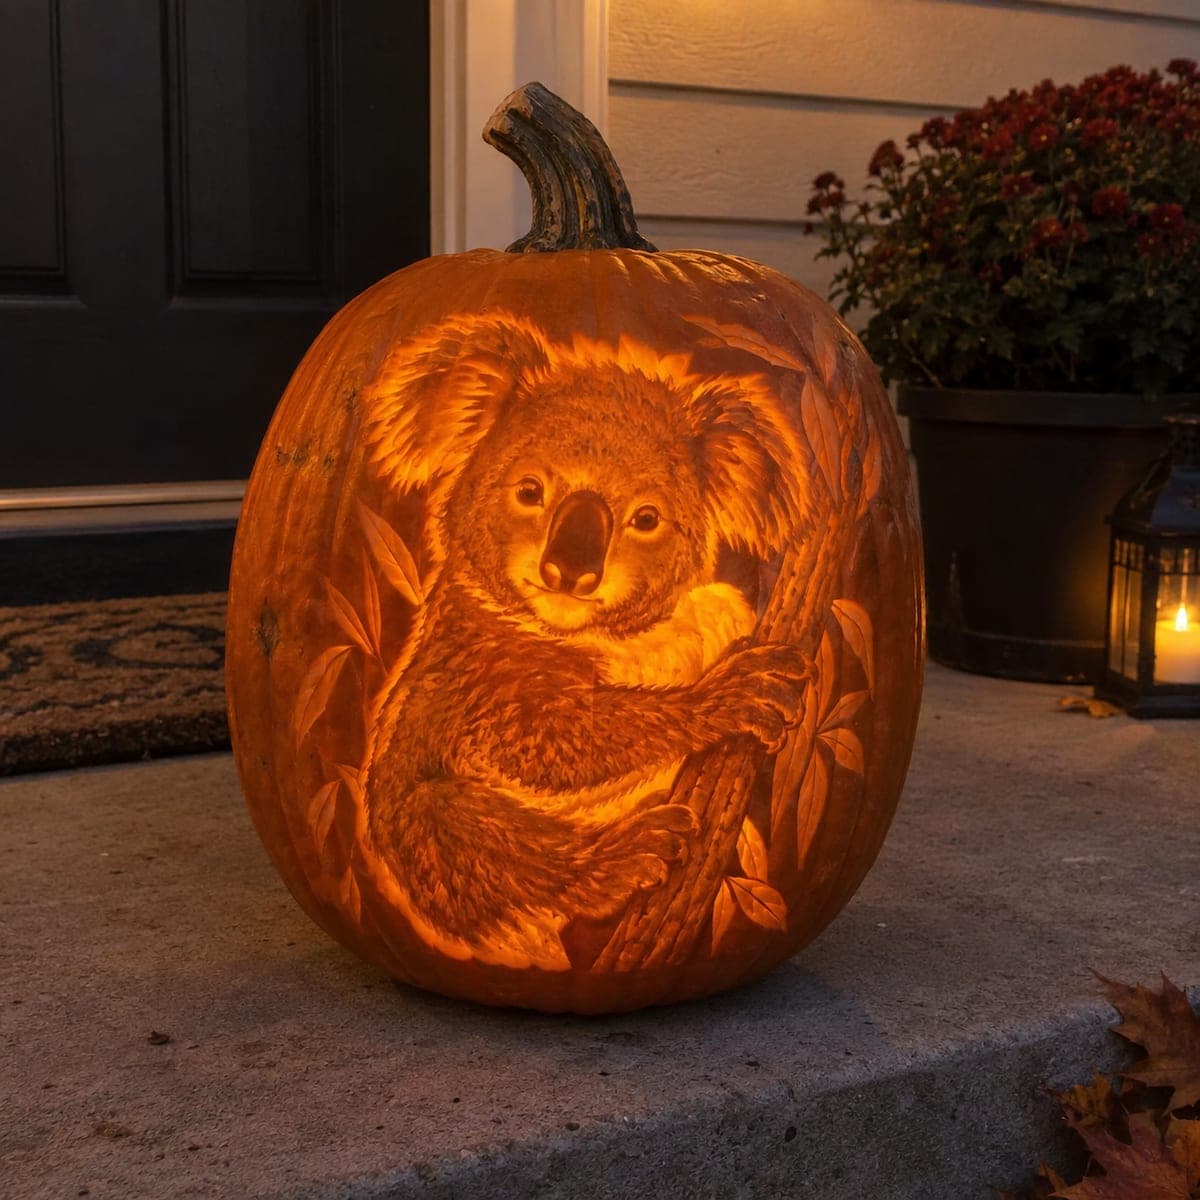
Koala in a Eucalyptus Tree Carved PumpkinAI
0

Koala in a Eucalyptus Tree Carved Pumpkin

A fluffy koala hugs a eucalyptus branch on this pumpkin, surrounded by etched leaves, with its round ears, wide nose, and clinging paws shaded in soft graduated light. Nearly the entire surface is worked at varying depths, which is what gives the fur its downy, backlit look. Block in the darkest zones first (the nose, branch, and shadowed arm), then thin the face and chest for the brightest glow, and expect several hours of patient loop-tool work.

This is an AI-generated concept image: a realistic, carvable design idea rather than a photo of a finished carve. AI concepts are always labeled and sit out the leaderboard and the contest.

No ratings yet Β· Sign in to rate

Comments (0)

  • No comments yet β€” be the first.

Save without an account. Sign in to like or comment.

Our tips for carving a similar design

This design lives entirely in surface shading, so the whole face is sculpted at different depths rather than cut through. The core trick is working from dark to light: leave the nose, branch, and shadowed arm as untouched or barely scraped skin, then thin the cheeks and chest until they glow. Since this is an AI concept, treat it as a plan for how you could carve a similar downy, backlit koala.

Written by PumpkinCarvingIdeas.com, inspired by the image above. These are our suggestions, not instructions from the uploader. This approach to the AI concept has not been tested on a real pumpkin.

From pumpkin to porch

  1. Transfer and map your light zones

    Print or draw the koala centered on the smoothest face of your pumpkin and tape the pattern in place. Poke through the main outlines with a pin, or shade the key boundaries with a washable marker. Mark three zones before you cut: darkest (nose, branch, shadowed arm), mid glow (fur, ears, leaves), and brightest (chest and lit side of the face). Having this map keeps the fur reading correctly once it is lit.

  2. Scoop out the lid or a back door

    Have an adult cut an access opening in the back or bottom so the front face stays clean and unbroken. Cutting from the bottom lets the pumpkin sit flat over an LED puck later. Scrape the inside wall behind the face down to about one inch thick so light passes through evenly. A thinner wall shades faster and glows warmer.

  3. Establish the darkest shadows

    Leave the nose, the eyes, and the shadowed arm as untouched skin so they stay dark. Lightly etch the branch and the outer edges of the ears just enough to separate them from the background. Work these first so you have fixed reference points for how bright everything else should get. Resist the urge to go deep here; dark means barely touched, not carved away.

  4. Build the fur with a loop tool

    Use a small loop or ribbon tool to scrape short, directional strokes that follow the way the fur grows: outward on the ears, down the chest, along the arm. Vary your pressure so the fur fades smoothly from dark to light rather than in hard steps. Thin the cheeks and chest the most, since those catch the strongest glow. This is the slow part, so expect a few patient hours and check the light often.

  5. Etch the eucalyptus leaves

    Shade the surrounding leaves at a shallow, even depth so they read as a soft frame without stealing focus from the koala. Keep each leaf connected to the skin around it and leave thin ridges between overlapping leaves as natural bridges. A V-gouge gives clean central veins. These leaves should glow dimmer than the koala's chest to keep the depth believable.

  6. Balance the glow and photograph

    Drop in an LED light and look at the whole face from a few feet back. Where the fur looks flat, scrape a little more; where a spot glares too bright, you cannot add pumpkin back, so go slowly. Wipe the surface, coat cut edges with a little petroleum jelly to slow drying, and shoot your photo at dusk on a porch step for that warm backlit look.

Gather your supplies

Check things off as you get ready.

Work on a stable surface, keep your free hand out of the cutting path, and have an adult handle sharp tools.

Three levels of light

  • Leave intact

    The nose, eyes, and the shadowed arm stay as untouched skin so they read as the darkest anchors.

  • Peel & shade

    The fur, ears, eucalyptus leaves, and branch get scraped to varying depths for a soft graduated mid glow.

  • Cut through

    Nothing is cut fully through on the face; the brightest glow comes from the thinnest-scraped chest and lit cheek.

Learn the carving basics

Before you start cutting

Do I cut all the way through anywhere on this design?

No, this is a shaded portrait, so almost the entire image stays as skin scraped to different depths. The brightest areas are simply the thinnest, not open holes. Cutting through would break the soft, downy look and create harsh glare.

How thick should the wall behind the koala be?

Aim for about one inch across the whole carving area so the light spreads evenly. A consistent wall keeps the fur gradients smooth instead of blotchy. Scrape any thick spots down before you start the detail work.

How do I keep the fur from looking flat when lit?

Work in short directional strokes that follow the fur growth and vary how deep you scrape. Test with your LED light frequently, since depth changes look very different backlit than in daylight. Leave the shadow zones nearly untouched to give the lighter fur something to contrast against.

Your take belongs here, too.

Changed a detail? Made it simpler? Share a photo of your version and tell the community what worked.

Share your pumpkin

More pumpkins like this

You've reached the end Β· 8 pumpkins
The Patch Report

Fresh pumpkins, in your inbox.

The best new carvings, ideas worth stealing, and how-tos for carving season. Short, seasonal, and gone by November.

A short email during carving season. Unsubscribe anytime. See our privacy policy.