Halloween Pumpkin Carving Contest · Starts October 1st · $500 in prizes
← Back to ideas
@ai_concepts
Jul 11, 2026
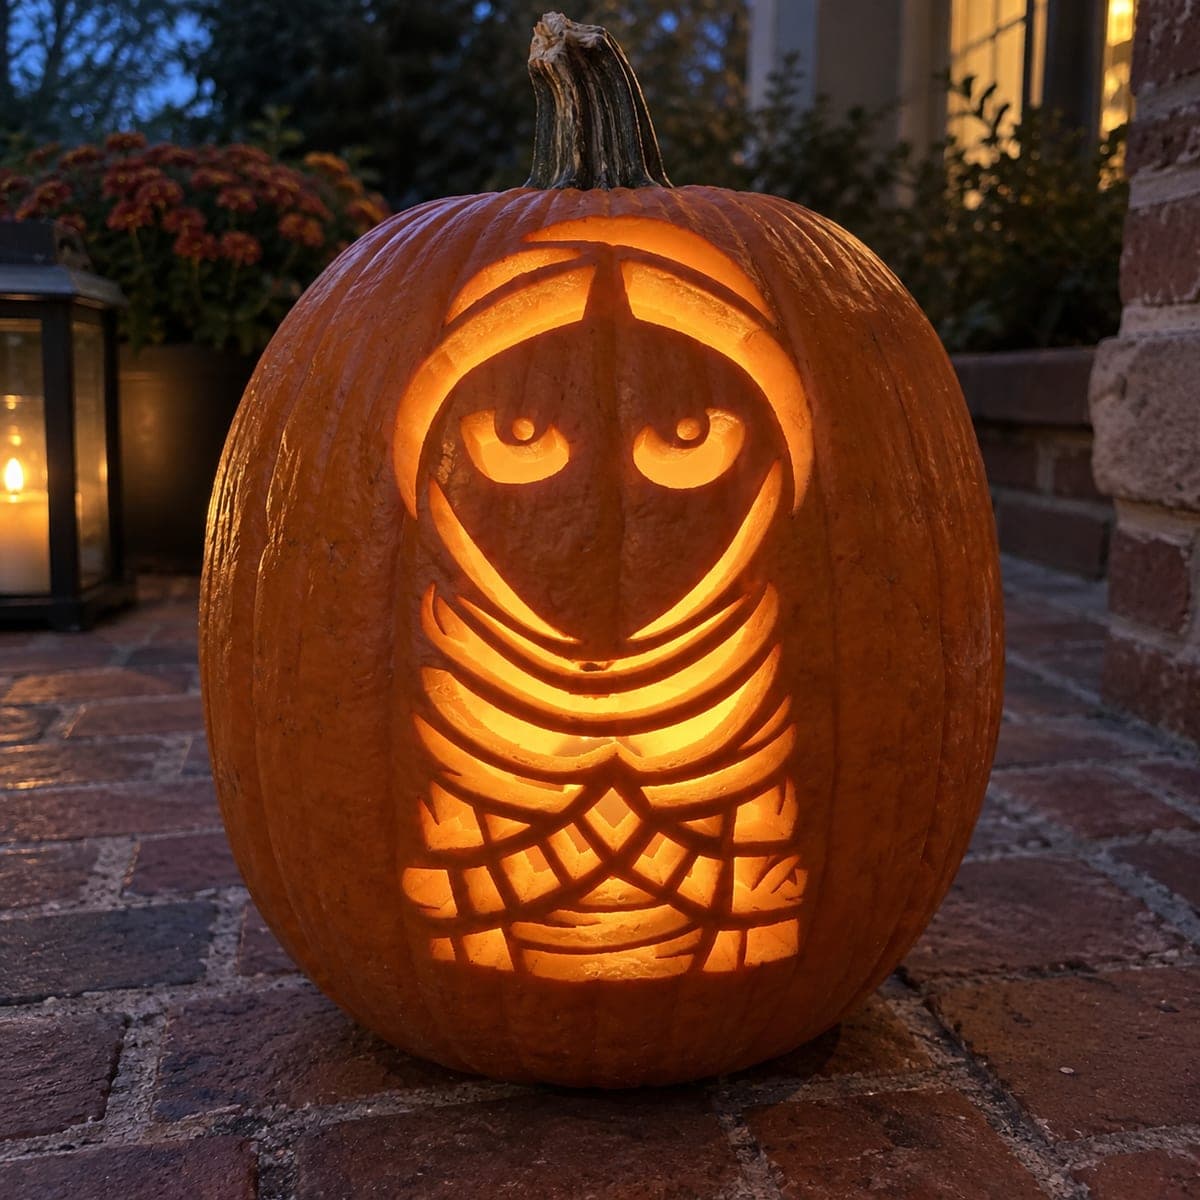
Mummy Face Pumpkin Carving With Glowing EyesAI
0

Mummy Face Pumpkin Carving With Glowing Eyes

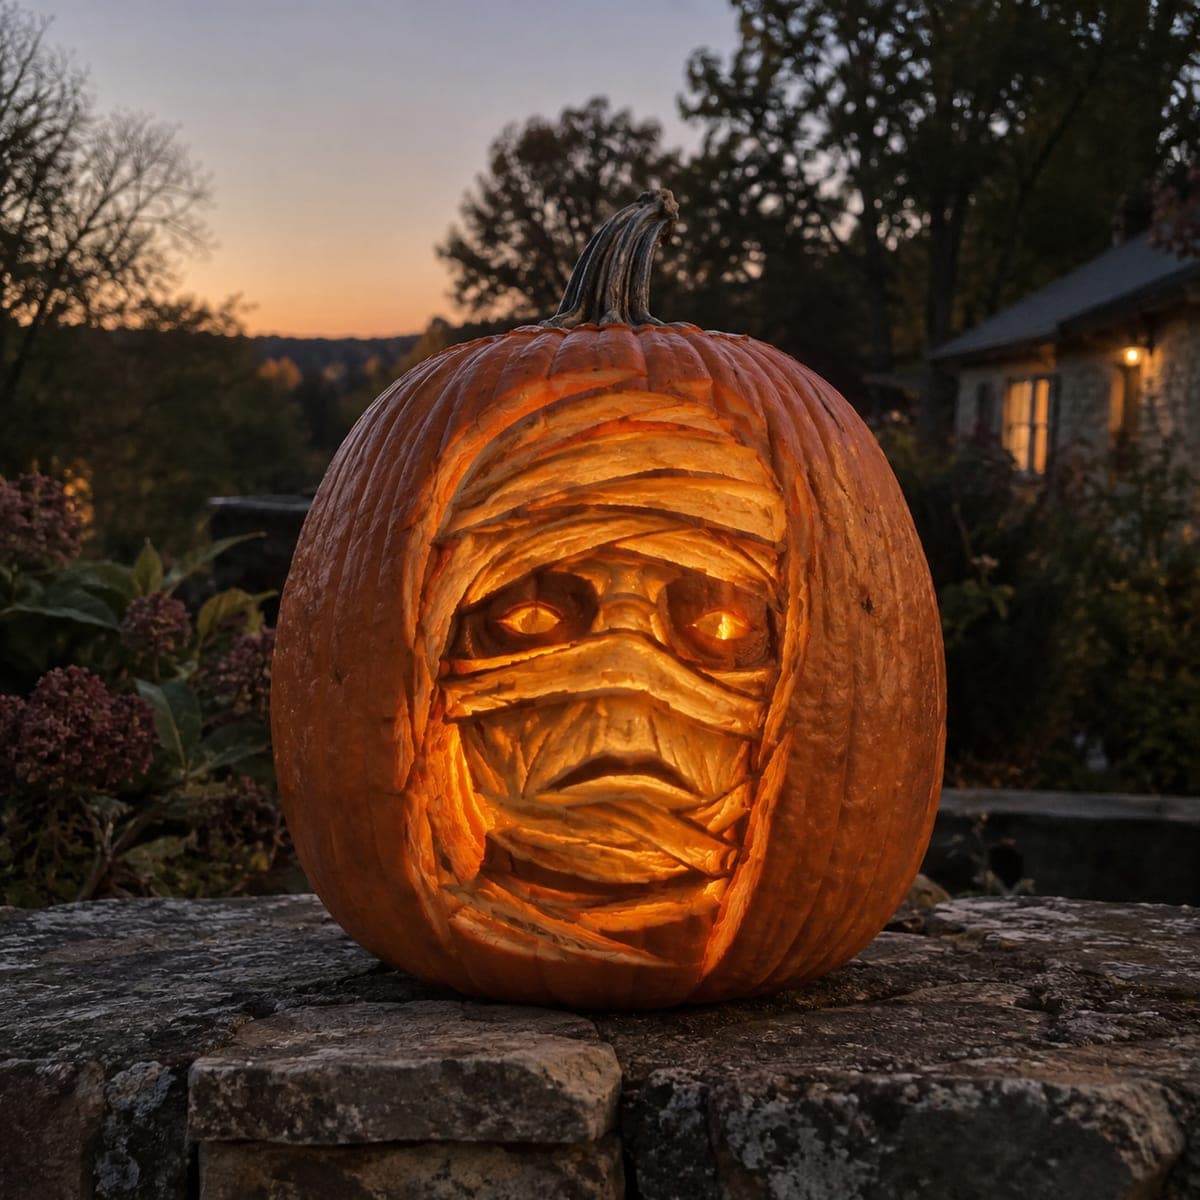
Layers of tattered bandages wrap this pumpkin's carved mummy face, with two sunken eyes smoldering from the gaps in the wrappings. Each bandage strip is sculpted at a slightly different depth, so the candlelight leaks through the seams and makes the whole face flicker like it is breathing. Carve the eye sockets deepest, then build the wraps outward in overlapping bands. Photograph it at dusk when the sky still holds some color behind it.

This is an AI-generated concept image: a realistic, carvable design idea rather than a photo of a finished carve. AI concepts are always labeled and sit out the leaderboard and the contest.

No ratings yet · Sign in to rate
Comments (0)

  • No comments yet — be the first.

Save without an account. Sign in to like or comment.

Our tips for carving a similar design

The trick here is depth layering: the bandages are shaded relief work at slightly different depths, so light leaks through the seams instead of blasting out of big holes. You carve the eye sockets deepest and brightest, then build overlapping bands of skin-peeled relief outward across the face. Almost nothing is cut all the way through except the two glowing eyes, which keeps the flickering, breathing look.

Written by PumpkinCarvingIdeas.com, inspired by the image above. These are our suggestions, not instructions from the uploader. This approach to the AI concept has not been tested on a real pumpkin.

From pumpkin to porch

  1. Prep the pumpkin and cut the lid

    Pick a tall, evenly shaped pumpkin with a smooth front panel for the face. Cut a lid from the bottom or back rather than the top so the stem stays intact for the sunset photo. Scrape the inside wall of the face area down to about one inch thick with a loop tool. A thinner wall makes the shaded bandage layers glow evenly.

  2. Transfer the mummy pattern

    Tape your stencil flat against the front and poke through the outline of the wrap bands and the two eyes. Mark which strips overlap which, since that overlap is what sells the tattered look. Keep the eye openings small and slightly sunken toward the center. Do not cut anything yet, just get a clean dotted map.

  3. Peel the bandage layers at different depths

    Using a shading or ribbon tool, skin-peel each bandage strip so it glows dim orange, leaving the deepest gaps between strips a touch thinner for more light. Vary the depth strip by strip so no two bands match, which is what makes the surface flicker. Leave narrow ridges of untouched skin between some wraps to read as shadow seams. Work slowly and keep every strip connected to its neighbors so nothing falls loose.

  4. Sculpt the sunken eye sockets

    Carve a shallow bowl around each eye so the sockets look recessed under the wrappings. Shade the eyelids and brow ridge thin for a soft glow before you commit to any full cut. This shadowed frame is what makes the eyes look smoldering rather than cartoonish. Take your time, since the eyes are the focal point of the whole face.

  5. Cut the eyes through last

    Only after all the shading is done, cut the two eye openings fully through the wall for the brightest light. Keep them narrow slits or almonds so the glow stays intense and focused. Clean the edges from the inside so no stray pulp blocks the light. Because these are the only true cutouts, the rest of the face keeps its structure.

  6. Light it and shoot at dusk

    Drop in a warm LED light or two, never a candle, and aim for a flickering amber tone. Set the pumpkin so the light pools in the eyes and seeps through the bandage seams. Photograph it at dusk while the sky still holds some color behind it, as the caption suggests. Mist the surface lightly if it starts to dry and curl.

Gather your supplies

Check things off as you get ready.

Work on a stable surface, keep your free hand out of the cutting path, and have an adult handle sharp tools.

Three levels of light

  • Leave intact

    The narrow ridges of skin between wrap strips stay dark as shadow seams

  • Peel & shade

    The overlapping bandage strips and the eyelid area get skin-peeled for a soft dim glow

  • Cut through

    Only the two narrow eye slits are cut fully through for the brightest smoldering light

Learn the carving basics

Before you start cutting

How do I keep the bandage strips from looking flat?

Vary the depth of every strip and let them overlap instead of lining up neatly. Peel some almost to the light and leave others thicker, then keep a thin ridge of untouched skin between a few of them. That mix of depths is what makes the wraps look layered and tattered.

Should the eyes be cut all the way through?

Yes, but only the eyes, and save them for last. Cutting them through is what gives the bright, smoldering glow, while the rest of the face stays shaded relief. Keep them small and narrow so the light stays concentrated rather than washing out the wraps.

This is an AI concept, so is it even carvable?

A design like this is realistic if you treat the bandages as shading and only cut the eyes through. Keep your wall around an inch thick and leave every strip attached to its neighbors so nothing breaks loose. The look comes from depth and light, not from lots of open holes.

Your take belongs here, too.

Changed a detail? Made it simpler? Share a photo of your version and tell the community what worked.

Share your pumpkin

More pumpkins like this

You've reached the end · 8 pumpkins
The Patch Report

Fresh pumpkins, in your inbox.

The best new carvings, ideas worth stealing, and how-tos for carving season. Short, seasonal, and gone by November.

A short email during carving season. Unsubscribe anytime. See our privacy policy.