Halloween Pumpkin Carving Contest · Starts October 1st · $500 in prizes
← Back to ideas
@ai_concepts
Sep 14, 2026
Close-Up Bandaged Mummy Face PumpkinAI
0

Close-Up Bandaged Mummy Face Pumpkin

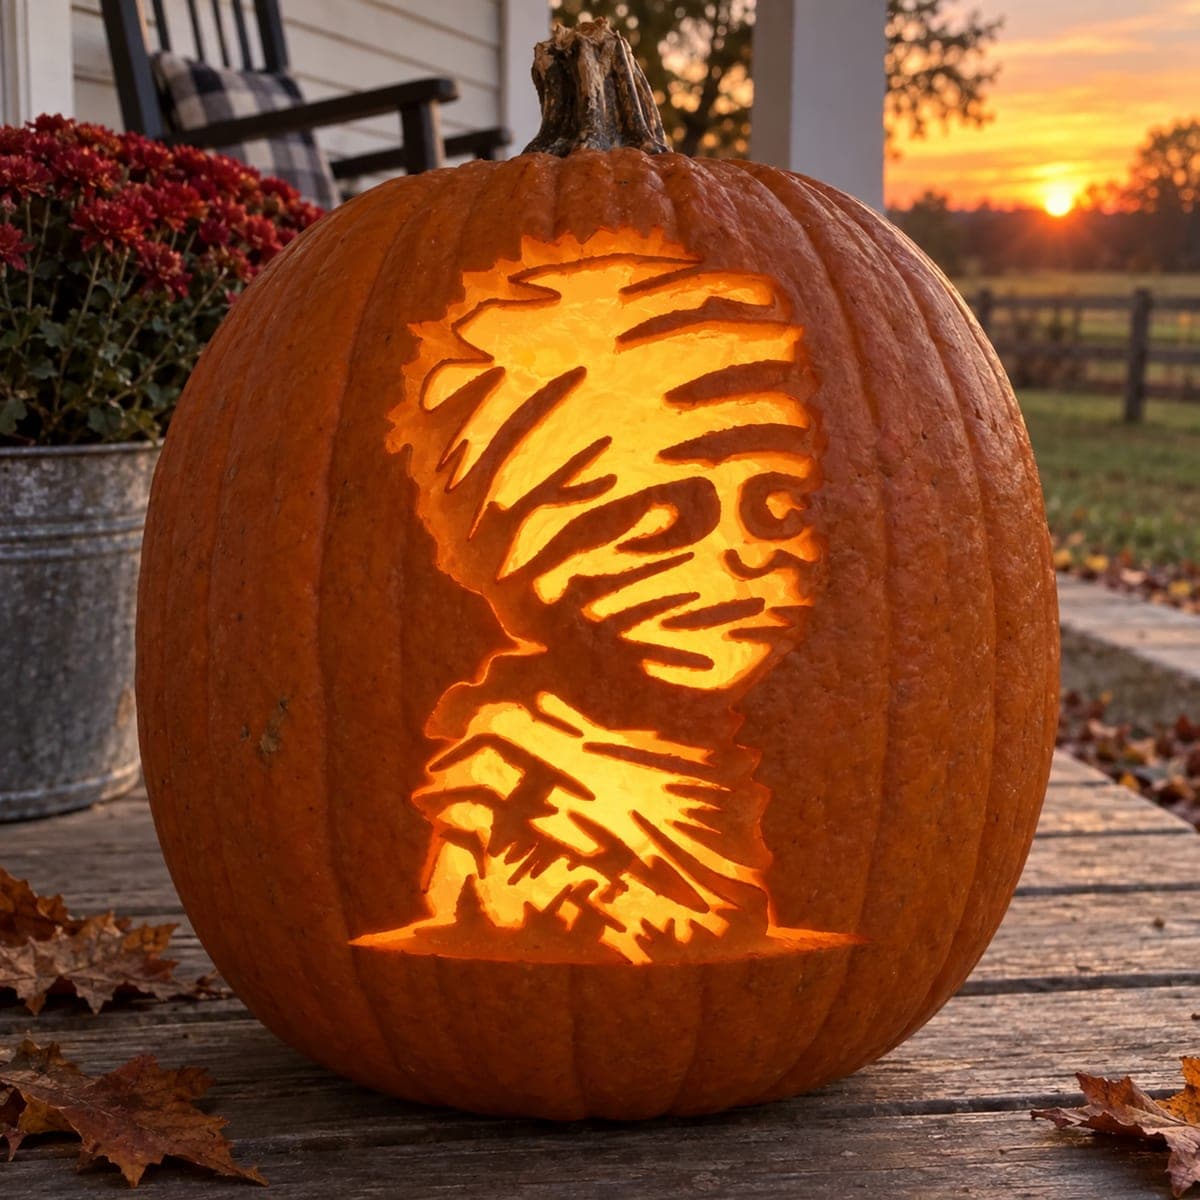
This close-up mummy face pumpkin carving idea fills the pumpkin surface with dense horizontal bandage strips, two narrow glowing eyes, a small triangular nose opening, and a row of tiny teeth below. Every bandage layer is pierced through, so the design radiates light from dozens of thin parallel gaps stacked across the whole face. When carving, do the eye sockets first to anchor your layout, then work the bandage strips outward from center to edges so you always have solid wall to brace against.

This is an AI-generated concept image: a realistic, carvable design idea rather than a photo of a finished carve. AI concepts are always labeled and sit out the leaderboard and the contest.

No ratings yet · Sign in to rate
Comments (0)

  • No comments yet — be the first.

Save without an account. Sign in to like or comment.

Our tips for carving a similar design

The core trick here is stacking dozens of thin horizontal bandage gaps across the whole face so the pumpkin glows in parallel stripes, with narrow eyes, a small triangular nose, and a row of tiny teeth reading as the face beneath the wraps. The plan is to lock in the two eye openings first as your anchor, then cut the bandage slots outward from the center so you always have solid pumpkin wall to brace against. Since this is a concept design, you can adapt the slot spacing to whatever your pumpkin comfortably supports.

Written by PumpkinCarvingIdeas.com, inspired by the image above. These are our suggestions, not instructions from the uploader. This approach to the AI concept has not been tested on a real pumpkin.

From pumpkin to porch

  1. Prep the pumpkin and pick a flat face

    Choose a large pumpkin with a broad, even front so the bandage strips have room to stack. Cut a lid from the bottom rather than the top so the design stays intact and the pumpkin sits steady. Scoop the inside and thin the carving wall to about one inch with a sturdy scraper. A thinner wall makes the many parallel slots much easier to pierce cleanly.

  2. Transfer the layout

    Print or draw the mummy face and tape it flat to the front, snipping the edges so the paper hugs the curve. Poke your design lines with a transfer tool or pushpin, spacing dots close together along each bandage gap. Mark the two eyes, the triangular nose, and the small teeth row clearly since those are your brightest features. Peel the paper and connect the dots lightly with a marker before you cut.

  3. Cut the eyes first to anchor the face

    Start with the two narrow eye openings, since they set the spacing for everything else. Use a small carving saw and gentle pressure, cutting fully through so they read as sharp bright slits. Keep the little bridge of pumpkin between the eyes intact for that classic mummy squint. This anchor point gives you a reference for aligning the bandage strips above and below.

  4. Add the nose and teeth

    Cut the small triangular nose opening next, keeping it modest so it does not overwhelm the eyes. Carve the short row of tiny teeth below as separate slots, leaving thin walls between each one so they stay attached and structurally sound. Do not connect all the teeth into one big hole, or the strip above them can sag. These small openings will glow brightest, so cut them cleanly.

  5. Slot the bandage strips from center outward

    Now pierce the horizontal bandage gaps, working from the middle of the face out toward the edges. Cut each thin slot fully through, but leave a solid rib of pumpkin between every strip so the wall never loses its strength. Vary the length and slight angle of the strips so the wraps look layered rather than mechanical. Always keep uncut pumpkin on both sides of your saw to brace against, and save the longest slots for last.

  6. Light it and photograph

    Set a bright LED puck or a string of battery lights inside, never a candle, since the dense slots need even light to glow across the whole face. Test in the dark and add or widen slots if any area looks flat. Wipe the surface dry, since a wet pumpkin like the one pictured shows off reflections nicely at dusk. Shoot slightly off center so the parallel gaps catch the light.

Gather your supplies

Check things off as you get ready.

Work on a stable surface, keep your free hand out of the cutting path, and have an adult handle sharp tools.

Three levels of light

  • Leave intact

    The outer pumpkin skin around the face and the ribs between each bandage strip stay dark to define the wraps.

  • Peel & shade

    Shallow-scraped areas along the bandage edges can glow a soft dim orange for a layered, gauzy look.

  • Cut through

    The two eye slits, the triangular nose, the tiny teeth, and every pierced bandage gap shine brightest.

Learn the carving basics

Before you start cutting

How do I keep so many bandage slots from weakening the pumpkin?

Leave a solid rib of pumpkin between every slot instead of cutting them close together, and never let two slots meet. Work outward from the center so you always have intact wall on both sides to brace against. If a spot feels flimsy, widen the ribs and cut fewer, slightly longer strips.

This is an AI concept, so will a real pumpkin glow this evenly?

No real pumpkin exists in the image, so treat the dense even glow as a goal rather than a guarantee. A single centered LED can leave dark patches across dozens of slots, so use a bright puck light or a small cluster of battery lights. Test in the dark and adjust slot width where the light looks thin.

How small can I make the teeth without them breaking?

Keep each tooth as its own short slot with a thin wall of pumpkin between it and the next one. Avoid carving one long opening, since the strip above the teeth can sag or snap. A row of four or five small gaps reads clearly and stays sturdy.

Your take belongs here, too.

Changed a detail? Made it simpler? Share a photo of your version and tell the community what worked.

Share your pumpkin

More pumpkins like this

You've reached the end · 8 pumpkins
The Patch Report

Fresh pumpkins, in your inbox.

The best new carvings, ideas worth stealing, and how-tos for carving season. Short, seasonal, and gone by November.

A short email during carving season. Unsubscribe anytime. See our privacy policy.