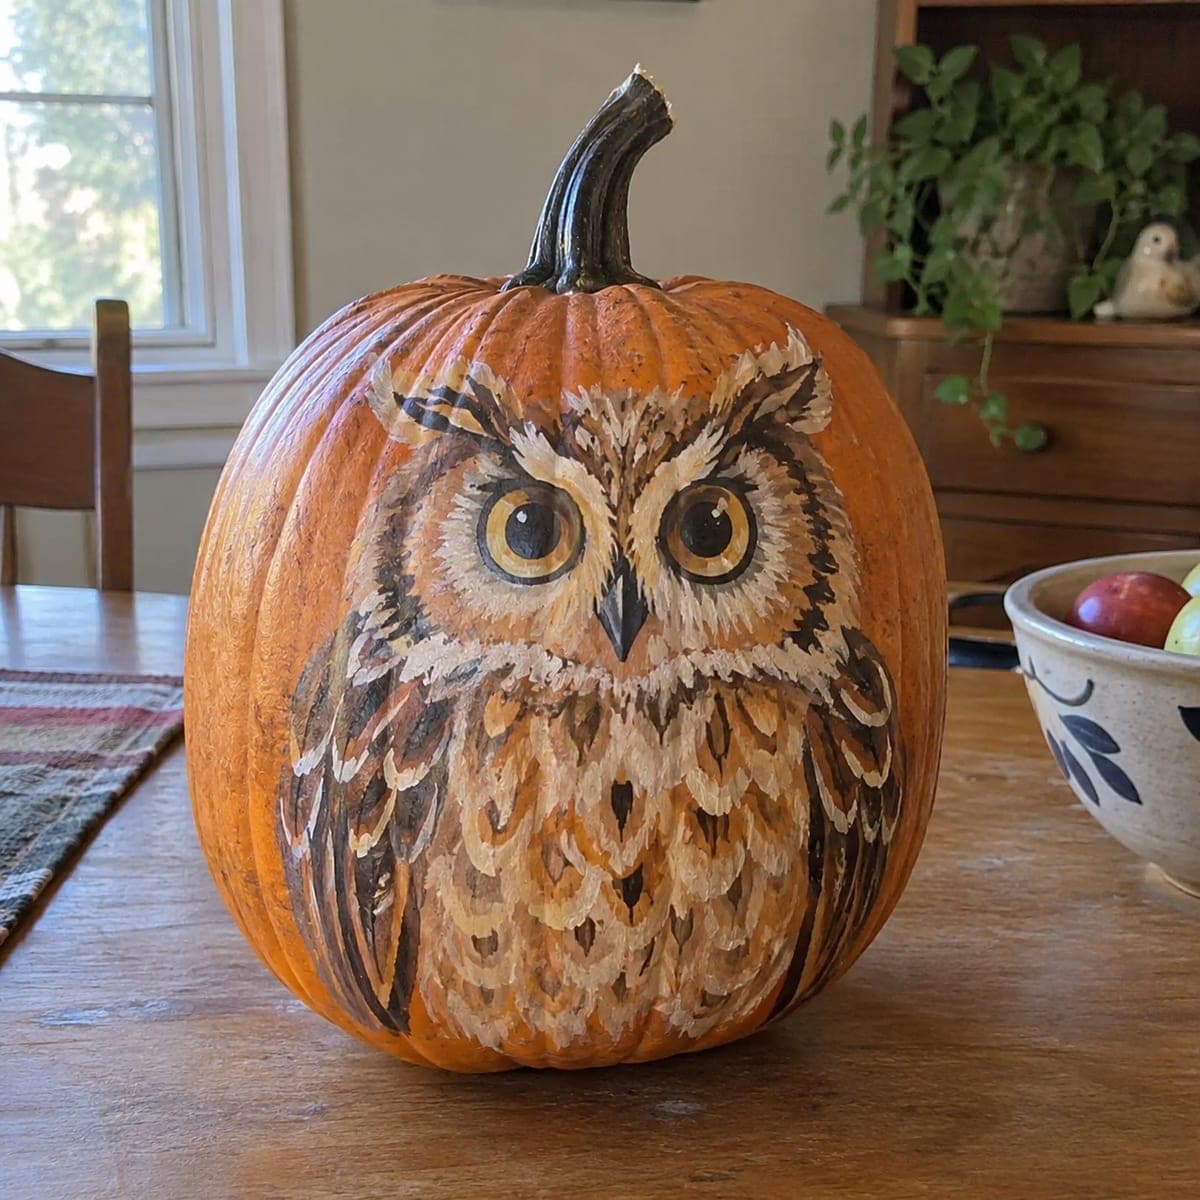
A strikingly realistic owl face gazes forward from the surface of an orange pumpkin, painted with warm browns, tawny golds, and deep blacks that blend naturally with the pumpkin's color. Acrylic paint applied in thin feather-stroke layers gives the plumage its layered, dimensional look. Because no cutting is involved, this no-carve pumpkin idea will last several weeks longer than a carved one. Seal the finished paint with a matte varnish to protect it from moisture.
This is an AI-generated concept image: a realistic, carvable design idea rather than a photo of a finished carve. AI concepts are always labeled and sit out the leaderboard and the contest.
The core trick here is stacking thin, curved feather strokes so light and dark layers build depth without any cutting. Start by mapping the big shapes, the face disc, huge eyes, and beak, then work outward and downward into the plumage. Because nothing is cut, the finished pumpkin lasts far longer than a carved one, and a matte sealer keeps the paint safe from moisture.
Written by PumpkinCarvingIdeas.com, inspired by the image above. These are our suggestions, not instructions from the uploader. This approach to the AI concept has not been tested on a real pumpkin.
From pumpkin to porch
1
Pick and prep the pumpkin
Choose a tall pumpkin with a smooth, mostly flat front panel so the owl face reads clearly. Wipe the surface with a damp cloth and let it dry fully, since paint grips a clean, dry rind best. A slightly ribbed pumpkin still works, just plan the eyes to sit on the flattest area. No cutting is needed, so the stem and shell stay fully intact.
2
Sketch the face map
With a soft pencil or washable marker, lightly draw two large circles for the eyes, a small downward triangle for the beak, and the rounded facial disc around them. Add the ear tufts up top and a soft boundary where the face meets the chest feathers. Keep lines light so they hide under paint later. Step back often to check the eyes sit level and evenly spaced.
3
Block in base tones
Using acrylics, lay flat mid tones first, a tawny gold across the chest and warm brown around the face. Fill the eyes with a ring of yellow and leave a small dot of white for the highlight. Paint the beak and pupils solid black, and let each color dry before layering the next. Thin coats prevent muddy blending on the curved surface.
4
Build feather layers
Switch to a small round or liner brush and paint short, curved strokes that all point the same direction, downward on the chest and outward on the face. Work from darker browns up to cream, letting earlier layers peek through for a stacked, dimensional look. Vary the length so no two rows look identical. Patience here is what makes the plumage feel real rather than flat.
5
Refine details and eyes
Deepen the shadows around the beak and under the ear tufts with your darkest brown, then add crisp cream flecks along the facial disc edge. Sharpen the eye rings and reinforce the white catchlight so the gaze feels alert. Fine dark lines around each eye pull the whole face together. Let everything cure fully before the last step.
6
Seal and stage the photo
Once the paint is bone dry, brush or spray on a matte varnish to lock out moisture and dull any brush shine. Set the finished pumpkin on a wood table with soft daylight from the side to show off the feather texture. A neutral background keeps the focus on the owl. Snap your photo and share it with the community.
Gather your supplies
Check things off as you get ready.
Work on a stable surface, keep your free hand out of the cutting path, and have an adult handle sharp tools.
Three levels of light
Leave intact
The unpainted orange rind around the owl stays as the natural warm background.
Peel & shade
Since this is a painted design, the tawny gold chest and face act as the mid tone, letting the pumpkin's own color glow through thin coats.
Cut through
No cutouts are used, but the cream feather flecks and the white eye catchlights read as the brightest points that pull the eye in.
Do I need to cut into the pumpkin at all for this owl?
No, this is a fully no-carve design, so the shell and stem stay intact. That is exactly why it lasts several weeks longer than a carved jack-o-lantern. If you want a glow later, you could set a battery LED nearby rather than inside.
How do I get the feathers to look layered instead of flat?
Paint many short, curved strokes that all follow the same direction, and let each layer dry before adding the next. Start dark and work up to cream so earlier layers peek through the gaps. Varying stroke length and leaving small shadows between rows creates the stacked, dimensional effect.
What is the best way to keep the paint from smearing or spoiling?
Let every color cure fully before handling, then finish with a matte varnish once the whole design is dry. The sealer blocks moisture, which is the main thing that breaks down both paint and pumpkin. Store it somewhere cool and out of direct sun to stretch its life.
Your take belongs here, too.
Changed a detail? Made it simpler? Share a photo of your version and tell the community what worked.
 AI
AI

Comments (0)