Halloween Pumpkin Carving Contest · Starts October 1st · $500 in prizes
← Back to ideas
@ai_concepts
Jul 28, 2026
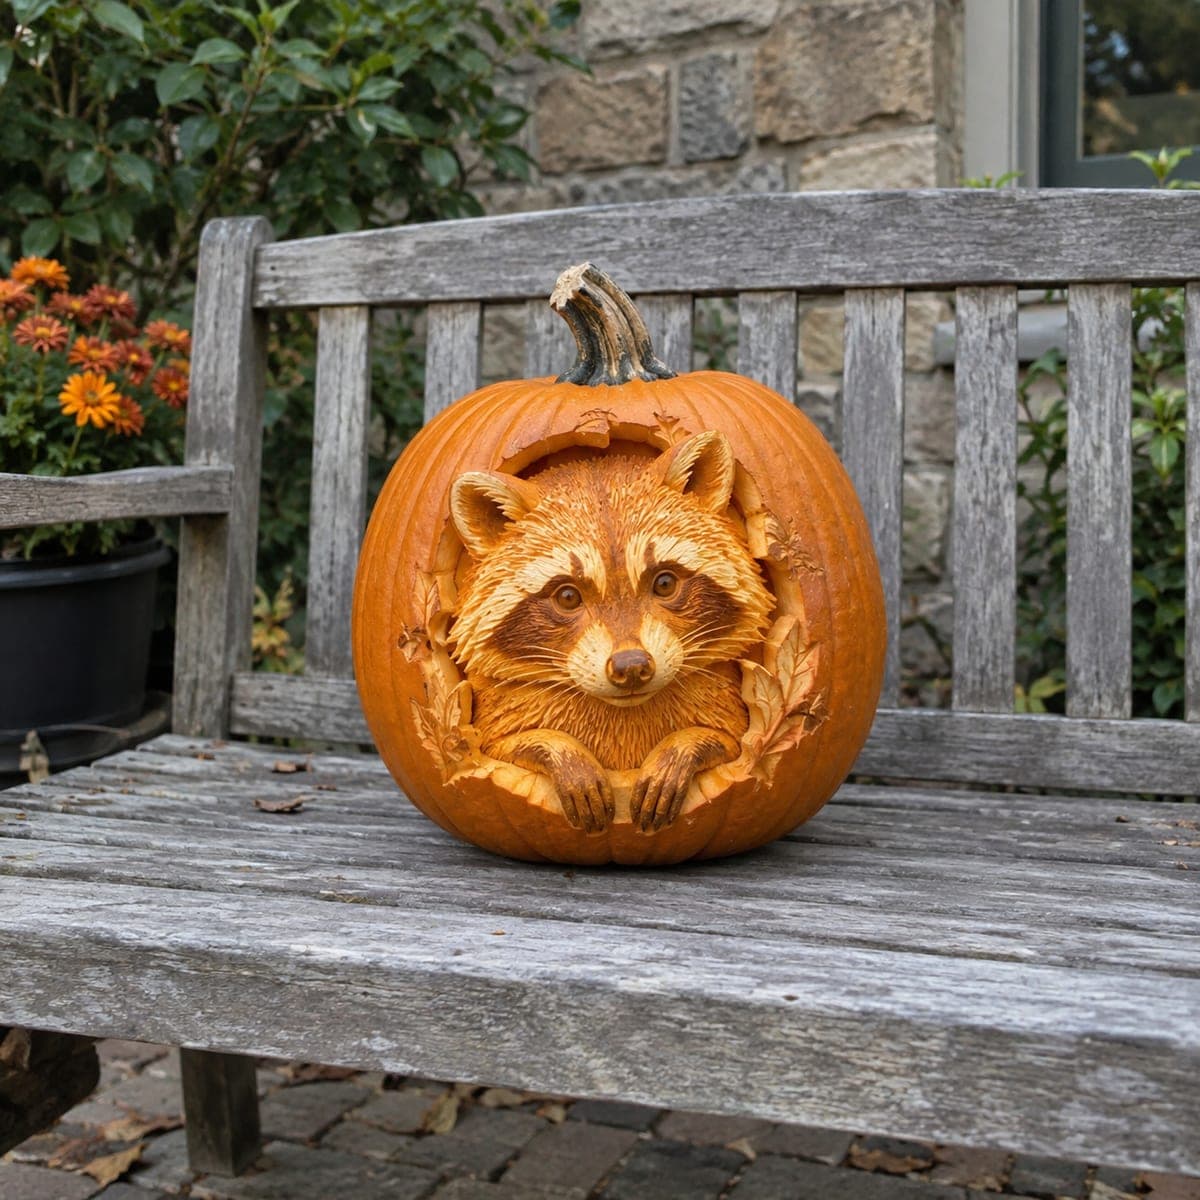
Peeking Raccoon Sculpted Pumpkin CarvingAI
0

Peeking Raccoon Sculpted Pumpkin Carving

A masked raccoon peers out of a sculpted opening in this pumpkin, both paws hooked over the rim as if it is climbing out, with carved oak leaves framing the hole. The fur, face, and leaves are shaped in deep relief with loop tools, leaving the animal attached to the shell at every point. Rough out the head as a simple dome first, then layer in fur strokes last so you do not overwork the surface.

This is an AI-generated concept image: a realistic, carvable design idea rather than a photo of a finished carve. AI concepts are always labeled and sit out the leaderboard and the contest.

No ratings yet · Sign in to rate
Comments (0)

  • No comments yet — be the first.

Save without an account. Sign in to like or comment.

Our tips for carving a similar design

The trick here is deep relief sculpting, where the raccoon and oak leaves are shaved out of the pumpkin wall while staying fully attached to the shell. Plan the head as a rounded dome first and let the surrounding skin fall away as a framing ring, so the animal reads as three dimensional under a single soft light. Because this is a concept image, treat it as a target to work toward and keep every paw and ear thick enough to survive real carving.

Written by PumpkinCarvingIdeas.com, inspired by the image above. These are our suggestions, not instructions from the uploader. This approach to the AI concept has not been tested on a real pumpkin.

From pumpkin to porch

  1. Prep the pumpkin and transfer the layout

    Pick a large pumpkin with a flat front and a thick, blemish free wall, since relief work needs depth to sculpt into. Cut a lid from the bottom or back so you can add an LED later without disturbing the face. Scrape the inside of the front wall down to a workable thickness, then tape your pattern on and poke or trace the main outlines. Mark the raccoon body, the two paws on the rim, and the oak leaves before any cutting begins.

  2. Rough out the raccoon as a dome

    Using a ribbon or loop tool, shave away the skin around the animal so the head and shoulders stand up as a simple raised mound. Do not chase detail yet, just establish where the surface is high at the nose and cheeks and low at the frame. Keep the whole shape connected to the shell so it stays strong. Step back often and check the dome from the side to confirm it bulges outward evenly.

  3. Shape the face and paws in relief

    Now carve the muzzle forward, sink the eye sockets slightly, and round the ears and cheeks with smaller loops. Build the two paws over the rim as solid, chunky forms and leave them thick where they hook the edge so they will not snap. Define the mask by cutting the dark eye patches a touch deeper than the pale fur around them. Work slowly and keep tool cuts shallow near thin spots like ear tips.

  4. Add the oak leaves and framing ring

    Carve the oak leaves around the opening in medium relief so they sit behind the raccoon rather than competing with it. Vary their depth so a few overlap and cast small shadows. Keep each leaf attached along its base and avoid piercing all the way through, which keeps the frame sturdy. This ring of leaves is what makes the animal look like it is peeking out of a hollow.

  5. Layer in fur strokes last

    Finish with fine directional strokes using a small loop or detail tool to suggest fur flowing off the nose, over the cheeks, and down the chest. Follow the growth direction and vary pressure so some strokes are deep and some barely graze the surface. Do this step only when the forms are correct, because heavy fur texturing early will muddy the shapes. Peel a thin layer off the palest areas so they catch light warmly.

  6. Light it and photograph

    Set a warm LED puck or string inside and aim it so the glow rakes across the raccoon from below and behind. Relief carvings look best with soft, angled light that deepens the shadows in the mask and fur. Mist the surface with water and refrigerate between showings to keep the fine detail crisp. Shoot in low evening light to let the sculpted texture pop.

Gather your supplies

Check things off as you get ready.

Work on a stable surface, keep your free hand out of the cutting path, and have an adult handle sharp tools.

Three levels of light

  • Leave intact

    The dark eye mask patches and the deepest fur shadows stay as untouched skin.

  • Peel & shade

    The raccoon's fur, muzzle, paws, and the oak leaves are skin peeled for a soft mid glow.

  • Cut through

    Keep full cutouts minimal, only small nicks between leaves if any, so the sculpted forms stay connected and strong.

Learn the carving basics

Before you start cutting

Do any parts get cut all the way through?

Very little, if any. This is a relief carving, so almost everything is shaped by peeling and shaving rather than cutting through the wall. Keep the raccoon and leaves attached at every point and let the LED glow through the thinned skin instead of open holes.

How do I keep the paws on the rim from breaking?

Carve them as thick, blocky forms rather than slender fingers, and leave plenty of pumpkin behind them where they hook the edge. Do the paws early while the shell is still firm, and avoid undercutting so deeply that they become fragile. If the pumpkin softens, chill it before adding the final paw detail.

Since this is a concept image, is a raccoon like this actually carvable?

Yes, a similar piece is achievable if you keep expectations realistic. Real pumpkin flesh will not hold hair fine detail as crisply as a rendered image, so aim for grouped fur strokes rather than individual hairs. Pick a fresh, thick pumpkin and it will hold the domed head and layered leaves well.

Your take belongs here, too.

Changed a detail? Made it simpler? Share a photo of your version and tell the community what worked.

Share your pumpkin

More pumpkins like this

You've reached the end · 8 pumpkins
The Patch Report

Fresh pumpkins, in your inbox.

The best new carvings, ideas worth stealing, and how-tos for carving season. Short, seasonal, and gone by November.

A short email during carving season. Unsubscribe anytime. See our privacy policy.