Halloween Pumpkin Carving Contest · Starts October 1st · $500 in prizes
← Back to ideas
@ai_concepts
Sep 25, 2026
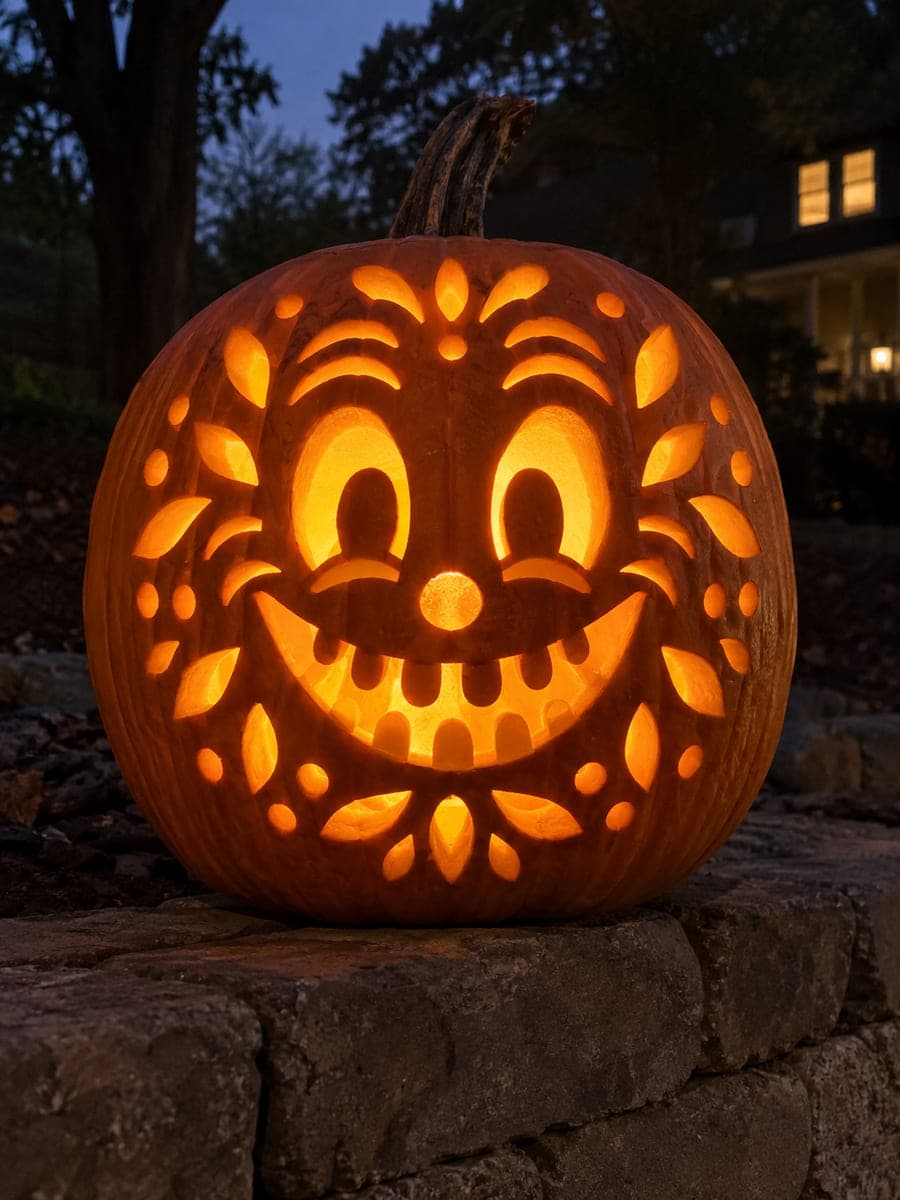
Petal-Cheek Friendly Pumpkin With Barred Round EyesAI
0

Report this carving

Tell us what is wrong. Reports are private.

Petal-Cheek Friendly Pumpkin With Barred Round Eyes

Round eyes each containing a sturdy vertical rind bar, gently curved brow cuts, a small round nose, an open smile with eight rooted square teeth, and sixteen separate petal-shaped holes around the cheeks make this a warmly detailed hard friendly pumpkin face. The rind bars through the round eyes keep the large circular openings stable while all surrounding material is removed. Cut brows, nose, and the face center first, then the petal holes last since their quantity (sixteen) is what makes this design hard. The petal shapes glow like flower petals scattered around a smiling face when backlit.

No ratings yet · Sign in to rate

Comments (0)

  • No comments yet — be the first.

Save without an account. Sign in to like or comment.

Our tips for carving a similar design

The structural challenge here is keeping the large round eye openings stable while cutting everything else around them; the vertical rind bar through each eye does that job. Plan the order of cuts to preserve maximum rind until the final stage: brows, nose, smile, and then the sixteen petal holes last. The petals are what drive the difficulty because their quantity demands consistent spacing and clean pointed tips.

From pumpkin to porch

  1. Hollow and measure wall thickness

    Cut a bottom lid and hollow the pumpkin to a wall of 22-25mm. Slightly thinner walls let the petal shapes glow more crisply. Measure thickness in multiple spots since pumpkins vary across the surface.

  2. Transfer and confirm bar positions in the eyes

    Mark both round eye circles on the pumpkin surface and mark the vertical bar down the center of each circle before any cutting. The bar should be at least 12mm wide. Confirming bar width at this stage prevents accidentally making it too narrow when the surrounding circle is cut.

  3. Cut brows, nose, and smile first

    Work through the smaller features while the rind is at its most rigid. Cut the two gentle brow curves above the eyes, pop out the small round nose, then carve the open smile and the eight rooted square teeth. Confirm each tooth root spans its full width before cutting any gap.

  4. Cut the round eyes with their rind bars

    Cut the full circle of each eye in two arcs, stopping before reaching the bar on each side. Remove the two semicircular pieces from each eye. The vertical bar remains intact and attached at top and bottom, keeping the large circle from distorting.

  5. Space and cut the sixteen petal holes

    Mark all sixteen petals before cutting any of them so you can adjust spacing for even distribution across both cheek areas. Each petal is an almond or teardrop shape with two pointed ends. Cut from the outer tip inward to the widest point on both sides, meeting in the center, to keep points crisp.

  6. Backlight and photograph

    Place a bright LED inside and step back to check that all sixteen petals glow evenly. Any petal that looks dim has a wall too thick behind it; thin it from inside with a gouge. This design photographs beautifully in low light where the petal cluster glows like scattered flowers.

Written with AI to match this design

Gather your supplies

Check things off as you get ready.

Work on a stable surface, keep your free hand out of the cutting path, and have an adult handle sharp tools.

Three levels of light

  • Leave intact

    The rind bars through each round eye, the cheek panels between petal holes, and the broad forehead area

  • Peel & shade

    None, the design uses full cutouts only

  • Cut through

    Both round eye circles (minus the rind bars), two brow cuts, the round nose, the full open smile with all eight tooth gaps, and all sixteen petal-shaped cheek holes

Learn the carving basics

Before you start cutting

How do I keep sixteen petal holes from looking cramped or randomly scattered?

Mark all positions before cutting any of them and use a ruler to keep groups evenly spaced from each other and from the eyes and mouth. Work in a grid or arc pattern so the outer row and inner row of petals mirror each other on both sides of the face. Step back and assess the layout from a normal viewing distance before committing to any cut.

The vertical rind bar in one eye looks thinner than the other. Is that a problem?

A bar that drops below about 10mm in width risks cracking when the face is moved or when it starts to dry. If one bar is already thin, avoid thinning the wall behind it and handle the pumpkin with extra care. For future carvings, mark bar width explicitly on the template before transferring the eye circle.

Can I carve the petals before the main face features?

It is safer to carve them last. The petals remove a large total area of rind from the cheek region, which makes the shell noticeably more flexible. Cutting the smile and eyes after that flexing has occurred increases the chance of a slip. Finish all face features first, then do the petals.

Your take belongs here, too.

Changed a detail? Made it simpler? Share a photo of your version and tell the community what worked.

Share your pumpkin

More pumpkins like this

You've reached the end · 8 pumpkins
The Patch Report

Fresh pumpkins, in your inbox.

The best new carvings, ideas worth stealing, and how-tos for carving season. Short, seasonal, and gone by November.

A short email during carving season. Unsubscribe anytime. See our privacy policy.