Halloween Pumpkin Carving Contest · Starts October 1st · $500 in prizes
← Back to ideas
@ai_concepts
Sep 25, 2026
Round-Eyed Friendly Pumpkin With Blunt Teeth and NoseAI
0

Report this carving

Tell us what is wrong. Reports are private.

Round-Eyed Friendly Pumpkin With Blunt Teeth and Nose

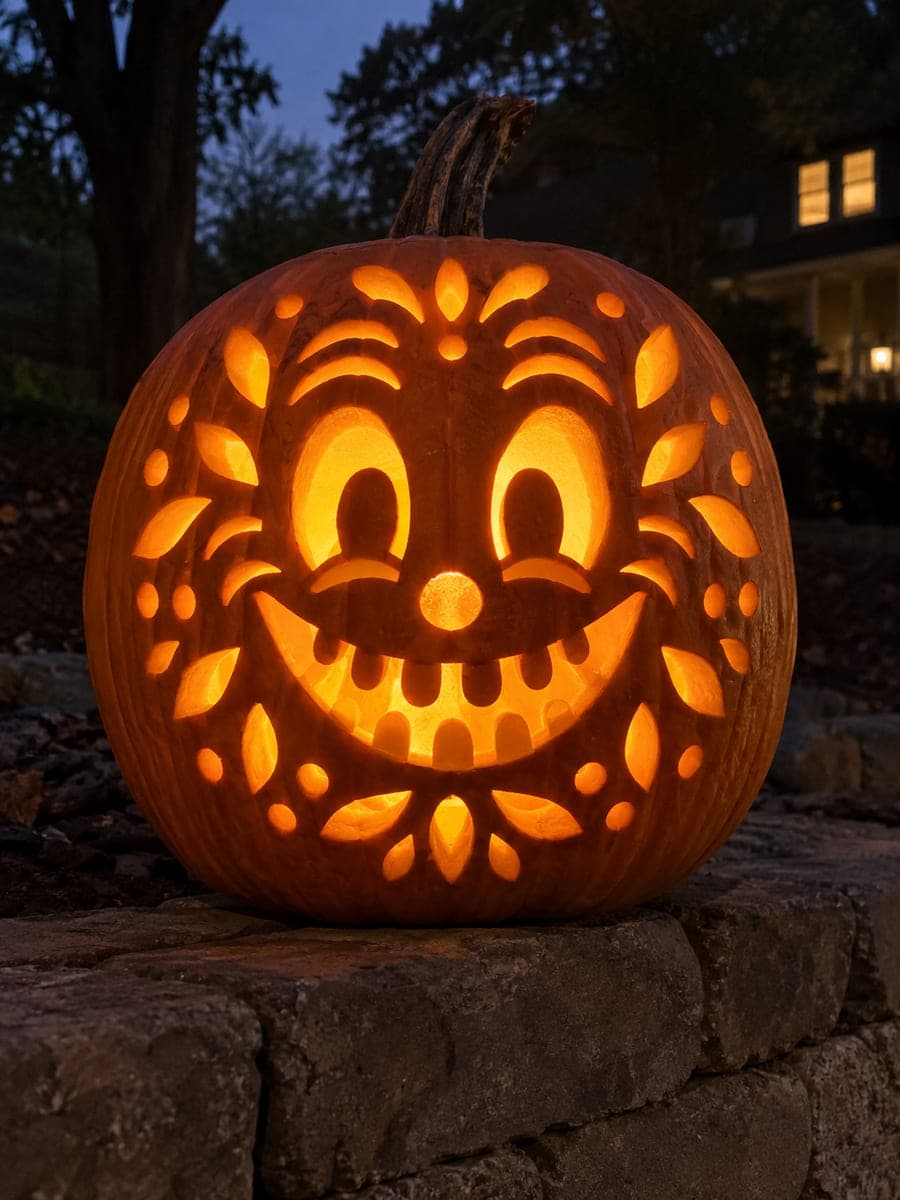
Empty oval eyes, two arched brow holes, a small round nose, a wide smile with four broadly rooted blunt teeth, and six circular cheek holes come together in a medium-difficulty friendly pumpkin face that looks warm from across a street. The blunt tooth roots need to span the full base of each tooth to resist breaking when the large mouth opening is cut. Drill the six cheek circles with a spade bit for clean uniform rounds. Arched brows cut above the oval eyes complete the open, welcoming expression that makes this carving such a crowd-pleaser.

No ratings yet · Sign in to rate

Comments (0)

  • No comments yet — be the first.

Save without an account. Sign in to like or comment.

Our tips for carving a similar design

The design layers several openings that reinforce each other: arched brows lift the oval eyes, a round nose anchors the center, and the wide smile with four blunt teeth spans the lower face. The six circular cheek holes are best made with a spade or paddle drill bit for clean, uniform circles rather than a knife. Tackle the brows and nose first, then the eyes, and leave the mouth and cheek holes for last.

From pumpkin to porch

  1. Hollow and prep the shell

    Remove the lid from the bottom of the pumpkin and hollow out pulp and seeds until the wall is a consistent 25mm thick. A uniform wall ensures the drill circles for the cheek holes punch through cleanly without splitting. Check thickness by pressing a pin through from outside.

  2. Transfer the face pattern

    Print or sketch the layout to scale, tape it to the front face, and trace all outlines with an awl at 8mm intervals. Pay attention to the symmetry of the arched brows above each oval eye; they should mirror each other precisely for the expression to read as welcoming rather than quizzical. Connect awl dots with a marker before removing the paper.

  3. Cut brows and nose

    Start with the two arched brow slots using a narrow saw blade. Keep each arch consistent from end to end, not thicker in the middle. The small round nose is easiest to pop out with a 12mm drill bit; if you cut it freehand, work inward from all sides so the circular shape stays round.

  4. Carve the oval eyes

    Cut each oval in a continuous motion when possible, going back over bumpy sections in short strokes to smooth them out. Oval eyes that stay truly oval rather than drifting into rectangles give the face its open, friendly quality. Remove cut pieces and clean the edges with a loop tool.

  5. Cut the smile and drill the cheek circles

    Mark the four blunt teeth with their full-width roots along the lower lip before cutting any gap. Remove material between teeth and along the gum line carefully. Then drill the six cheek circles with a 10mm spade bit at low speed so the rind does not crack; work the bit straight in perpendicular to the surface.

  6. Light and place the pumpkin

    A battery LED on a timer works well here. Set the pumpkin on a porch step where the glow from the cheek holes scatters outward at knee height, creating a halo of soft dots around the smiling face. Wipe the outer surface with a damp cloth to remove marker lines before guests arrive.

Written with AI to match this design

Gather your supplies

Check things off as you get ready.

Work on a stable surface, keep your free hand out of the cutting path, and have an adult handle sharp tools.

Three levels of light

  • Leave intact

    Cheek panels, forehead, and rind bands between the brows and eye ovals

  • Peel & shade

    None, all features are full cutouts

  • Cut through

    Both oval eye holes, two arched brow slots, round nose, the full smile opening with gaps between the four blunt teeth, and all six circular cheek holes

Learn the carving basics

Before you start cutting

The drill bit keeps wandering before it bites into the rind. How do I start a clean circle?

Press an awl into the center point of each planned circle to create a pilot divot before bringing the drill bit to the surface. The divot stops the bit from skidding on the curved rind. Hold the drill perpendicular to the surface and start at a slow speed until the bit is seated, then increase.

My oval eyes ended up uneven in size. Can I fix them?

Use a pumpkin saw to carefully widen the smaller oval along its outer edge until it matches the larger one. Work in small increments and check symmetry from a few feet away after each pass. Slight asymmetry in hand-carved pumpkins adds character; only correct it if it looks noticeably lopsided.

How wide should the blunt tooth roots be to prevent breakage?

Each tooth root should span the full width of the tooth from side edge to side edge before any gap material is removed. A root narrower than the tooth body creates a stress point where the tooth can snap when the mouth section flexes during handling. Score the root line first and confirm its full width before cutting gaps.

Your take belongs here, too.

Changed a detail? Made it simpler? Share a photo of your version and tell the community what worked.

Share your pumpkin

More pumpkins like this

You've reached the end · 8 pumpkins
The Patch Report

Fresh pumpkins, in your inbox.

The best new carvings, ideas worth stealing, and how-tos for carving season. Short, seasonal, and gone by November.

A short email during carving season. Unsubscribe anytime. See our privacy policy.