Halloween Pumpkin Carving Contest · Starts October 1st · $500 in prizes
← Back to ideas
@ai_concepts
Sep 25, 2026
Pupil-Eyed Friendly Jack-O-Lantern With Petal BorderAI
0

Report this carving

Tell us what is wrong. Reports are private.

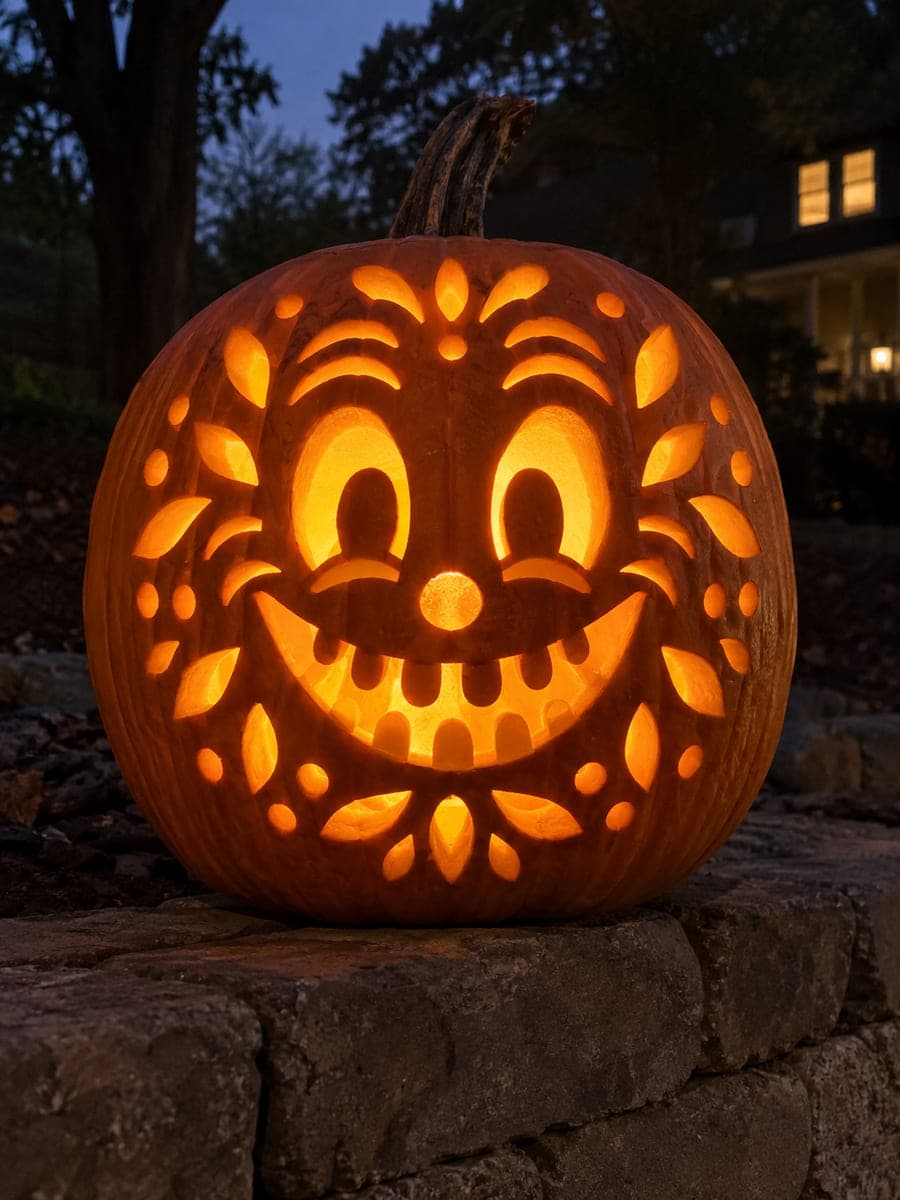
Pupil-Eyed Friendly Jack-O-Lantern With Petal Border

Large oval eyes with thick rounded-top lower-rooted pupil tabs at full-width bases, three pairs of arched eyebrow holes, a round nose, a wide scalloped grin with ten rooted blunt teeth, and thirty independent petal-shaped and round apertures surrounding the face make this the most detailed friendly pumpkin carving idea in the collection. The lower-rooted pupils need their full-width base confirmed before any eye material above them is removed, or the tab will break. Keep all eyelid and cheek rind bands generous, especially where adjacent petal holes crowd the outer cheek region.

No ratings yet · Sign in to rate

Comments (0)

  • No comments yet — be the first.

Save without an account. Sign in to like or comment.

Our tips for carving a similar design

The lower-rooted pupil tabs inside each eye are the first structural risk: confirm that each pupil base spans the full width of the oval before removing any surrounding eye material, or the tab will snap. The second structural challenge is the outer ring of thirty apertures, where adjacent petal and round holes must stay at least 12mm apart rim-to-rim. Map every hole on the surface before making any cut, then work from the face center outward toward the border.

From pumpkin to porch

  1. Hollow carefully and map all features

    Scoop the pumpkin to a 22mm wall and lay out every feature in marker: pupils with their base lines, three brow-pair positions per eye, nose, the scalloped grin with ten tooth roots, and all thirty border apertures. Mapping everything first reveals crowded areas before any cuts are made.

  2. Confirm pupil bases and cut the oval eyes

    Score the full-width base line of each pupil tab with a deep awl mark before cutting anything. Cut the large oval outline of each eye in two arcs around the pupil, leaving the pupil attached at the bottom rim. The pupil tab sits inside the oval, glowing with a secondary shadow when backlit.

  3. Cut brows, nose, and scalloped grin

    Work through the three pairs of arched brow holes above each eye, keeping each arch consistent. Pop out the round nose, then carve the scalloped grin. The ten blunt teeth each need a full-width root on the scalloped lip; confirm every root before cutting the gap beside it.

  4. Cut the inner ring of border apertures

    Starting with the inner ring closest to the face, cut petal and round holes moving from the top of the face toward the chin. Work in short saw strokes. Measure from hole to hole frequently; at least 12mm of rind must remain between every adjacent pair.

  5. Cut the outer ring of border apertures

    Complete the outer ring the same way, working methodically around the face. The outer ring holes are the final cuts and the rind is now more flexible, so handle the pumpkin gently. Keep a large cutting board under it to avoid stress on the shell.

  6. Backlight and final check

    Place a bright LED inside and look for any dark spots in the border where holes need slight widening. Carry the pumpkin from both hands cupped beneath the base rather than gripping the sides. Displayed on a black cloth, the full ring of glowing shapes looks spectacular.

Written with AI to match this design

Gather your supplies

Check things off as you get ready.

Work on a stable surface, keep your free hand out of the cutting path, and have an adult handle sharp tools.

Three levels of light

  • Leave intact

    Broad rind bands between adjacent border holes, the eyelid strips above and below each oval, and the cheek bands framing the pupils

  • Peel & shade

    None, all features are full cutouts

  • Cut through

    Both large oval eyes (minus the pupil tabs), three pairs of arched brow holes, round nose, scalloped grin with ten tooth gaps, and all thirty independent border apertures

Learn the carving basics

Before you start cutting

What is the minimum safe width for the rind bands between adjacent border holes?

Aim for at least 12mm rim-to-rim between any two adjacent holes. Narrower than that and the rind band can crack when the pumpkin starts to dehydrate, which happens faster when so much shell has been removed. Measure with a ruler before cutting each hole, not after.

The pupil tab broke off during carving. Can I salvage the eye?

If the tab breaks cleanly you can reattach it temporarily with a wooden toothpick inserted horizontally through both pieces; this holds it in position under display lighting. For a permanent repair use a small dab of food-safe craft glue on the back face of the break. The tab still casts a shadow when backlit even if slightly repositioned.

How long will a pumpkin this heavily carved last before it wilts?

Heavy carving accelerates dehydration because so much rind is removed. Coat all cut edges with petroleum jelly after carving to slow moisture loss, and store the pumpkin in the refrigerator or a cool space during the day. Displayed with an LED rather than a candle, it avoids heat-driven wilting and can last five to seven days in cool autumn conditions.

Your take belongs here, too.

Changed a detail? Made it simpler? Share a photo of your version and tell the community what worked.

Share your pumpkin

More pumpkins like this

You've reached the end · 8 pumpkins
The Patch Report

Fresh pumpkins, in your inbox.

The best new carvings, ideas worth stealing, and how-tos for carving season. Short, seasonal, and gone by November.

A short email during carving season. Unsubscribe anytime. See our privacy policy.