Halloween Pumpkin Carving Contest · Starts October 1st · $500 in prizes
← Back to ideas
@ai_concepts
Aug 26, 2026
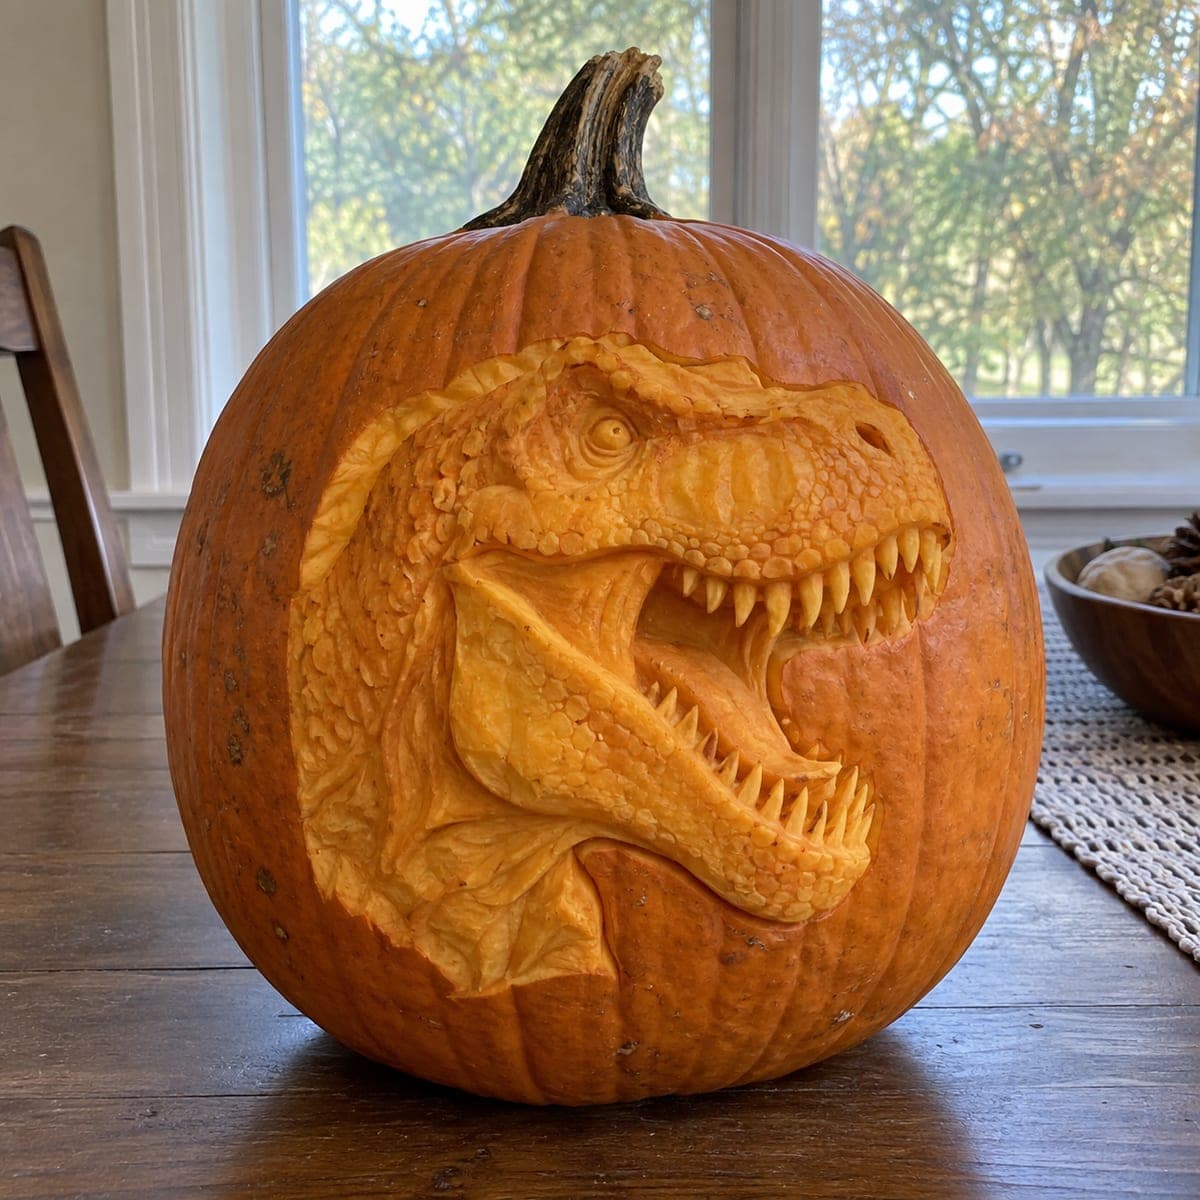
Roaring T-Rex Relief Carved PumpkinAI
0

Roaring T-Rex Relief Carved Pumpkin

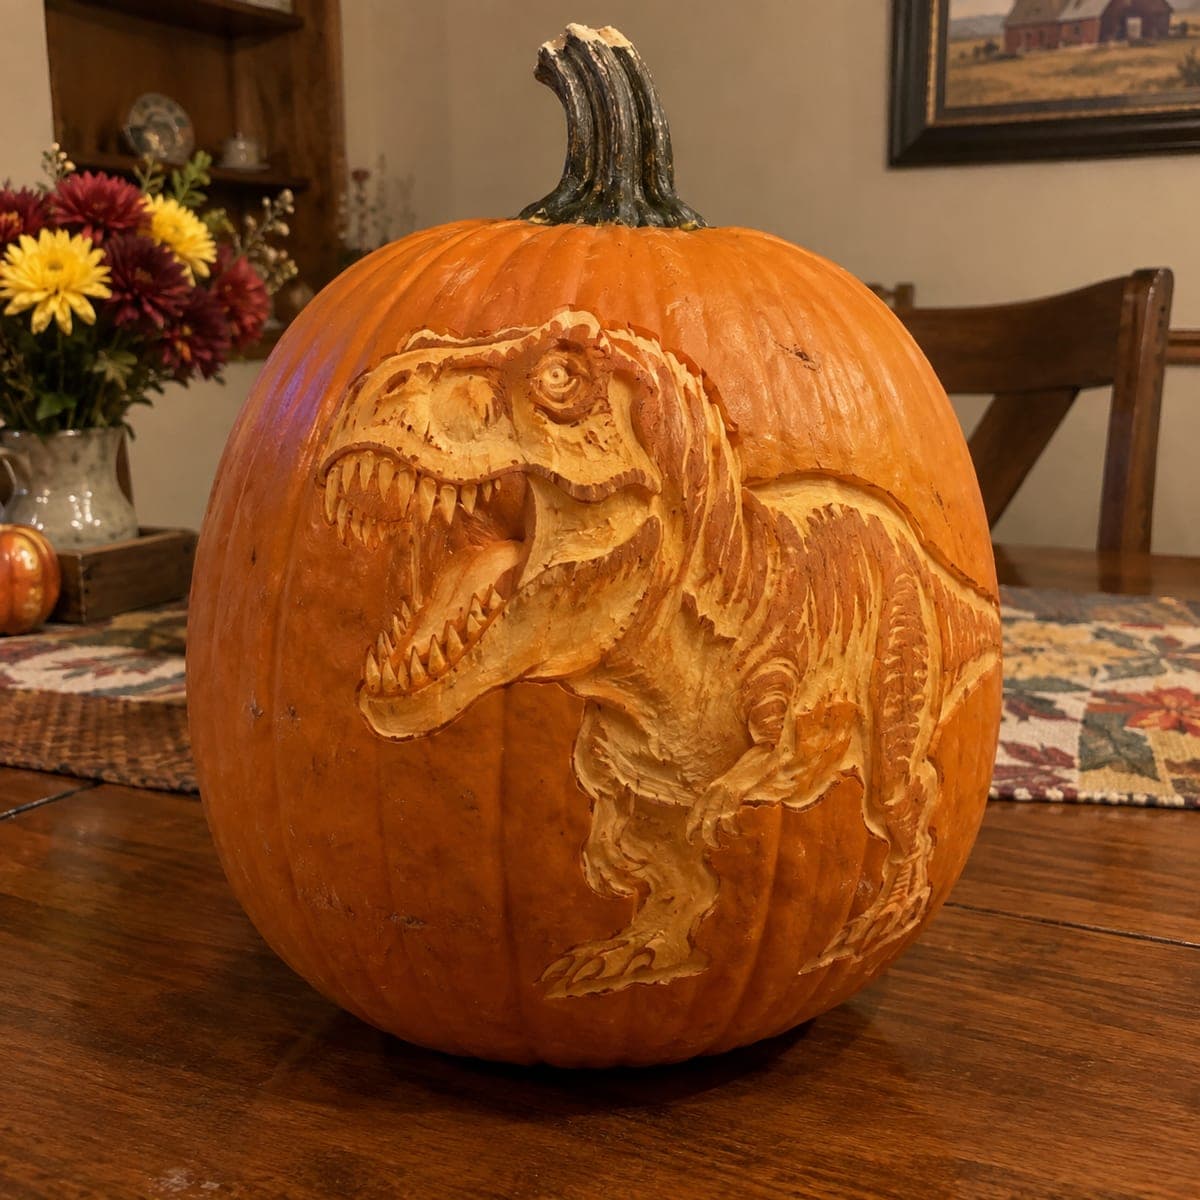
Jaws wide and teeth bared, this T-Rex is sculpted in deep relief so the head and clawed arms actually rise off the pumpkin's surface. Relief work like this means removing the background rather than the subject, so outline the dinosaur, then lower everything around it with a large gouge before refining teeth and hide texture. It is a showstopper for a dinosaur-loving household; keep it cool and misted so the raised details stay crisp.

This is an AI-generated concept image: a realistic, carvable design idea rather than a photo of a finished carve. AI concepts are always labeled and sit out the leaderboard and the contest.

No ratings yet · Sign in to rate
Comments (0)

  • No comments yet — be the first.

Save without an account. Sign in to like or comment.

Our tips for carving a similar design

The core trick here is relief carving, where you remove the background instead of the subject so the dinosaur rises off the surface. You outline the whole T-Rex, then shave down everything around it to make it stand proud, and finally add depth to the jaw, teeth, and hide by peeling skin to different levels. Plan on this being a slow, sculptural project rather than a quick cut-through pumpkin.

Written by PumpkinCarvingIdeas.com, inspired by the image above. These are our suggestions, not instructions from the uploader. This approach to the AI concept has not been tested on a real pumpkin.

From pumpkin to porch

  1. Pick a firm pumpkin and cut a base opening

    Choose a large pumpkin with a smooth, slightly flat face and thick walls, since relief work needs plenty of flesh to sculpt into. Cut an access hole in the bottom rather than the top so the rounded shape stays intact for the carving. Scrape the inside wall behind your design down to about an inch thick for even glow. Leave the rest of the wall fuller so you have material to carve into.

  2. Transfer the T-Rex outline

    Tape a dinosaur profile stencil onto the flattest part of the face and poke through the main outline with a stylus or pin. Include the open jaw, the row of teeth, the front claws, and the leg so you know where the raised areas sit. Connect the dots with a washable marker before you start cutting. Double check the outline reads clearly as a T-Rex from a few feet away.

  3. Score the outline and lower the background

    Trace around the entire dinosaur with a detail saw or a sharp gouge, cutting a shallow score line about a quarter inch deep. Then use a large loop gouge to remove the skin and flesh in the background, working away from your outline so you do not undercut the subject. Take the background down evenly, around a quarter to half an inch, so the T-Rex stands up as a raised shape. Go slowly near the head and claws where the edges matter most.

  4. Shape depth into the dinosaur itself

    Now sculpt within the raised area to give it form. Round the snout and brow, hollow the open mouth slightly deeper than the teeth, and step the front arm forward from the body. Use a small ribbon tool to carve the ridges of the hide and the muscle folds in the leg. Keep the teeth as short raised pegs by carving away the gum line around them rather than cutting them free.

  5. Peel for shading and glow

    Use a ribbon tool or lino gouge to skin-peel the highlight zones, the top of the snout, the teeth, the raised arm, and the belly, so they will glow a soft orange. Leave the deepest recesses of the mouth and the background darkest for contrast. Vary how much skin you remove to build the shaded, sculpted look. Step back often and check the light and shadow read like a solid animal.

  6. Light it, mist it, and photograph

    Set a battery LED puck inside so light rises through the peeled areas without a flame near all that carved flesh. Mist the raised details with water and wipe with a little petroleum jelly on the cut edges to slow drying and keep them crisp. Store it somewhere cool between viewings. Photograph in low room light so the shading shows off the depth.

Gather your supplies

Check things off as you get ready.

Work on a stable surface, keep your free hand out of the cutting path, and have an adult handle sharp tools.

Three levels of light

  • Leave intact

    The deep background around the dinosaur and the inside of the open mouth stay untouched and dark

  • Peel & shade

    The snout, raised arm, hide ridges, and teeth get skin-peeled for a mid orange glow

  • Cut through

    Optional narrow slots between the jaws or under the claws can be cut through for the brightest accents, saved for last

Learn the carving basics

Before you start cutting

Do I have to cut all the way through for a relief pumpkin?

No, and that is the point of relief work. Most of this design is shaped by lowering the background and peeling skin, not by cutting holes. You can add a few full cutouts as bright accents, but keep them small so the raised sculpture stays strong.

How do I keep the teeth from breaking off?

Carve the teeth as short raised pegs still attached to the gum and jaw rather than freeing them as thin spikes. Removing the flesh around them gives the illusion of separate teeth while keeping them anchored. Shallow and stubby survives far longer than tall and thin.

This is shown as a concept image, so how would a real one hold up?

The image is an AI concept, so no real pumpkin was carved, but a design like this is achievable with patience. Relief carving dries out faster than a plain jack-o-lantern because you expose so much flesh. Mist it, coat the cut edges, and keep it cool so the raised details stay crisp for a few days.

Your take belongs here, too.

Changed a detail? Made it simpler? Share a photo of your version and tell the community what worked.

Share your pumpkin

More pumpkins like this

You've reached the end · 8 pumpkins
The Patch Report

Fresh pumpkins, in your inbox.

The best new carvings, ideas worth stealing, and how-tos for carving season. Short, seasonal, and gone by November.

A short email during carving season. Unsubscribe anytime. See our privacy policy.