@jackslantern
Sep 5, 2026
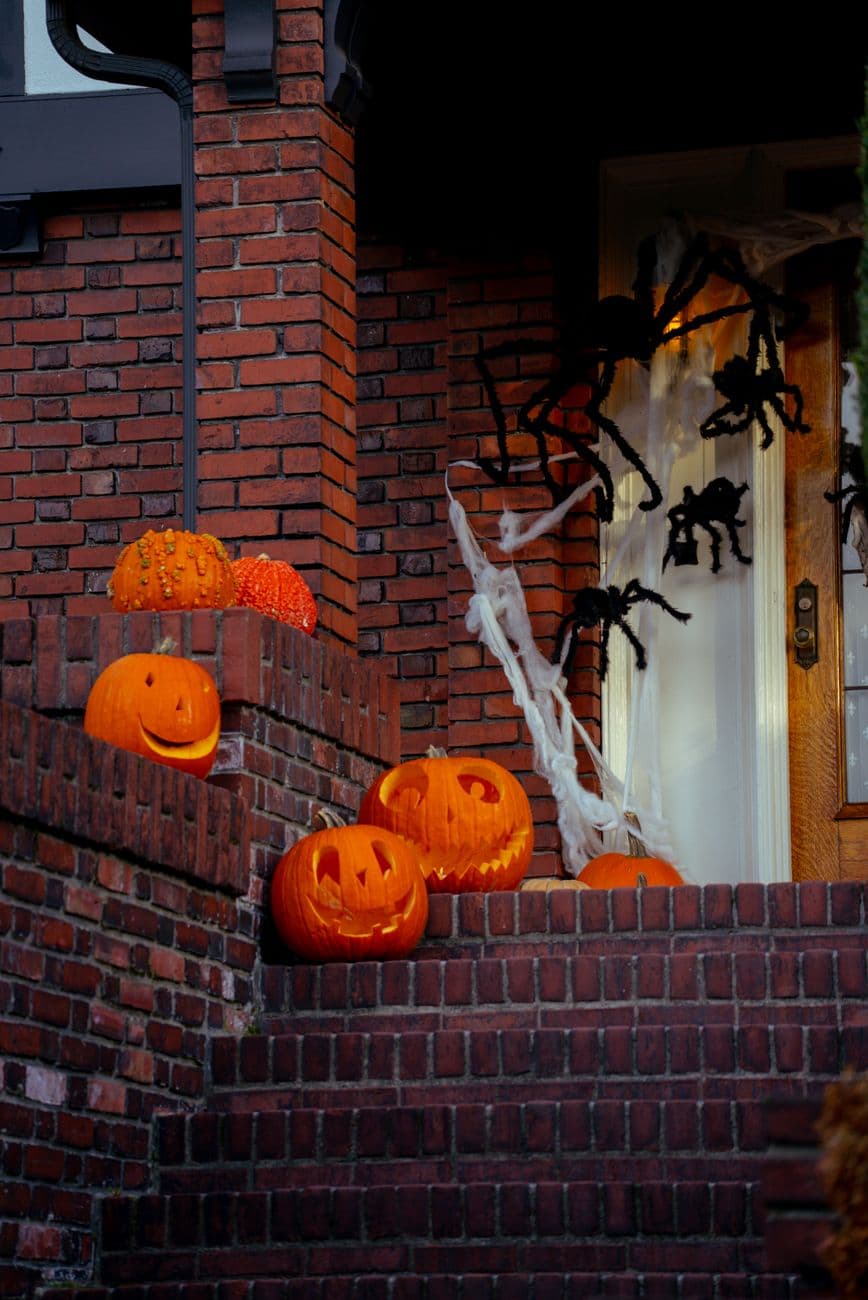
Spiders at the door
Three grinning jacks working the brick staircase while giant furry spiders climb the front door behind them.
No ratings yet · Sign in to rate
Three grinning jacks working the brick staircase while giant furry spiders climb the front door behind them.
The core trick here is repetition and staging: several classic grinning jack-o'-lanterns arranged on steps so their glow builds a scene, with a spider theme carried into the door decor behind them. You carve simple triangle eyes and toothy mouths on each pumpkin, then vary the sizes and heights so no two faces look identical. The whole effect comes from grouping and lighting rather than any single fancy cut.
Written by PumpkinCarvingIdeas.com, inspired by @jackslantern's photo above. These are our suggestions, not instructions from the uploader, and this approach hasn't been tested on their exact carve.
Choose three pumpkins in slightly different sizes so they stagger nicely on the steps. Cut a lid at an angle on the back or top of each so the lid does not fall in, then scoop the guts and scrape one wall down to about an inch thick where the face will go. A thinner wall carves cleaner and lets more light through. Have an adult handle all the cutting tools.
Tape a classic jack-o'-lantern stencil to each pumpkin, or draw simple triangle eyes, a small triangle nose, and a wide toothy grin freehand. Vary the expressions a little so one looks sleepy, one looks cheeky, and one grins ear to ear. Poke the outlines with a pin or transfer tool so you can see the lines clearly. Keep the teeth chunky rather than needle thin so they hold up outdoors.
Start with the smallest openings, the eyes and nose, using a fine carving saw and steady sawing motion. Cut on the pin lines and push the pieces out gently from inside. Doing the small cuts first keeps the pumpkin sturdy while you work. Take your time so the points of each triangle stay crisp.
Save the big mouth for last since it removes the most material and weakens the shell. Cut around the teeth carefully, leaving each tooth wide at the base so none snap off. Clean up any ragged edges by trimming from behind. If a tooth feels loose, leave a little extra pumpkin on it rather than thinning it out.
The scene behind the pumpkins is store bought, not carved: large furry spiders and stretched cotton webbing on the door. Anchor a couple of oversized spiders on the door and door frame with removable hooks, then pull thin webbing between them. Keep webbing well away from any light source. This backdrop is what turns three simple jacks into a spooky story.
Drop a battery LED tea light or small puck light into each pumpkin, never a candle, since these sit near webbing and a wood door. Arrange the pumpkins on the steps at different heights so their faces all read from the sidewalk. Step back in the dark to check the glow and nudge any pumpkin whose face is hidden in shadow. Snap your photo once the porch light is dimmed so the grins really pop.
Check things off as you get ready.
Work on a stable surface, keep your free hand out of the cutting path, and have an adult handle sharp tools.
The outer skin of each pumpkin stays dark and orange, framing the faces.
Shave a thin border around the eyes or cheeks if you want a soft dim halo around each feature.
The triangle eyes, nose, and toothy grins are cut clean through for the brightest glow.
Three is the sweet spot shown here, but the scene works with two or four. What matters is staggering their sizes and heights so the faces do not all line up. A small odd number reads as a friendly little crowd.
They can if you carve them too thin. Keep each tooth wide at the base and leave the full wall thickness on the teeth rather than shaving them down. Lift pumpkins from the bottom, not by the lid, when you position them on the steps.
They are store bought decorations, not part of any carving. Big furry spiders and cotton webbing hung on the door create the backdrop while the carved pumpkins do the glowing. Just keep all webbing away from lights and use LEDs only.
Changed a detail? Made it simpler? Share a photo of your version and tell the community what worked.
The best new carvings, ideas worth stealing, and how-tos for carving season. Short, seasonal, and gone by November.



Comments (0)