Halloween Pumpkin Carving Contest · Starts October 1st · $500 in prizes
← Back to ideas
@ai_concepts
Sep 14, 2026
Split Hockey Mask PumpkinAI
0

Split Hockey Mask Pumpkin

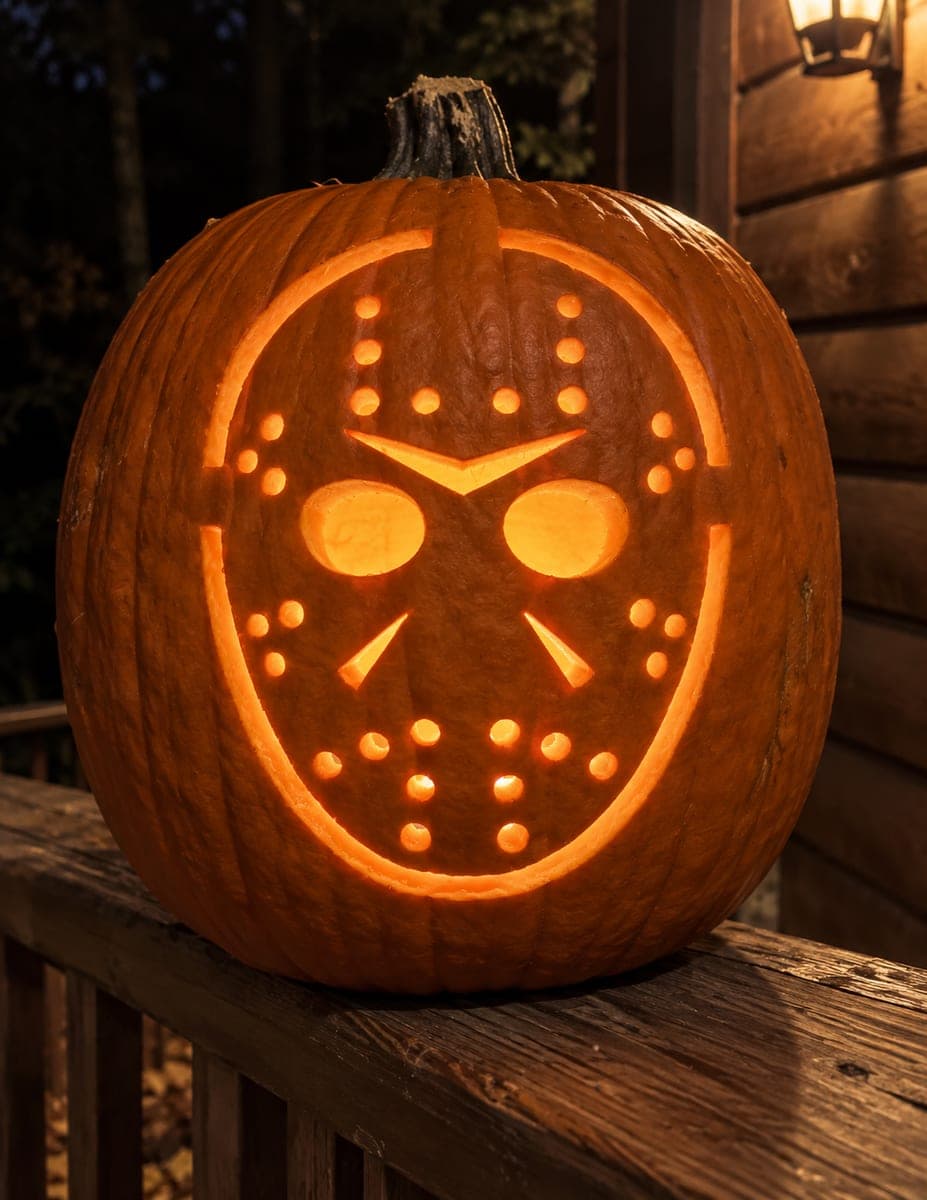
A hockey mask face fills the tall oval pumpkin with round dot perforations across the forehead and cheeks, two circular eye openings, and a curved mouth slit, all glowing against the dark exterior in this scary pumpkin carving idea. The mask contour and each individual dot are pierced through, so the composition relies on many small circles rather than one large opening. Use a drill bit or round linoleum cutter for the circular perforations before reaching for the saw, since drilling produces cleaner circles than cutting and protects the thin skin between each dot.

This is an AI-generated concept image: a realistic, carvable design idea rather than a photo of a finished carve. AI concepts are always labeled and sit out the leaderboard and the contest.
No ratings yet · Sign in to rate

Comments (0)

  • No comments yet — be the first.

Save without an account. Sign in to like or comment.

Our tips for carving a similar design

The core trick here is building the whole mask from many small drilled circles plus a few larger cutouts, rather than one big opening. You outline the mask silhouette and let its curved edge glow, then punch the forehead and cheek vent dots, the round eyes, and the slit mouth. Because a real pumpkin was never carved for this AI concept, the plan keeps every dot separated by solid skin so nothing collapses.

Written by PumpkinCarvingIdeas.com, inspired by the image above. These are our suggestions, not instructions from the uploader. This approach to the AI concept has not been tested on a real pumpkin.

From pumpkin to porch

  1. Prep and open the pumpkin

    Pick a tall oval pumpkin with a flat, smooth front panel. Have an adult cut a lid from the back or bottom so the clean front stays intact for the mask. Scrape the inside of the front wall down to about one inch thick with a scoop, which makes drilling and cutting far easier. A thinner wall lets the light push through the peeled areas evenly.

  2. Transfer the stencil

    Tape your hockey mask stencil flat against the front, snipping the edges so it hugs the curve. Poke the outline of the mask, both eye circles, the mouth slit, and every dot with a pin or a transfer tool. Space the dots exactly as marked so the skin between them stays strong. Peel the paper and check that each dot has a clear ring of pumpkin around it.

  3. Drill the dot perforations first

    Use a drill bit or a round linoleum cutter to make the small circles across the forehead and cheeks. Drilling gives cleaner circles than a saw and protects the thin skin between each dot. Work slowly, keeping the bit straight so holes stay round. Do all the small dots before any large opening, since the pumpkin is strongest while still mostly solid.

  4. Cut the eyes and mouth

    Switch to a fine carving saw for the two round eye openings and the curved mouth slit. Cut just inside your traced lines and let waste pieces drop inward, then push them out from behind. Keep the bridge of skin between the eyes intact, since it defines the mask. Saw the mouth as a thin curved slot rather than widening it.

  5. Score the mask contour

    For the outer mask edge and the darker facial lines, use a shallow skin-peel instead of a full cut. Peel just the orange rind away so those lines glow dim while the surrounding pumpkin stays dark. This gives the split-face silhouette its soft outline without weakening the shell. Save any full cutout of the contour for last if you want it brighter.

  6. Light it and photograph

    Drop in a battery LED puck, never a candle, and set it low so the dots and eyes catch the light. Test in a dark room and rotate the light until the mouth and vents glow evenly. Wipe the cut edges and mist them with water if they dry out. Shoot the photo straight on to show the full symmetric mask.

Gather your supplies

Check things off as you get ready.

Work on a stable surface, keep your free hand out of the cutting path, and have an adult handle sharp tools.

Three levels of light

  • Leave intact

    The pumpkin skin outside the mask stays untouched and dark, framing the face.

  • Peel & shade

    The mask contour and thin facial lines get a shallow skin-peel for a dim orange glow.

  • Cut through

    The eye circles, mouth slit, and every forehead and cheek dot are cut or drilled through for the brightest light.

Learn the carving basics

Before you start cutting

How do I keep the skin between the dots from tearing?

Drill each hole with steady pressure and a straight bit instead of sawing, which is what tears the thin walls. Leave the marked spacing between dots untouched and resist the urge to widen any hole. Working on a wall scraped to about one inch also reduces cracking.

Should I cut the mask outline all the way through?

You do not have to. A shallow peel along the contour gives a soft glowing edge and keeps the shell strong, which suits this dot-heavy design. If you want a sharper split-face look, cut the outline through only after every dot and eye is finished.

What size drill bit works best for the vent dots?

A bit around one quarter inch reads well from a distance and stays clean. Test one dot on the back of the pumpkin first to confirm the light shows through. Keep all the dots the same size so the pattern looks intentional.

Your take belongs here, too.

Changed a detail? Made it simpler? Share a photo of your version and tell the community what worked.

Share your pumpkin

More pumpkins like this

You've reached the end · 8 pumpkins
The Patch Report

Fresh pumpkins, in your inbox.

The best new carvings, ideas worth stealing, and how-tos for carving season. Short, seasonal, and gone by November.

A short email during carving season. Unsubscribe anytime. See our privacy policy.