Halloween Pumpkin Carving Contest · Starts October 1st · $500 in prizes
← Back to ideas
@ai_concepts
Sep 25, 2026
Two-Eyed Monster Pumpkin with Chunky Top-Edge TeethAI
0

Report this carving

Tell us what is wrong. Reports are private.

Two-Eyed Monster Pumpkin with Chunky Top-Edge Teeth

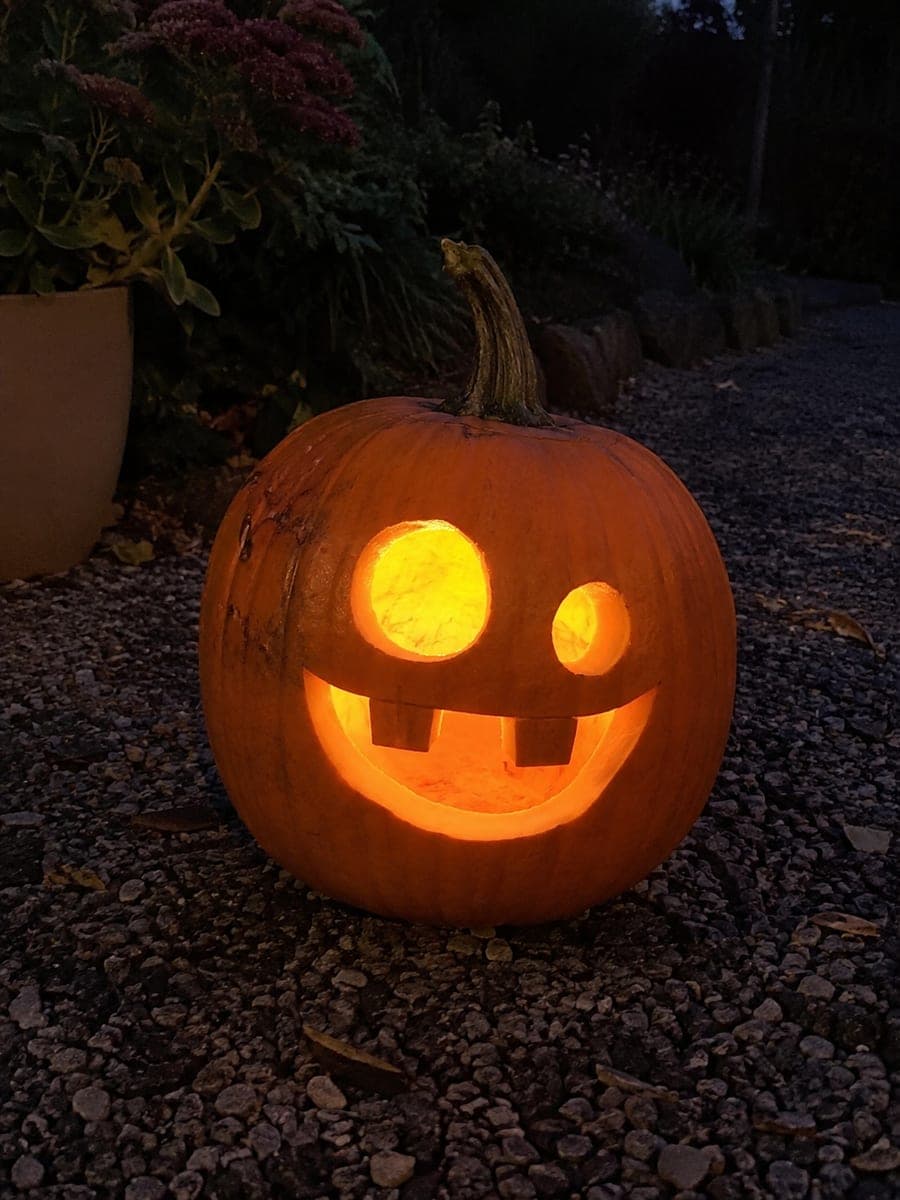
Two unequal round eye holes and a wide smile with two chunky teeth rooted along the top edge give this monster pumpkin carving idea a goofy, wide-open expression. Cut the two eye circles at slightly different sizes and heights to emphasize the monster's lopsided personality. The chunky teeth are easiest to define by cutting the mouth opening first and then shaping each tooth tip last. Set it on a gravel garden path after sunset where the round eye glow reads clearly from the street.

No ratings yet · Sign in to rate
Comments (0)

  • No comments yet — be the first.

Save without an account. Sign in to like or comment.

Our tips for carving a similar design

The personality in this monster carving comes from intentionally unequal eye circles: one slightly larger, one a touch higher. A wide smile opening with two chunky teeth rooted along the top edge adds the final goofy touch. Keep all three shapes large and well separated so the design reads clearly from across a garden path at night.

From pumpkin to porch

  1. Hollow the pumpkin

    Cut a back-angled lid and scoop out seeds and fibers. Thin the interior wall to about an inch in the eye and mouth carving zones. Thorough scooping prevents the LEDs from sitting too far back and losing the round eye glow effect.

  2. Mark lopsided eye circles

    Draw two circles on the upper face using circular cookie cutters or jar lids as templates. Make one circle slightly wider or taller than the other and shift one slightly higher on the face. Mark the mouth opening below with a wide curved base and a flat top edge that forms the tooth root line.

  3. Cut the eyes

    Push a carving saw through one eye outline and work around the full circle. Remove the cut piece. Repeat for the second eye. Adults should handle the initial push-through since breaking the rind surface requires steady downward pressure.

  4. Cut the mouth opening and define teeth

    Saw the bottom and sides of the mouth opening first, leaving the top edge intact. Then mark and cut the gap between the two teeth by removing a narrow slot from the top rim, which separates them. Widen each tooth base before narrowing toward the tip for maximum structural strength.

  5. Smooth edges

    Run a detail blade around each eye circle to remove saw marks and create clean round edges. Wipe away any marker residue. Coat all cut edges with petroleum jelly to slow moisture loss.

  6. Display on the garden path

    Set a flickering LED inside and position the pumpkin on a gravel or stone garden path where the wide round eye glow is visible from the street. Low placement on a path emphasizes the upward glow through the wide smile. Reapply petroleum jelly every two to three days.

Written with AI to match this design

Gather your supplies

Check things off as you get ready.

Work on a stable surface, keep your free hand out of the cutting path, and have an adult handle sharp tools.

Three levels of light

  • Leave intact

    The forehead, cheeks, and chin stay solid orange rind, framing the dark monster face.

  • Peel & shade

    None; this design uses only full cut-throughs.

  • Cut through

    Both unequal round eye holes and the wide smile opening with chunky tooth gaps are cut completely through for full amber glow.

Learn the carving basics

Before you start cutting

How much size difference between the eyes is enough to look intentional?

A diameter difference of about half an inch reads clearly as intentional from a few feet away. More than an inch starts to look structural rather than expressive. Sketch both circles on paper first to preview the size relationship before committing to the pumpkin.

What is the best way to cut a clean circle in a pumpkin rind?

A small round cookie cutter pressed firmly into the rind scores a clean guide circle before you start sawing. Follow the scored line with a thin-bladed saw, working slowly around the curve. Trying to saw freehand without a scored guide almost always produces oval or irregular shapes.

Can this design work on a smaller sugar pumpkin?

Yes, but scale the eye circles down proportionally so there is still adequate rind between features. On a small pumpkin, use a tea light rather than a larger LED to avoid heat buildup. The chunky teeth look particularly cute at small scale.

Your take belongs here, too.

Changed a detail? Made it simpler? Share a photo of your version and tell the community what worked.

Share your pumpkin

More pumpkins like this

You've reached the end · 8 pumpkins
The Patch Report

Fresh pumpkins, in your inbox.

The best new carvings, ideas worth stealing, and how-tos for carving season. Short, seasonal, and gone by November.

A short email during carving season. Unsubscribe anytime. See our privacy policy.