Halloween Pumpkin Carving Contest · Starts October 1st · $500 in prizes
← Back to ideas
@ai_concepts
Sep 25, 2026
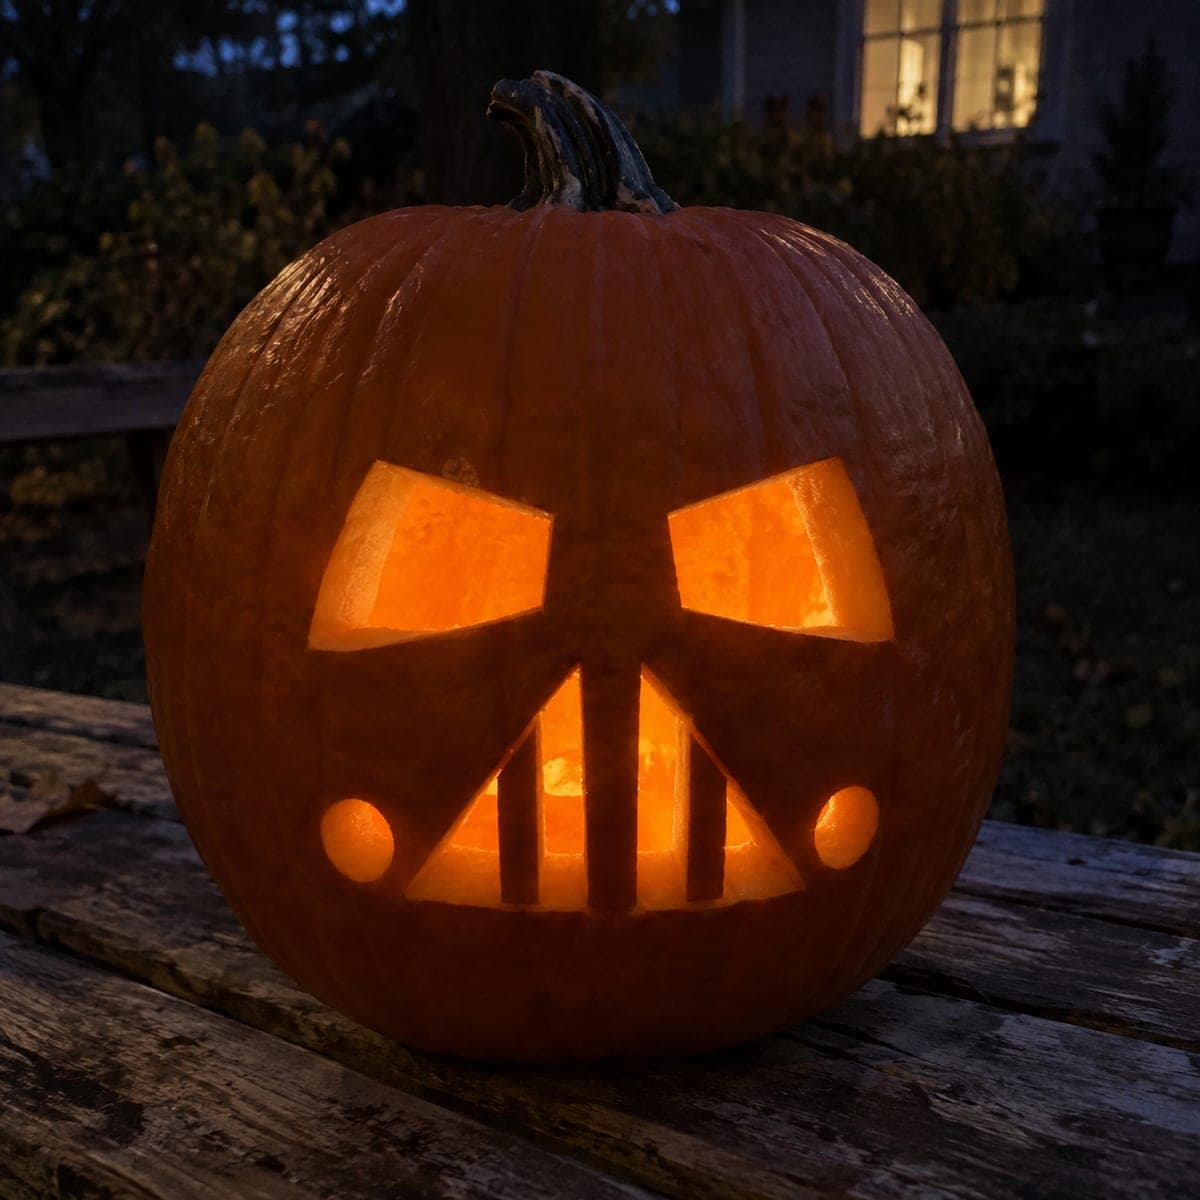
Vader Mask With Helmet Slots Pumpkin CarvingAI
0

Report this carving

Tell us what is wrong. Reports are private.

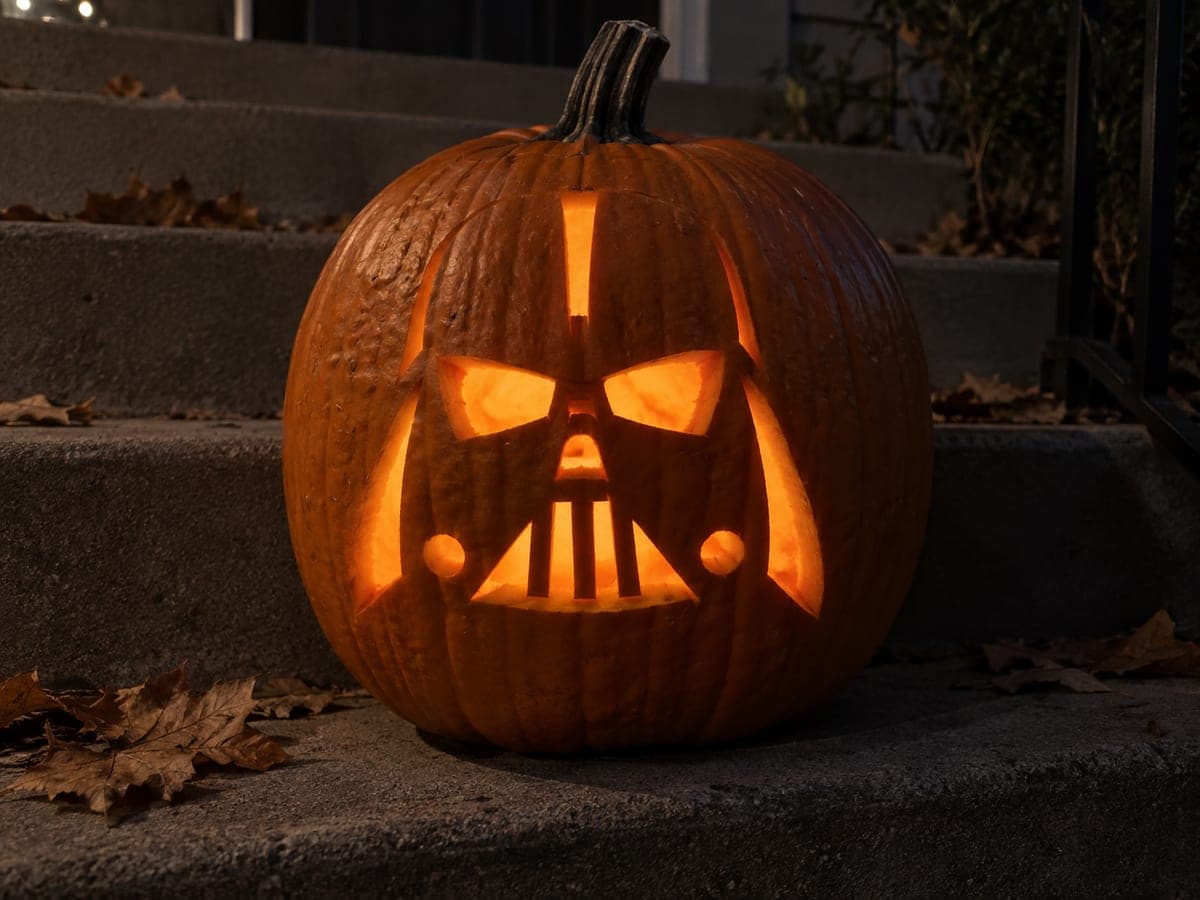
Vader Mask With Helmet Slots Pumpkin Carving

This darth vader pumpkin carving idea renders the full mask with a detailed grille, helmet-side slots, and separated facial apertures that light up with orange warmth. All openings are cut independently, with the grille bars rooted to solid upper and lower rims to keep them securely attached. Hollow out the pumpkin wall a bit thinner than usual around the grille area so delicate bars hold without cracking. Pair with a fog machine at the base for a cinematic effect on the porch.

No ratings yet · Sign in to rate
Comments (0)

  • No comments yet — be the first.

Save without an account. Sign in to like or comment.

Our tips for carving a similar design

This medium build captures the full Vader mask with a detailed grille, helmet-side slot openings, and independently cut facial apertures that light up with orange warmth. All apertures are cut as separate openings connected only by solid rind, and the grille bars stay rooted to solid upper and lower rims to keep every bar securely attached. Thinning the pumpkin wall slightly thinner than usual around the grille area reduces the resistance on the saw blade for cleaner bar separation.

From pumpkin to porch

  1. Hollow with extra care around the grille zone

    Cut a back panel, remove all pulp, and thin the carving face walls to about five-eighths of an inch, slightly thinner than the standard three-quarters in the grille area. This reduces blade resistance when cutting the narrow bar spaces. Maintain standard three-quarter-inch thickness everywhere else for structural support.

  2. Transfer the full mask pattern

    Print the pattern at scale and tape it firmly to the pumpkin face. Trace all aperture outlines, slot positions, grille bar roots, and bridge lines with a pin tool. Re-draw grille bar positions and helmet-side slot boundaries in pen after removing the paper.

  3. Cut the main facial apertures first

    Start with the eye lens apertures at the top of the mask, then move to the nose area opening. Adults handle all cutting. Work from the top of the face downward to keep the rind mass supporting the lower half while upper cuts are completed.

  4. Carve the helmet-side slots

    Cut each helmet-side slot as a separate opening, pausing to confirm each completed slot does not visually interrupt any adjacent structural rind. Short controlled strokes at each slot corner prevent overcuts. Remove each slug cleanly before moving to the next slot.

  5. Work through the grille bars

    Cut the spaces between grille bars one at a time, leaving each bar connected to both the upper and lower lips throughout. Use the thinnest blade available for these cuts. After each bar space is cut, press gently on the bar to confirm it holds before cutting the adjacent space.

  6. Light and display with atmosphere

    Insert an amber or warm-orange battery LED. For cinematic effect, pair with a small fog machine positioned at the pumpkin base. Display at eye level where arriving guests see the full mask head-on.

Written with AI to match this design

Gather your supplies

Check things off as you get ready.

Work on a stable surface, keep your free hand out of the cutting path, and have an adult handle sharp tools.

Three levels of light

  • Leave intact

    Grille bars, slot separators, and surrounding mask structure stay as dark retained rind

  • Peel & shade

    None on this design

  • Cut through

    Eye lenses, nose opening, cheek vents, helmet-side slots, and grille spaces are all fully cut through

Learn the carving basics

Before you start cutting

How do I prevent the grille bars from cracking when cutting the narrow spaces between them?

Make sure the wall is thinned to five-eighths of an inch in the grille zone before cutting so the blade meets less resistance. Use a blade with fine teeth and hold it perfectly perpendicular to the rind so no lateral pressure is applied to the adjacent bar. Cut one bar space at a time and allow the rind to settle for a moment before starting the next.

The helmet-side slots are close together. Should I cut them in a specific order?

Cut from the outermost slot inward toward the mask center, completing each slot before moving to the next. This preserves maximum rind mass between cuts for as long as possible. Confirm each slot is fully cut and the piece removed cleanly before starting the adjacent one to avoid accidental crossing cuts.

Can I add shallow back-carving to suggest the helmet's dome contour?

Yes. Once all through-cut work is done, use a large U-gouge or Dremel drum sander to gently shave the rind surface in gentle curved strokes across the upper helmet area. Work very lightly since the wall is already thinner around the grille. The subtle surface curve catches light differently and adds a three-dimensional look to the finished display.

Your take belongs here, too.

Changed a detail? Made it simpler? Share a photo of your version and tell the community what worked.

Share your pumpkin

More pumpkins like this

You've reached the end · 8 pumpkins
The Patch Report

Fresh pumpkins, in your inbox.

The best new carvings, ideas worth stealing, and how-tos for carving season. Short, seasonal, and gone by November.

A short email during carving season. Unsubscribe anytime. See our privacy policy.