Halloween Pumpkin Carving Contest · Starts October 1st · $500 in prizes
← Back to ideas
@ai_concepts
Sep 14, 2026
Veiled Nun Portrait PumpkinAI
0

Veiled Nun Portrait Pumpkin

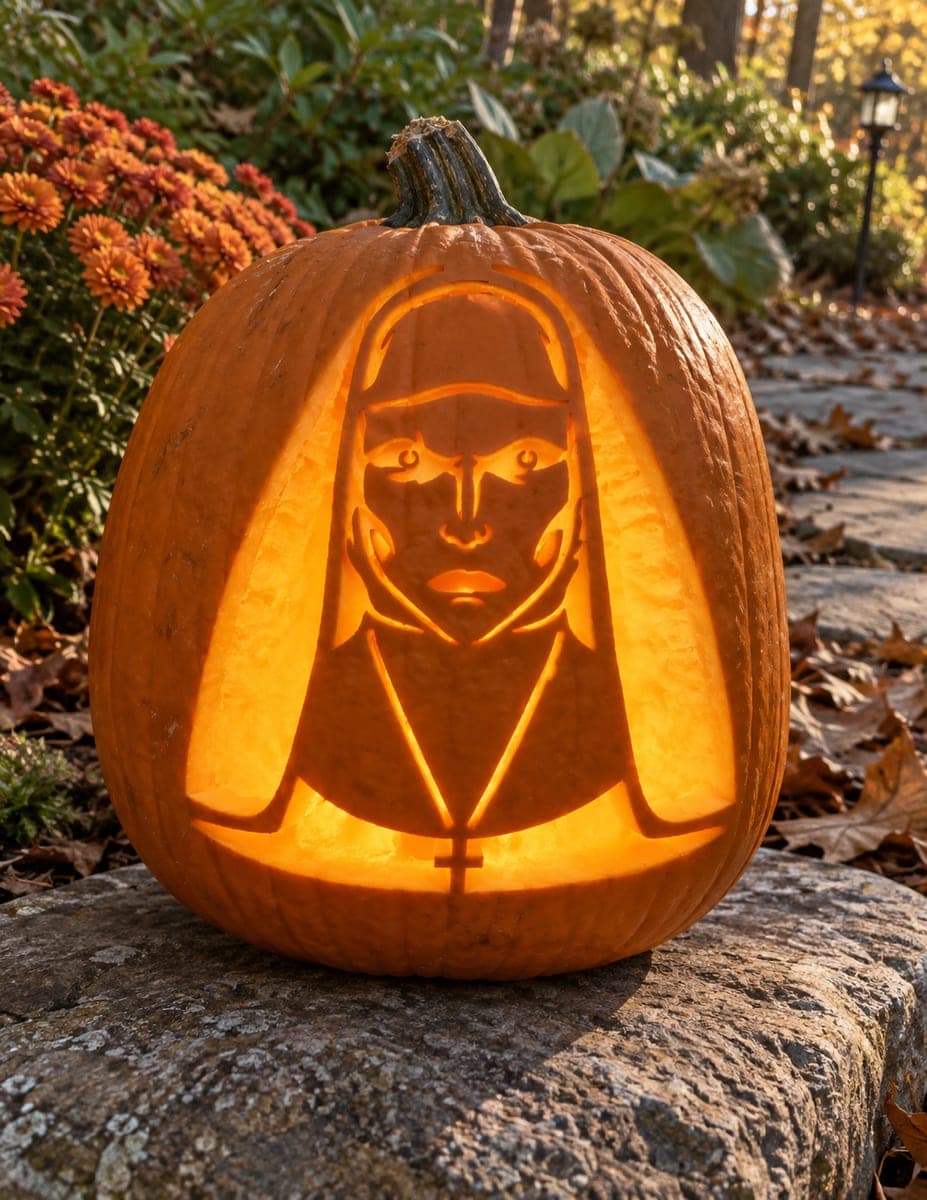
A stern face framed by a rigid two-panel white veil stares forward, with heavy carved eye sockets, a furrowed brow, and a small cross pendant at the collar all rendered in cut lines. The structured geometry of the veil panels contrasts with the organic face lines in this striking faces pumpkin carving idea. Cut the straight veil borders first using a ruler edge as a guide, then switch to freehand cuts for the facial features so the clean geometric lines are not disturbed by later work.

This is an AI-generated concept image: a realistic, carvable design idea rather than a photo of a finished carve. AI concepts are always labeled and sit out the leaderboard and the contest.

No ratings yet · Sign in to rate
Comments (0)

  • No comments yet — be the first.

Save without an account. Sign in to like or comment.

Our tips for carving a similar design

The core trick here is the contrast between the rigid two-panel veil and the softer face inside it. You carve the straight veil borders as full cutouts so bright light frames a dim, peeled face. Everything else, the sockets, brow lines, and cross, is rendered as thin cut lines and shaded skin so the portrait reads clearly without collapsing.

Written by PumpkinCarvingIdeas.com, inspired by the image above. These are our suggestions, not instructions from the uploader. This approach to the AI concept has not been tested on a real pumpkin.

From pumpkin to porch

  1. Pick and prep a tall pumpkin

    Choose a tall, upright pumpkin with a broad, fairly flat front so the whole portrait fits without wrapping around the curve. Cut a lid from the bottom or the back rather than the top, which keeps the stem intact and makes the LED easy to place. Scoop the inside clean and thin the front carving wall to about one inch so light passes evenly. A consistent wall thickness is what makes shaded areas glow uniformly.

  2. Transfer the stencil

    Tape your nun stencil flat against the front, snipping the edges so the paper hugs the curve without wrinkles. Poke through all the outlines with a pushpin or a transfer tool, spacing dots close together on the curved facial lines. Peel the paper and connect the dots lightly with a washable marker. Double check that the veil panels are symmetrical before you cut anything.

  3. Cut the straight veil borders first

    Start with the long, straight outer edges of the two veil panels, using a firm ruler or a stiff card as a guide for your saw so the lines stay clean. These are your brightest full cutouts, so make them narrow slots rather than huge openings to keep the pumpkin strong. Because they are straight and structural, doing them first means later freehand work cannot wobble them. Support the wall with your free hand as you finish each slot.

  4. Shade the face and veil interior

    Switch to a lino or gouge tool and peel just the skin off the face and the inner veil area so those zones glow a soft dim orange. Leave the raised brow ridge, the nose bridge, and the lips as untouched or lightly peeled skin so they stay darker and give the face dimension. Work shallow and test against a light often, since you can always remove more but cannot put skin back. This shading is what separates a flat mask from a real portrait.

  5. Freehand the facial detail lines

    Now cut the fine lines: the heavy eye sockets, the small round eyes, the furrowed brow creases, and the collar and cross pendant. Keep these as thin cut lines rather than big holes so the face does not lose structure, and leave small bridges where two lines nearly meet. The little cross should stay attached at top and bottom so it does not fall out. Go slow and let the tool do the work to avoid overshooting into the shaded skin.

  6. Light it and photograph

    Set a battery LED puck inside, warm white or amber, and add a second small light if the tall body leaves the lower cross dim. Rotate the pumpkin until the veil slots frame the glowing face evenly. Photograph at dusk on a stone or step so the warm cutouts pop against a dark background. Mist the cut edges with water and keep it cool to slow shrinking if you display it more than a day.

Gather your supplies

Check things off as you get ready.

Work on a stable surface, keep your free hand out of the cutting path, and have an adult handle sharp tools.

Three levels of light

  • Leave intact

    The raised brow ridge, nose bridge, and lips left as skin for dark shadow and depth.

  • Peel & shade

    The face and the inner veil area, skinned to a soft dim orange glow.

  • Cut through

    The straight veil border slots and the fine eye, brow, and cross lines for the brightest light.

Learn the carving basics

Before you start cutting

How do I keep the two veil panels symmetrical?

Transfer the stencil carefully and measure both panels against a center line before cutting. Cut one border, then mirror the same measurement on the other side using your ruler edge. Checking symmetry on the marker lines is far easier than trying to fix it after the slots are open.

Will the small cross pendant fall out?

Not if you keep it as thin cut lines rather than a big opening, and leave narrow bridges of skin at the top and bottom of the cross. Those bridges hold it in place and still read as a cross once lit. Cut the cross lines last so the surrounding wall stays firm while you work.

This is an AI concept image, so can a real pumpkin look like this?

Yes, a similar look is achievable, though the crisp digital edges will be a little softer on real pumpkin flesh. Keep the veil openings as narrow slots and hold detail lines thin with bridges so nothing sags. Warm, even shading on the face is what sells the portrait more than razor-sharp lines.

Your take belongs here, too.

Changed a detail? Made it simpler? Share a photo of your version and tell the community what worked.

Share your pumpkin

More pumpkins like this

You've reached the end · 8 pumpkins
The Patch Report

Fresh pumpkins, in your inbox.

The best new carvings, ideas worth stealing, and how-tos for carving season. Short, seasonal, and gone by November.

A short email during carving season. Unsubscribe anytime. See our privacy policy.