Halloween Pumpkin Carving Contest · Starts October 1st · $500 in prizes
← Back to ideas
@ai_concepts
Jul 18, 2026
Western Boots and Hat Shaded Pumpkin SceneAI
0

Western Boots and Hat Shaded Pumpkin Scene

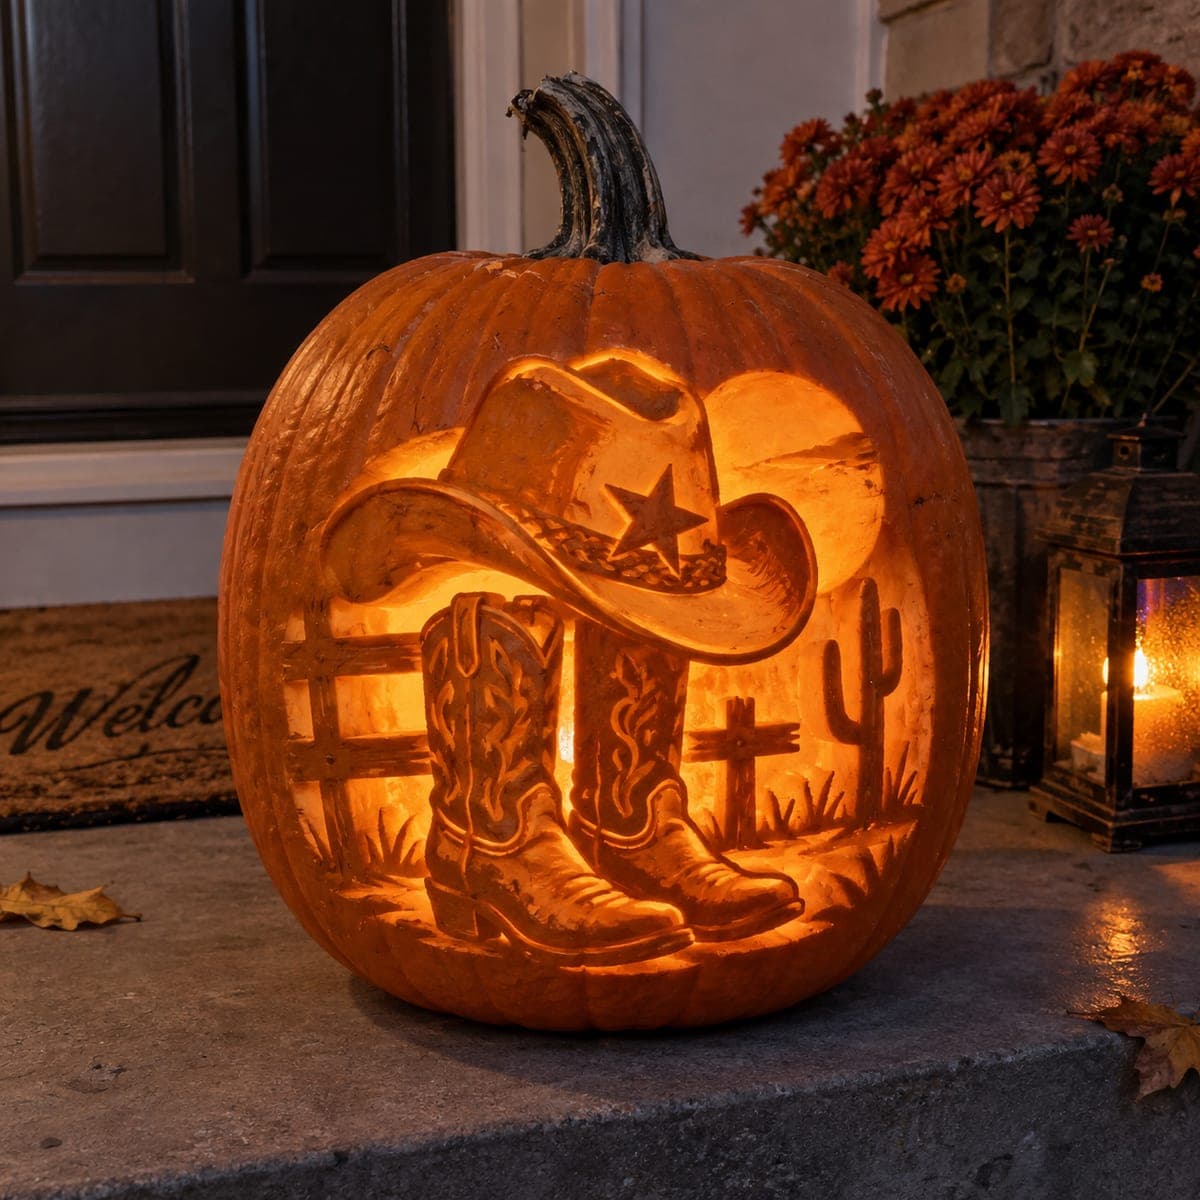
A pair of ornate cowboy boots with a sheriff-star hat resting between them is carved in glowing detail against a desert backdrop with cactus silhouettes and a setting sun, making this a standout western pumpkin carving idea. The layered scene uses shading to create depth, with the boots and hat carved at full relief while the sky background is thinned for maximum glow. Carve the background sky first, then define the boots and hat with a detail knife so their edges stay crisp. Displayed with a lantern beside it on the porch steps, this creates a ranch-style fall vignette.

This is an AI-generated concept image: a realistic, carvable design idea rather than a photo of a finished carve. AI concepts are always labeled and sit out the leaderboard and the contest.
No ratings yet · Sign in to rate

Comments (0)

  • No comments yet — be the first.

Save without an account. Sign in to like or comment.

Our tips for carving a similar design

The core trick here is relief shading, where you skin away pumpkin flesh at different depths instead of cutting all the way through. The boots and hat are left thick and only lightly thinned so they read as raised objects, while the sky and sun behind them are shaved thin for a bright glow. Since this is a concept image, think of it as a target to work toward, planning your depths before any tool touches the shell.

Written by PumpkinCarvingIdeas.com, inspired by the image above. These are our suggestions, not instructions from the uploader. This approach to the AI concept has not been tested on a real pumpkin.

From pumpkin to porch

  1. Transfer the pattern and plan your depths

    Pick a large, smooth-walled pumpkin and cut a wide access lid in the base or back so the shell stays intact up front. Tape your stencil flat over the face and poke through the outlines with a pin or transfer tool. Before carving, mark which zones are dark skin, which get thinned, and which get cut through. A clear plan keeps the layered depth from turning muddy once you start shaving.

  2. Scoop the wall thin and even

    Hollow the inside behind the design until the front wall is about one inch thick. An even wall makes shading predictable, since thinner spots glow brighter. Scrape with a loop tool and check thickness by pressing gently from both sides. This prep step is what makes the whole scene light up cleanly later.

  3. Shave the sky and sun for glow

    Using a ribbon or gouge tool, skin the outer skin off the background sky and the round setting sun so the flesh underneath goes translucent. Work in smooth passes and keep the surface consistent for an even wash of light. Leave the sun slightly thinner than the surrounding sky so it reads as the brightest spot. Save any full cutouts for last so the shell stays strong while you shade.

  4. Carve the cactus, fence, and cross details

    Lightly peel the cactus silhouettes, the rail fence, and the little cross so they sit a touch brighter than the raw skin but dimmer than the sky. Keep the fence rails connected to the ground line so nothing floats free and weakens. Use a small detail knife for crisp edges. These mid-tone shapes give the desert its sense of distance.

  5. Build the boots and hat at full relief

    Leave the boots and hat as the thickest, darkest areas, then carve only shallow lines for the stitching, the tooled patterns, and the hat brim. A V-gouge is ideal for the decorative swirls on the boot shafts. Cut the sheriff star as a small full opening so it pops against the dark hat. Because these are the closest objects, keeping them dark and detailed makes them jump forward against the glowing sky.

  6. Light it and stage the shot

    Set a battery LED puck or string inside, never a candle, since the thin shaded areas can scorch. Warm white light flatters the orange best. Place it on a step with a lantern and some mums nearby for that ranch-style fall vignette, then photograph it after dark so the shading depth shows. Mist the cut edges and refrigerate between displays to keep it fresh.

Gather your supplies

Check things off as you get ready.

Work on a stable surface, keep your free hand out of the cutting path, and have an adult handle sharp tools.

Three levels of light

  • Leave intact

    The cowboy boots and the hat crown stay as untouched skin so they read dark and forward.

  • Peel & shade

    The cactus, rail fence, cross, and ground grasses get a shallow skin-peel for a soft mid glow.

  • Cut through

    The setting sun, sky wash, and the small sheriff star are thinned or cut through for the brightest light.

Learn the carving basics

Before you start cutting

How do I keep the boots looking raised instead of flat?

Leave the boots at nearly full wall thickness and only carve shallow surface lines for the stitching and tooling. The contrast between their dark skin and the glowing sky behind them is what creates the sense of depth. Resist the urge to cut through any part of the boots except tiny accent details.

Since this is a concept image, is a scene like this even possible on a real pumpkin?

Yes, a layered shaded scene like this is achievable, though it takes patience and an even, thin wall. The key is treating it as a shading project, not a cutout project, so most of the face stays intact. Keep the fence rails and cactus arms connected to their bases so nothing thin snaps off.

What is the best carving order for the layers?

Work back to front and thin to thick. Shave the sky and sun first, then the mid-tone desert details, then refine the boots and hat last. Any true cutouts, like the star, should come at the very end so the shell stays rigid while you do the delicate shading.

Your take belongs here, too.

Changed a detail? Made it simpler? Share a photo of your version and tell the community what worked.

Share your pumpkin

More pumpkins like this

You've reached the end · 8 pumpkins
The Patch Report

Fresh pumpkins, in your inbox.

The best new carvings, ideas worth stealing, and how-tos for carving season. Short, seasonal, and gone by November.

A short email during carving season. Unsubscribe anytime. See our privacy policy.