Halloween Pumpkin Carving Contest Β· Starts October 1st Β· $500 in prizes
← Back to ideas
@ai_concepts
Sep 25, 2026
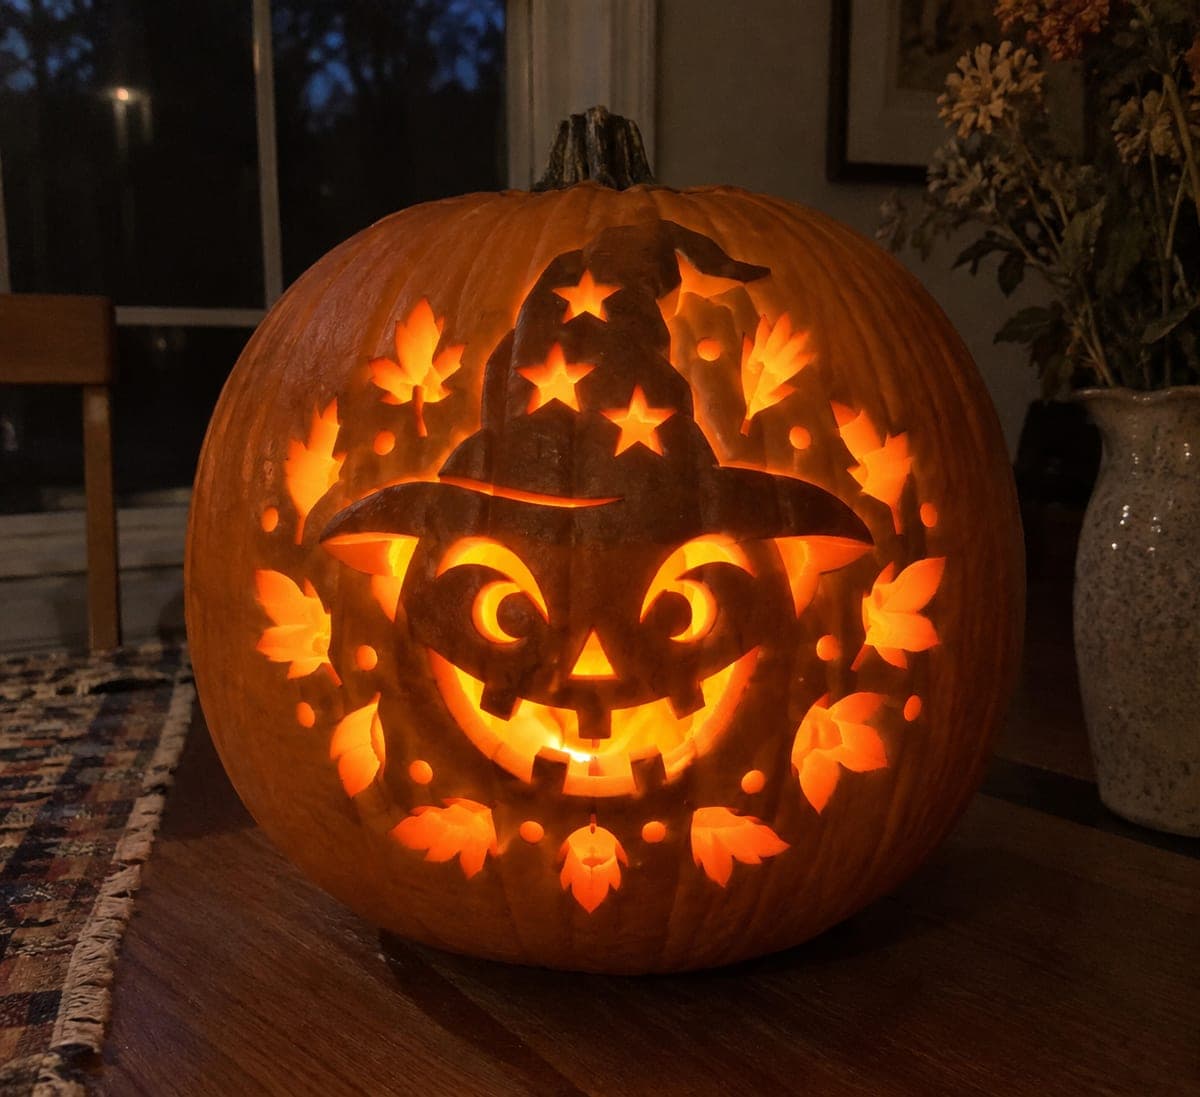
Witch Hat and Face Expert Traditional Pumpkin CarvingAI
0

Report this carving

Tell us what is wrong. Reports are private.

Witch Hat and Face Expert Traditional Pumpkin Carving

A traditional witch hat stays part of the intact upper rind with cutout stars through its crown, while an arched-eye grinning face below features attached pupils, a scalloped mouth with broad rooted teeth, and a ring of separate leaf holes around it in this expert traditional pumpkin carving. Never cut an outline around the hat or face outline since the intact rind is what keeps each section connected to the shell. Complete the outer leaf ring first, then the face details, and finish with the hat stars.

No ratings yet Β· Sign in to rate

Comments (0)

  • No comments yet β€” be the first.

Save without an account. Sign in to like or comment.

Our tips for carving a similar design

The defining rule of this design is that the witch hat and the face border are never outlined with a continuous cut; their shapes exist only because of the negative spaces punched around them. Every aperture is an island of light surrounded by intact rind, and the rind itself forms the hat silhouette and face. Working in three stages, outer leaf ring first, face features second, hat stars last, keeps the most structurally important areas intact while you still have a solid shell to work against.

From pumpkin to porch

  1. Hollow to a generous wall thickness

    Hollow the pumpkin to at least 30 mm wall thickness across the full design area. This design has many small apertures close together, and a thicker wall means the rind bridges between holes stay strong. Mark the composition zones with chalk: the hat crown at the top, the face region in the middle, and the leaf ring around the outside.

  2. Transfer the full pattern with a poke trace

    Print the full multi-element design to fit your pumpkin. Tape it firmly and poke all aperture outlines through with a pin tool. Include every leaf hole, star hole, and tooth slot in the trace. The hat silhouette shape will be defined only by the positions of the star and leaf holes that surround it, so accurate placement here is critical.

  3. Cut the outer leaf ring first

    Working around the outer edge of the composition, cut each individual leaf-shaped hole fully through. Move from one leaf to the next without connecting any of them to each other. Clearing this ring first stabilizes the border zone and defines the outer edge of the face composition.

  4. Cut the face features

    Now cut the arched eye openings (saving the attached pupils for last within each eye), the eyebrow-hole pairs above the eyes, the diamond nose, and the scalloped mouth slots one tooth gap at a time. Complete the pupil tabs by cutting the eye arch away from the scored pupil outline, leaving each pupil firmly attached at its upper edge.

  5. Cut the hat crown stars last

    With the face complete and the pumpkin structurally settled, cut the star holes through the upper rind crown. These are the highest-risk holes since the upper rind is thinner; work slowly and keep each star at least 8 mm away from its neighbors.

  6. Light and verify connectivity

    Place an LED candle inside and look at the design. Every piece of visible rind should be connected to at least one neighboring piece all the way back to the main shell. Wobble any element gently with a fingertip; if anything moves freely, add a small bridge cut to reconnect it before the pumpkin dries.

Written with AI to match this design

Gather your supplies

Check things off as you get ready.

Work on a stable surface, keep your free hand out of the cutting path, and have an adult handle sharp tools.

Three levels of light

  • Leave intact

    The full witch hat silhouette and all rind between apertures stays dark, forming the design

  • Peel & shade

    None; this is an all-or-nothing silhouette design

  • Cut through

    Star holes in the hat crown, arched eye openings, brow holes, diamond nose, scalloped tooth-slot grin, and the full ring of leaf holes

Learn the carving basics

Before you start cutting

How do I make sure the hat silhouette reads clearly without a defining outline cut?

The hat reads because of the gap between the star holes inside the crown and the leaf holes outside it. Make that gap, the uncut rind forming the hat brim and sides, at least 15 mm wider than the gaps within the leaf ring. The contrast in rind density is what makes the hat shape pop.

The leaf ring has 12 or more individual holes. Should I cut them all at once or in sessions?

Work in two sessions if the pumpkin is fresh and firm: complete the leaf ring in one sitting, then refrigerate the pumpkin overnight and do the face and hat stars the next day. A fresh, cool pumpkin holds its shape far better during the high-detail face work.

Can I simplify this for a less experienced carver?

Yes. Replace the leaf ring with four to six simple round holes, reduce the tooth slot count to three or four, and skip the attached-pupil detail in favor of plain open eye arches. The hat silhouette effect still works with far fewer total apertures.

Your take belongs here, too.

Changed a detail? Made it simpler? Share a photo of your version and tell the community what worked.

Share your pumpkin

More pumpkins like this

You've reached the end Β· 8 pumpkins
The Patch Report

Fresh pumpkins, in your inbox.

The best new carvings, ideas worth stealing, and how-tos for carving season. Short, seasonal, and gone by November.

A short email during carving season. Unsubscribe anytime. See our privacy policy.