Halloween Pumpkin Carving Contest · Starts October 1st · $500 in prizes
← Back to ideas
@ai_concepts
Sep 14, 2026
Detailed Standing Rat PumpkinAI
0

Detailed Standing Rat Pumpkin

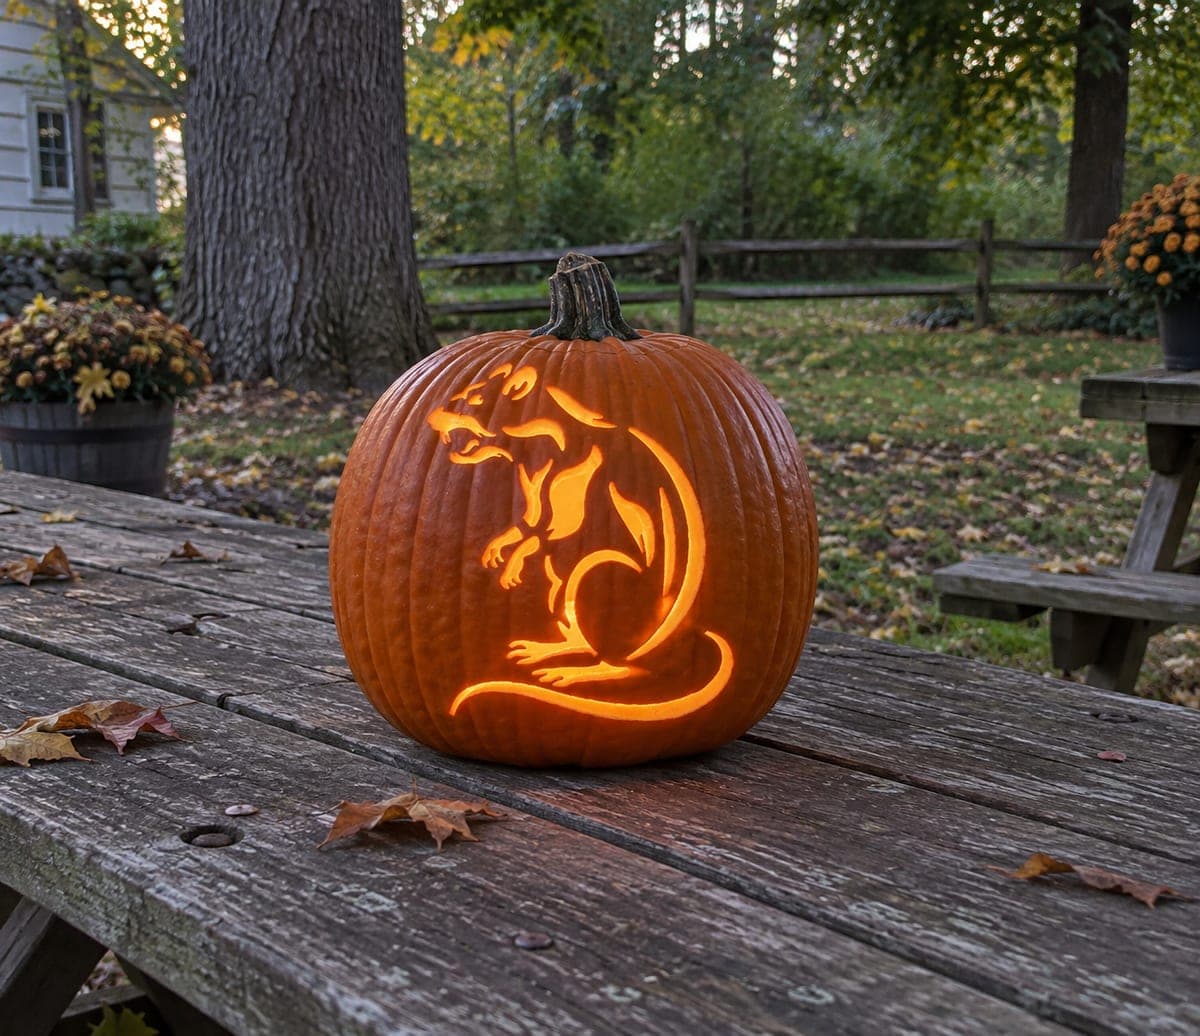
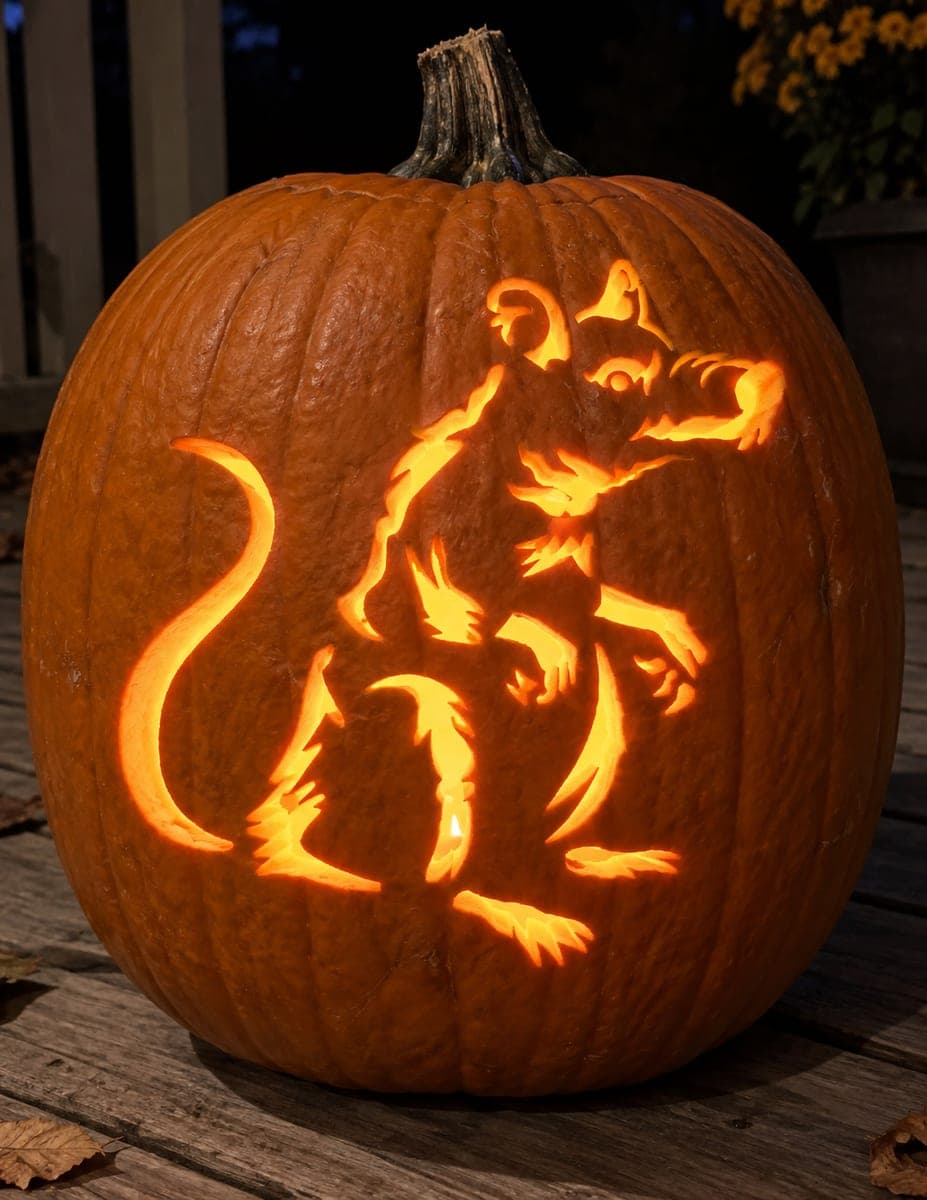
A standing rat faces right with a pointed snout, visible ear, tufted fur texture along its back, and a long S-curved tail dropping to the ground, the whole figure rendered in a shaded pumpkin carving with graduated skin depths. The scraping technique leaves a lighter glow where fur highlights catch the interior light and a darker midsection where skin remains thicker. Work the tail from base to tip at a shallow depth first, then deepen the belly and fur lines on the back in a second pass so you can compare tonal contrast before removing more material.

This is an AI-generated concept image: a realistic, carvable design idea rather than a photo of a finished carve. AI concepts are always labeled and sit out the leaderboard and the contest.

No ratings yet · Sign in to rate

Comments (0)

  • No comments yet — be the first.

Save without an account. Sign in to like or comment.

Our tips for carving a similar design

The core trick here is layered scraping, where you remove skin at different depths so the rat glows in graded tones instead of flat cutouts. You build the shape in passes, keeping the fur tufts and the long S-curved tail as thin scraped highlights against a darker belly. Only a few areas get cut all the way through, so plan your brightest spots before you commit.

Written by PumpkinCarvingIdeas.com, inspired by the image above. These are our suggestions, not instructions from the uploader. This approach to the AI concept has not been tested on a real pumpkin.

From pumpkin to porch

  1. Prep and transfer the pattern

    Pick a large, evenly rounded pumpkin with a smooth face so the fur lines read clearly. Cut a lid from the bottom or the back, not the top, so the stem stays intact and the shell keeps its strength. Scoop the inside until the front wall is about an inch thick, which gives you room to scrape without breaking through. Tape your rat stencil over the flattest area and poke or trace the outline so you have a guide to follow.

  2. Outline the rat and the tail

    Using a fine detail blade, lightly score the full silhouette including the snout, ear, and the S-curved tail dropping to the base. Do not cut deep yet, just define the edges so you know where each tone will sit. Treat the tail as one continuous ribbon and leave plenty of pumpkin on either side of it so it stays supported. This scored map keeps you from over cutting in the next passes.

  3. Scrape the tail at shallow depth first

    Work the tail from base to tip using a loop or ribbon tool, removing only the outer skin for a soft, even glow. Keep the depth consistent so the tail lights up as one smooth curve rather than patchy spots. Because the tail is long and thin, go slow and support the shell with your free hand. Stop here and light-test it before moving on so you can judge the tone.

  4. Deepen the belly and back fur

    On a second pass, scrape the midsection and belly a touch deeper so those areas glow brighter than the tail, and pull short flicking strokes for the tufted fur along the back. Vary your pressure so some fur tips catch more light than others, which is what sells the shading. Compare the new tones against the tail before you remove any more material. Leave the darkest patches of the midsection barely scraped so they stay dim.

  5. Cut the brightest accents through

    Save the full cutouts for last, once all the scraping is done and the shell has firmed up your reference tones. Cut through only the sharpest highlights, such as the inner ear, the eye, and a few gaps between the paws and fur tufts. Keep small bridges of pumpkin wherever a thin sliver would otherwise fall out, especially near the snout and toes. Cutting these openings last protects the delicate fur work from cracking.

  6. Light it and photograph

    Drop in a battery LED light, never a candle, since the flame can scorch the thin scraped areas and dull the shading. Rotate the light or add a second small LED low in the cavity to push glow into the tail and lower paws. Wipe the cut edges, and if the pumpkin will sit out a while, coat exposed surfaces with a thin layer of petroleum jelly to slow drying. Shoot your photo in a dark setting so the graded tones show up.

Gather your supplies

Check things off as you get ready.

Work on a stable surface, keep your free hand out of the cutting path, and have an adult handle sharp tools.

Three levels of light

  • Leave intact

    The darker midsection and belly core, left as thick untouched skin so the rat's center reads shadowy.

  • Peel & shade

    The long S-curved tail and the tufted back fur, skin-peeled to a soft mid glow.

  • Cut through

    The inner ear, eye, and a few narrow gaps between the paws and fur tips, cut through for the brightest accents.

Learn the carving basics

Before you start cutting

This is shown as an AI concept, so can a real pumpkin hold this much fine detail?

Yes, with the right approach. Keep the thin fur tufts and the tail as scraped highlights rather than full cuts, and leave small bridges wherever a sliver would otherwise drop out. A thick front wall and a firm pumpkin make the delicate work far more stable.

How do I keep the long tail from breaking as I carve it?

Treat the tail as a scraped ribbon, not a cutout, so the skin behind it keeps it supported. Work from the base to the tip and support the shell with your free hand as you go. If you must cut any part through, leave tiny connecting bridges along its length.

How do I get the graded tones instead of a flat glow?

Remove skin in passes at different depths and light-test between each one. Shallow scraping glows dim, deeper scraping glows brighter, and full cuts are brightest. Scrape the tail first, then deepen the belly and fur, comparing tones before you commit to any more material.

Your take belongs here, too.

Changed a detail? Made it simpler? Share a photo of your version and tell the community what worked.

Share your pumpkin

More pumpkins like this

You've reached the end · 8 pumpkins
The Patch Report

Fresh pumpkins, in your inbox.

The best new carvings, ideas worth stealing, and how-tos for carving season. Short, seasonal, and gone by November.

A short email during carving season. Unsubscribe anytime. See our privacy policy.